Empties
The „empty“ is a single coordinate point with no additional geometry. Because an empty has no volume and surface, it cannot be rendered. Still it can be used as a handle for many purposes.
Selecting & Editing
An empty can only be edited in Object Mode, which includes its transformation and parenting properties. For other tools see the Object section.
- Apply Scale Ctrl-A
While empties don’t exactly have any object data attached to them which can be used for supporting „true“ apply scale (i.e. with non-uniform scaling), they do have Display Size which controls how large the empties are displayed (before scaling). This works by taking the scale factor on the most-scaled axis, and combines this with the existing empty Display Size to maintain the correct dimensions on that axis.
Properties

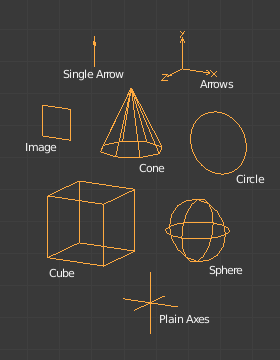
Empty Display Types.
- Display
- Plain Axes
Displays as six lines, initially with one pointing in each of the +X, -X, +Y, -Y, +Z, and -Z axis directions.
- Arrows
Displays as arrows, initially pointing in the positive X, Y, and Z axis directions, each with a label.
- Single Arrow
Displays as a single arrow, initially pointing in the +Z axis direction.
- Circle
Displays as a circle initially in the XZ plane.
- Cube
Displays as a cube, initially aligned to the XYZ axes.
- Sphere
Displays as an implied sphere defined by three circles. Initially, the circles are aligned, one each, to the X, Y, and Z axes.
- Cone
Displays as a cone, initially pointing in the +Y axis direction.
- Image
Empties can display images. This can be used to create reference images, including blueprints or character sheets to model from. The image is displayed regardless of the 3D display mode.
Empty Displays settings can be accessed from panel.
- Use Alpha
Use alpha blending instead of alpha-test (blends with the background but can have depth sorting artifacts).
- Opacity
Fade the image to make it transparent (uses the object Color’s alpha component).
- Offset X, Y
Offset the image origin (where 1.0 represents the width/height of the image).
- X=0.5, Y=0.5
Object origin at image center.
- X=0.0, Y=0.0
Object origin at image bottom, left.
- X=1.0, Y=1.0
Object origin at image top, right.
- Depth
- Default
Use normal depth behavior.
- Front
Always display on top of other objects.
- Back
Always display behind of other objects.
Tipp
When using the image as a reference for modeling, it can be useful to set the depth to Front, with a low Opacity.
- Side
- Both
Display both the front & back of the empty.
- Front
Only display the front of the image.
- Back
Only display the back of the image.
Tipp
This is useful if you’re using an image as a reference where you have photos from both the front and back, so two empty images can be set only to show when viewed from the correct side.
- Display Orthographic
Show in orthographic view.
- Display Perspective
Show in perspective view.
Hinweis
It’s often useful to disable this so reference images don’t get in the way when viewing a model.
- Display Only Axis Aligned
Only displays the image contents when the view is aligned with the object’s local axis.
- Size
Controls the size of the empties visualization. This does not change its scale, but functions as an offset.
Usage
Empties can serve as transform handles. Some examples of ways to use them include:
Parent object for a group of objects
An empty can be parented to any number of other objects. This gives the user the ability to control a group of objects easily, and without affecting a render.
Target for constraints
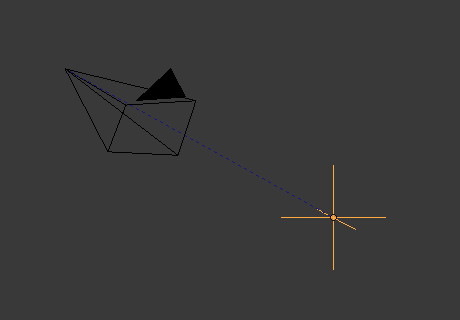
An empty can also be used as a target for normal, or bone constraints. This gives the user far more control; for instance, a rig can easily be set up to enable a camera to point towards an empty using the Track to constraint.
Array offset
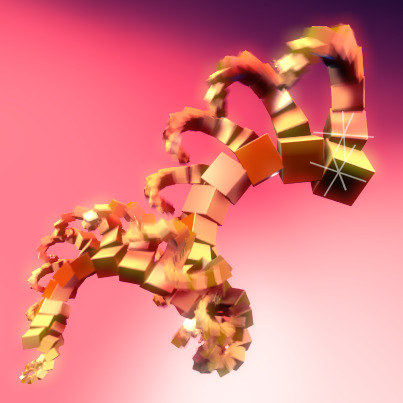
An empty can be used to offset an Array Modifier, meaning complex deformations can be achieved by only moving a single object.

An example of an empty being used to control an array.¶ |

An example of an empty being used to control the Track To constraint.¶ |
Other common uses:
Placeholders
Rigging controls
DOF distances
Reference Images