Primitives
Referenz
- Modus:
Object Mode and Edit Mode
- Menü:
- Tastenkürzel:
Shift-A
Siehe auch
When adding curves there are some common options like other Objects.
Bemerkung
Eventually all the primitive curves will be replaced to use the same curve system used for hair curves. Until this is done, their features will diverge.
They can be converted interchangeably to access the full range of edit and sculpting functionalities.
In Object/Edit Mode, the Add Curve menu, provides a few different curve primitives:
Bézier Curve
Adds an open 2D Bézier curve with two control points.
Bézier Circle
Adds a closed, circle-shaped 2D Bézier curve (made of four control points).
NURBS Curve
Adds an open 2D NURBS curve, with four control points, with Uniform knots.
NURBS Circle
Adds a closed, circle-shaped 2D NURBS curve (made of eight control points).
Path
Adds a NURBS open 3D curve made of five aligned control points, with Endpoint knots and the Curve Path setting enabled.
Empty Hair
Adds an empty high-performance curves object and automatically:
Assigns the active object as the Surface.
Set the surface object as the parent of the new object.
Adds a Geometry Nodes modifier to deform the curves on the surface.
Selecting
Hair curves, while similar to regular curves are a bit different and have their own selection tools. Many of these match their regular curve tools but are implemented differently All hair curve selection operators are documented below for completeness.
These selection operators work in both Sculpt and Edit modes.
Selection Modes
Referenz
- Modus:
Edit Mode
- Menü:
- Tastenkürzel:
1, 2
Note, this is only supported for „Hair Curves“.
Selection modes limits selection operators to certain curve domains. This feature is makes it easy to select whole segments at once, or to give more granular control over editing.
- Control Points:
Allows selection of individual control points.
- Curve:
Limits selection to whole curve segments.
Operators
- All
Select all control points or curves.
- None
Deselect all control points or curves.
- Invert
Invert the selection.
- Random
Randomizes inside the existing selection or create new random selection if nothing is selected already.
- Endpoints
Select endpoints of curves. Only supported in the Control Point selection mode.
- Grow
Select points or curves which are close to already selected elements.
Editing
The curves can be edited via sculpting.
Curves objects also have basic editing support in „Edit Mode“. Currently, only the basic Transform and Delete operators are supported.
The Delete operator can remove Control Points or Segments. Deleting can be used to make curves shorter or simplify segments by deleting control points in the mid section of a segment.
Eigenschaften
Hair Curves have different properties than regular Curve objects; these properties are documented below.
Attributes
The Attributes panel contains different hair characteristics such as the position and color of hair strands.
Use the List View to manage attributes.
Siehe auch
See the Attribute Reference for details on attributes.
Surface
- Surface
The curve surface is an optional mesh that is used to anchor the curves, and behave as a scalp for hair grooming. When adding a new Curves object via the Add Menu the active object is automatically set as the surface.
To set a new surface press Ctrl-P and select Object (Attach Curves to Surface) in the Set Parent To pop-up menu. This option can be seen as part of the Curves settings in the Properties Editor.
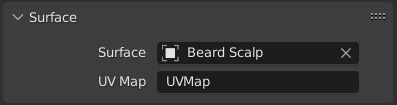
- Surface UV Map
The name of the attribute on the surface mesh used to define the attachment of each curve.
Bemerkung
If the UV from the surface changed, run Snap to Nearest Surfaces to re-attach the curves.
Fur
Adds a fur setup to the selected objects. The fur setup is based on Geometry Nodes and built with Hair Node Groups that come with Blender as bundled assets.
See Quick Fur for more information.