Navigation
Navigating in the 3D space is done with the use of both mouse movement and keyboard shortcuts.
To be able to work in the three-dimensional space that Blender uses, you must be able to change your viewpoint as well as the viewing direction of the scene. While we will describe the 3D View editor, most of the other editors have similar functions. For example, it is possible to pan and zoom in the Image editor.
Tip
Mouse Buttons and Numpad
If you have a mouse with less than three buttons or a keyboard without a numpad, see the Keyboard and Mouse page of the manual to learn how to use them with Blender.
Navigation Gizmo
The navigation gizmo can be found in the top right of the editor. The four buttons (listed from left to right) do the following:
The Orbit gizmo on the far right can be used to rotate around 3D Viewport. Hovering over the gizmo and dragging with LMB will orbit the view. Clicking any of the axis labels will Align to that view. Clicking the same axis again switches to the opposite side of that same axis,
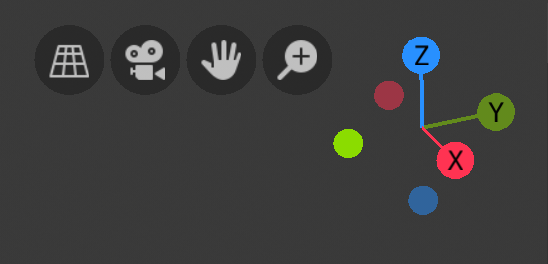
Navigation Gizmo.
Orbit
Reference
| Mode: | All modes |
|---|---|
| Menu: | |
| Hotkey: | MMB, Numpad2, Numpad4, Numpad6, Numpad8, Ctrl-Alt-Wheel, Shift-Alt-Wheel |
Rotate the view around the point of interest. Click and drag MMB on the viewport’s area. If you start in the middle of the area and move up and down or left and right, the view is rotated around the middle of the area.
To change the viewing angle in discrete steps, use Numpad8 and Numpad2 or use Numpad4 and Numpad6 to rotate the scene around the global Z axis from your current point of view. Finally Numpad9 switches to the opposite side of the view.
Alternatively, if the Emulate 3 button mouse option is select in the Preferences you can press and hold Alt while dragging RMB in the viewport’s area.
Note
Hotkeys
Remember that most hotkeys affect the active area (the one that has focus), so check that the mouse cursor is in the area you want to work in before you use the hotkeys.
Roll
Reference
| Mode: | All modes |
|---|---|
| Menu: | |
| Hotkey: | Shift-Numpad4, Shift-Numpad6 |
Rotate the viewport camera around its local Z axis in 15° discrete steps.
Panning
Reference
| Mode: | All modes |
|---|---|
| Menu: | |
| Hotkey: | Shift-MMB, Ctrl-Numpad2, Ctrl-Numpad4, Ctrl-Numpad6, Ctrl-Numpad8 |
Moves the view up, down, left and right. To pan the view, hold down Shift and drag MMB in the 3D View. For discrete steps, use the hotkeys Ctrl-Numpad8, Ctrl-Numpad2, Ctrl-Numpad4 and Ctrl-Numpad6 as with orbiting (note: you can replace Ctrl by Shift).
For those without a middle mouse button, you can hold Shift-Alt while dragging with LMB.
Zooming
Reference
| Mode: | All modes |
|---|---|
| Menu: | |
| Hotkey: | Ctrl-MMB, Wheel, NumpadPlus, NumpadMinus |
Moves the camera forwards and backwards. You can zoom in and out by holding down Ctrl and dragging MMB. The hotkeys are NumpadPlus and NumpadMinus. The submenu holds these functions too as well. Refer to the 3D View’s View menu image above for more information. If you have a wheel mouse, you can zoom by rotating the Wheel.
Hint
If You Get Lost
If you get lost in 3D space, which is not uncommon, two hotkeys will help you: Home changes the view so that you can see all objects , while NumpadPeriod zooms the view to the currently selected objects when in perspective mode .
Zoom Region
Reference
| Mode: | All modes |
|---|---|
| Menu: | |
| Hotkey: | Shift-B |
The Zoom Region tool allows you to specify a rectangular region and zoom in so that the region fills the 3D View.
You can access this through via the shortcut Shift-B, then LMB click and drag a rectangle to zoom into.
Alternatively you can zoom out using the MMB.
Dolly Zoom
Reference
| Mode: | All modes |
|---|---|
| Hotkey: | Shift-Ctrl-MMB |
In most cases its sufficient to zoom the view to get a closer look at something, however, you may notice that at a certain point you cannot zoom any closer.
This is because Blender stores a view-point that is used for orbiting and zooming. It works well in many cases, but sometimes you want to move the view-point to a different place. This is what Dolly supports, allowing you to transport the view from one place to another.
You can dolly back and forth by holding down Shift-Ctrl and dragging with MMB.