Markers
Markers are used to denote frames with key points or significant events within an animation. E.g. it could be that a character’s animation starts, the camera changes position, or a door opens. Markers can be given names to make them more meaningful at a quick glance. They are available in many of Blender’s editors.
Note
Unlike keyframes, markers are always placed at a whole frame number, you cannot set a marker at frame 2.5.
Markers can be created and edited in the following editors:
Note
A marker created in one of these editors will also appear in all others that support them.
Types
Besides standard markers, pose markers are another type of markers, which are specific to armatures and shape keys. They are used to denote poses in the Action Editor mode and Shape Keys Editor of Dope Sheet.
Visualization
In the supported editors, if at least one is created, markers are visualized in a separate row at their bottom. This area can be disabled per editor via the menu option.
Note
While the markers area is disabled, markers operators are not available in that editor, and in the header the Marker menu is hidden.
Standard
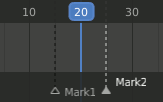
Regular markers are shown as small white triangles, empty if unselected or filled if selected, and with a dashed line that covers the editor height at the corresponding frame. If they have a name, this is shown to their right in white.
3D Viewport
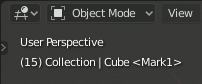
The 3D Viewport does not allow you to create, edit or remove markers, but it shows their name in the Object Info in the upper left corner, when on their frame.
Pose Markers
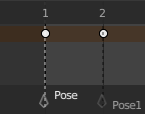
Pose markers show a diamond-shaped icon in the Dope Sheet. In the NLA editor pose markers are shown as a red dashed line inside the relative action strip.
Add Marker
Reference
- Mode
All modes
- Menu
- Hotkey
M
The simplest way to add a marker is to move to the frame where you would like it to appear, and press M.
Hint
Markers can also be added during playback.
Pose Markers
If Show Pose Markers is checked, a pose marker and a new pose in the Pose Library are added.
Selecting
Reference
- Mode
All modes
- Hotkey
LMB
Click LMB on the marker’s triangle to select it. Use Shift-LMB to select multiple markers.
In the Graph Editor, Dope Sheet, NLA Editor, Timeline, and Video Sequence Editor, you can also select all markers with A while hovering the mouse over the marker row, and apply selection tools on them like Box Select, etc. (as usual, LMB to select, RMB to deselect). The corresponding options are found in the Select menu of these editors.
Editing
Duplicate Marker
Reference
- Mode
All modes
- Menu
- Hotkey
Shift-D
You can duplicate the selected markers by pressing Shift-D. Once duplicated, the new ones are automatically placed in select mode, so you can move them to the desired location.
Note
Note that unlike most other duplications in Blender,
the names of the duplicated markers are not altered at all
(no .001 numeric counter append).
Duplicate Marker to Scene
Reference
- Mode
All modes
- Menu
Duplicates the selected markers into another scene.
Deleting Markers
Reference
- Mode
All modes
- Menu
- Hotkey
X
To delete the selected markers simply press X, and confirm the pop-up message with LMB.
Rename Marker
Reference
- Mode
All modes
- Menu
- Hotkey
Ctrl-M
Having dozens of markers scattered throughout your scene’s time will not help you much unless you know what they stand for. You can name a marker by selecting it, pressing Ctrl-M, typing the name, and pressing the OK button.
Move Marker
Reference
- Mode
All modes
- Menu
- Hotkey
G
Once you have one or more markers selected, press G, while hovering with the mouse over the marker bar, to move them, and confirm the move with LMB or Return (as usual, cancel the move with RMB, or Esc). Or drag them with the LMB.
By default, you move the markers in one-frame steps, but if you hold Ctrl, the markers will move in steps corresponding to one second (according to the scene’s FPS).
Show Pose Markers
Reference
- Mode
todo <2.8
- Editor
Action Editor and Shape Keys Editor
- Menu
Pose markers are only shown and editable in Action editor or Shape Keys editor by enabling the checkbox.
Make Markers Local
Reference
- Mode
All modes
- Menu
It is possible to convert standard markers into pose markers with . Note that the original marker will be gone. If you want to keep it, make a duplicate before you convert.
Jump to Next/Previous Marker
Reference
- Mode
All modes
- Menu
Moves the playhead to the next/previous marker relative to the current playhead position.
Bind Camera to Marker
Reference
- Editor
Timeline
- Menu
- Hotkey
Ctrl-B
Bind Camera to Markers is a special operator only available in the Timeline. The operator allows markers to be used to set the active object as the active camera.
To use this operator, select the object to become the active camera and select a marker to bind the active camera to. If no marker is selected when the operator is preformed, a marker will be added. When an object is bound to a marker, the marker will be renamed to the name of the active object. These markers also have a camera icon next to the left of the name to easily distinguish them from other informative markers
These markers can be moved to change the frame at which the active camera is changed to the object the marker is bound to.