Skeleton
Reference
- Mode
All Modes
- Panel
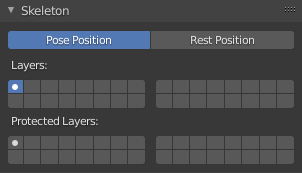
Skeleton panel.
In this panel you can arrange sets of bones into different layers for easier manipulation.
- Pose Position
A radio button to switch between Pose Position and Rest Position.
In Edit Mode, you always see armatures in their rest position, in Object Mode and Pose Mode, by default, you see them in Pose Position (i.e. as it was transformed in the Pose Mode). If you want to see it in the rest position in all modes, select Rest Position.
- Armature Layers
Each armature has 32 layers to organize armatures by “regrouping” them into sets of bones. only bones in active layers will be visible/editable, but they will always be effective (i.e. move objects or deform geometry), whether in an active layer or not. This property changes which layers are visible in the 3D Viewport. To show several layers at once, Shift-LMB on the desired layers to view. To move bones to a given layer, use Change Bone Layers.
- Protected Layers
You can lock a given bone layer for all proxies of your armature, i.e. all bones in this layer will not be editable.
Note
Protected Layers in proxy are restored to proxy settings on file reload and undo.