Introduction
This section describes Blender’s asset library system. It was introduced in Blender 3.0, and will be improved and expanded over multiple upcoming releases.
See also
- Asset Browser
The main interface for organizing and using assets.
- Asset Catalogs
For organizing assets.
- Pose Library
Build on top of the Asset Browser.
The following blog posts were written during the design and development of the Asset Browser. They are linked here for historical reasons, and to give some more context to the current design.
What is an Asset?
An asset is a data-block with meaning.
A blend-file is a database with multiple Data-Blocks: objects, textures, materials, etc. When planning to re-use or share these, the data needs a meaning. What is this? What is this for? Assets are curated data-blocks that are meant for easy reuse.
Note
The general term “asset” often also refers to other file types, such as images, sounds, video files, etc. These are currently not supported as asset in Blender.
For more info, see Future Development.
What is an Asset Library?
An asset library is a directory on your drive that is registered in the Preferences as an asset library.
Registering it means that you give the library a name (like “Sprite Fright”)
and the location on drive (like /home/sybren/projects/sprite-fright/assets).

Name and Location of asset libraries in the Preferences.
Once registered, you can select the asset library in the Asset Browser. All the blend-files in the asset library will be scanned for assets, and all those assets will be shown in the Asset Browser.
Note
Note that this scanning process may take a while, depending on the number of blend-files and the number of assets contained within them. Blender 3.1 will add indexing of these assets, greatly improving the speed at which an asset library can be reopened. See T91406 for more info.
The blend-files can be directly in the top-level directory of the asset library, or in any subdirectory. The on-drive organization of asset libraries is all up to you. Regardless of which blend-file contains the assets, each asset can be assigned a catalog. For more info about how to organize your assets this way, see Asset Catalogs.
Asset Types
Assets can be broadly divided into two types: primitive and preset assets. Which is which depends on the Data-Blocks type.
Primitive assets are data-blocks that are either linked or appended to the current file. Examples are objects, materials, and worlds. These can be dragged from the Asset Browser into the scene (objects and worlds), or onto existing objects (materials).
Preset assets are data-blocks that are loaded and then applied to something. An example is a pose asset. When applying the pose, the data-block is loaded from its blend-file, and then the pose is applied to the active armature.
In the future, the asset type definition will be expanded; see Future Development for more info.
The Current File Asset Library
To help with the management of assets in the current blend-file, you can set the Asset Browser to show the Current File asset library. This always shows the assets in the current file, even when the current file is not saved in an asset library. This also makes it possible to create assets and use them in the same file, for small single-file projects.
When the current blend-file is part of an asset library, you can also see its assets in that library, of course. The assets that are in the current file are marked with an icon; only those are editable.
Life Cycle of an Asset
This section describes how to create, edit, share, and use assets.
Creating an Asset
To create an asset, first create the thing you want to turn into an asset. That is, create the object, material, world, or pose your character. The next step depends on the type of asset (see Asset Types above).
For primitive assets, use the Mark as Asset operator. It can be found in the data-block selector, in the Outliner, and for objects in the 3D Viewport Object menu. When using Mark as Asset, an automatic preview is generated. If you want, you can also change or replace this with an image of your own choosing; use the folder button next to the preview image in the Asset Details region of the Asset Browser.
For preset assets, there will be a dedicated button for the different asset types. Currently poses are the only preset assets; use the Create Pose Asset button in the Action editor. This will copy the pose of the selected bones into a new Action, mark it as asset, and put it into the currently active asset catalog if there is an Asset Browser open.
After creating the asset, make sure the current blend-file is saved in your asset library. Blender does not copy the asset into the asset library for you.
Editing Assets
Since assets are regular data-blocks, with just a little bit of metadata attached, they can be edited like any other Blender data. Just open the file and edit the object, material, world, etc.
For poses assets, this is also possible. With the pose library file open, just click the Assign Action button to assign the pose action to the currently selected armature. Then you can use all of the animation tooling to edit the pose, remove or add keys, etc.
Editing asset metadata can be done via the Asset Browser.
Using Assets
Assets can be used from the Asset Browser.
The pose library extends this, and adds an Asset View to the 3D Viewport. See Use from 3D Viewport.
Removing Assets
Asset metadata can be erased by the Clear Asset operator. This operator is available in data-block selectors, the Asset Browser, and for objects in the 3D Viewport menu.
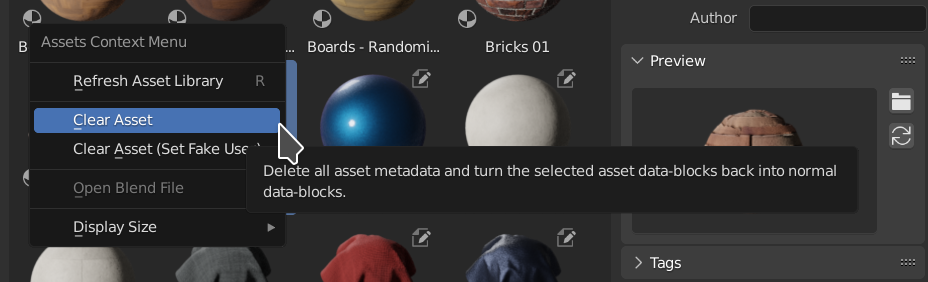
Clear Asset in the Asset Browser.
- Clear Asset
Removes the asset metadata (catalog, description, author, tags), effectively turning an asset into a regular data-block. As such, the same removal rules apply as with other data-blocks. For example, if a mesh object is still placed in the scene, Clear Asset will not remove it from the scene. See Life Time. The preview will be kept inside the data-block and not be removed.
- Clear Asset (Set Fake User)
Performs the same operation as Clear Asset, and then marks the data-block as protected. This makes it possible to no longer have the data-block marked as asset, and still be sure it is not lost when saving the blend-file.
Design Limitations
Blender is not allowed to write to other blend-files than the one you have currently open. This means that to edit an asset, you have to open its blend-file. Fortunately this is only a single click away, both in the Source List region of the Asset Browser and in the asset context menu.
This also means that Blender does not copy assets into the asset library for you. You are responsible for placing the blend-file with the asset in an asset library directory, and marking the asset as such. See Asset Pushing for more on this topic.
Future Development
This section describes interesting avenues for further development. Even though it is not an exhaustive list, it might help to better understand the current functionality of Blender’s Asset Browser.
Non-Data-Block Assets
Non-Blender assets, such as image or audio files, will likely be supported in a future version. For such files, asset metadata is then stored in XMP sidecar files, similar to what other software is also doing. Importers (USD, glTF, FBX, …) could add support for their file types as assets this way too. Furthermore, it should become possible to enrich an asset with a Python script, which can then provide code to be run when the asset is used.
Cross Blend-File Editing
As described above, Blender itself is not allowed to write to other blend-files than the currently open one. This rule helps to limit complexities; for example, it is hard to reliably implement an undo system when manipulating other files. The rule does get in the way of mass-updating assets when they are stored in various blend-files.
Since there is already tooling that can manipulate blend-files outside of Blender itself (see Blender Asset Tracer), it’s possible to also create an external tool for doing such edits across blend-files. Such a tool might even be implemented via Blender’s application templates system, or as an add-on; the rule above applies to Blender itself, not to its add-ons.
Asset Pushing
Asset pushing is a way of getting assets into the asset library, where you are working on a file
and want to copy the asset from that file into the library. This is a concept that appears deceptively simple.
In certain cases it is actually simple, but often enough it gets quite complex. For example,
when you want to push an object into an external asset library, should that also copy the materials?
What about the texture images referenced by those materials?
What about objects referenced by custom properties, constraints, or modifiers?
And in which files would they have to go?
Do they all go into one big assets.blend, individual blend-files,
or into a directory per asset type? Blender should not be making such decisions for you.
For specific cases, these things are all solvable. For this reason the pose library has been created as an add-on which is enabled by default. Studios with specific needs can disable the add-on and implement their own functionality; the building blocks are all in Blender’s core, and thus do not need to be copied for this. Furthermore, add-ons can write to other blend-files, so they could make the decisions for users.
Asset pushing is desirable. Because of the questions above, it is unknown how to implement this well, in a way that still allows artists control over their assets.