Images as Planes
Reference
- Category
Import-Export
- Menu
,
Properties panel.
This add-on imports images and creates planes with them as textures. It automates the process of creating a plane, resizing it to fit the dimensions of the image, and adding a material and image texture to that plane. The name of the plane, material and texture is derived from the image name.
You can either import a single image, multiple images, or an image sequence/movie clip. Selecting a single image will create one plane, selecting multiple images will create as many planes as images selected, on top of each other or spaced. Selecting a movie clip, or an image sequence will create a single plane with an animation.
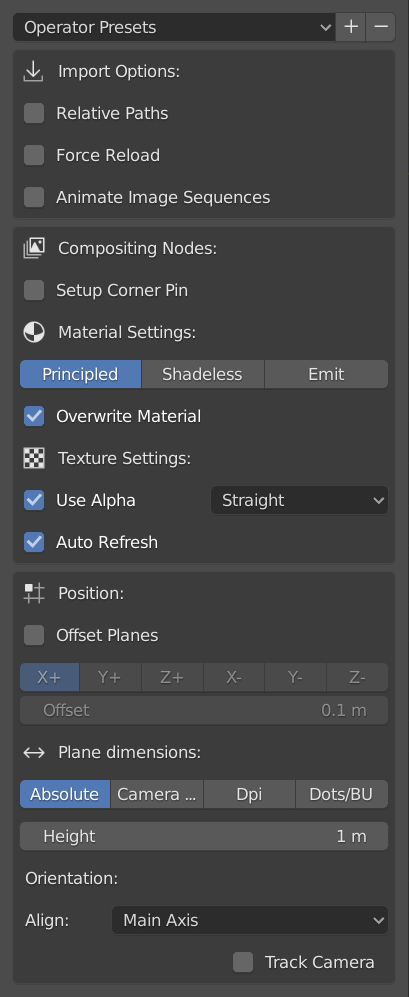
Properties
You save the current settings of the import as an Operator Preset.
Import Options
- Relative Path
Link to the image file using a relative file path.
- Force Reload
Reloads the image file into Blender if it is already added as an image data-block.
- Animate Image Sequences
Import sequentially numbers images as an animated image sequence instead of separate planes. They will be imported as a Clip texture on a single plane. The frame range will automatically be set but can be changed later.
Compositing Nodes
- Setup Corner Pin
A Corner Pin node is used to distort a plane and to create a warp view of the image. Selecting this option will build a compositing setup with the Image Texture, Scale and Corner Pin Node added to the Compositor.
Material Settings
The image is displayed on the plane through material and textures nodes. They can be edited in the Shader editor.
- Shader
- Principled
Creates a new material for the plane with a Principled BSDF shader node with default settings as the main component. The base color of the Principled BSDF node comes from an Image Texture node that is linked to the imported image.
- Shadeless
A shadeless material is a material that does not respond to light from other objects and has always the same color in any lighting environment. This option creates a new material for the plane with a group node as the main component. This node group is essentially a mix between a Diffuse and an Emission shader controlled by a Light Path node.
- Emit
Creates a new material for the plane with an Emission shader node as the main component. The base color of the node comes from an Image Texture node that is linked to the imported image. The strength can be set.
- Override Material
The name of the material is the same as the name of the image. If the material already exist Blender will append a number to the material name. With the Override Material checkbox, you can force the add-on to replace the existing material.
Texture Settings
- Use Alpha
The alpha channel of the image is used for transparency.
- Alpha Mode
Representation of alpha in the image file, to convert to and from when saving and loading the image. See Alpha Channel.
- Auto Refresh
Automatically refresh images in the viewport on frame changes.
Position
A single plane is positioned at the 3D Cursor. Multiple planes can be offset against each other following a selected axis.
- Offset Planes
- Local Axis
The axis that is used to offset the different planes. For example, if you choose X+, the images are positioned along the X axis, starting at the X coordinate of the 3D cursor and following with X+ offset.
X+, X-, Y+, Y-, Z+, Z-
- Offset
The space between each plane.
Plane Dimensions
Use the image’s pixel count to determine the planes size in units.
- Absolute
The size of the plane is based on the amount of pixels in the image.
- Height
The width is calculated based on the input height and the pixel dimensions of the image. For example, with the default Height of 1, an image of 800 × 600 will have a calculated width of 1 / 600 × 800 or 1.33 units.
- Camera Relative
The size of the image plane is set relative to the size of the camera frame.
- Fit
Scales the image to fit inside the camera view without altering the aspect ratio.
- Fill
Scales the image so that it fills the entire camera view, without altering the aspect ratio but some of the image can be spilled outside the camera frame.
- DPI
Dots per Inch.
- Definition
This is the number of pixels that fit in 1 inch. So, with the Unit System set to Metric and the Definition field set to the default 600 DPI, an image of 800 × 600 pixels will have a size of 0.0339 × 0.0254 units because 600 pixels are defined as 1 inch which equals 0.0254 m.
- Dots/BU
Dots per Blender Unit.
- Definition
The field Definition is by default set to 600, indicating that 1 unit equals 600 pixels in the image. So, an image of 800 × 600 will have a size of 1.33 × 1 unit.
Orientation
- Align
With this option you can set the rotation of the plane.
- Main Axis
The plane is positioned so that it faces the camera. This is achieved by rotating the plane so that the viewing axis of the camera is perpendicular to the plane.
- Face Camera
Face Camera is similar to Main Axis, but the plane is also rotated so that it aligns with the rotation of the camera.
- Z- (Down), Y-, X-, Z+ (Up), Y+, X+
The plane is rotated in such a way that the selected axis is perpendicular to the plane with the front face pointing to the positive or negative side of the axis. For example, the option Z+ (Up) is fully visible in Top View, because the Z axis is pointing perpendicular to the plane in this view and the front face of the image is pointing to the positive (Up) side of the Z axis.
- Track Camera
Uses a Locked Track Constraint to make the plane always align with the camera. The plane always faces the camera, even if the camera is moved. This option is only available if Main axis or Face Camera is selected in the Align panel.