Installation on Windows
This guide covers the following topics:
Installing Python (used to “convert” the source files to HTML)
Installing Python
Download the Python installation package for Windows. In this guide version 3.9.x is used.
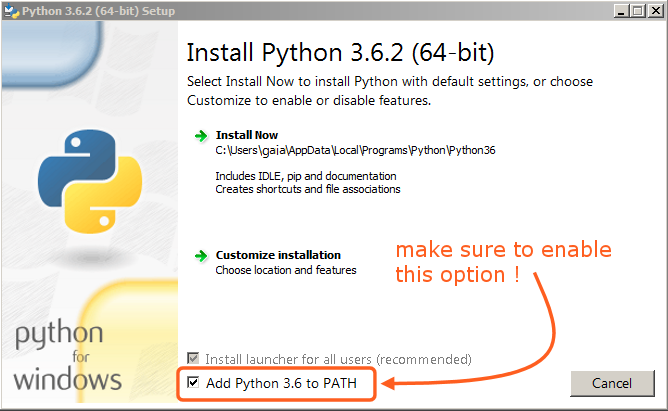
Install Python with the installation wizard. Please make sure that you enable the “Add Python to PATH” option:

The option must be enabled so you can build the manual with the make script.
All other settings can remain as set by default.
Installing Git and Downloading the Repository
In this guide, we will use the official Git client, though any Git client will do.
Download and install Git for Windows.
Simply check out the Blender Manual’s repository using:
cd ~
git lfs install
git clone https://projects.blender.org/blender/blender-manual.git
The repository will now be downloaded which may take a few minutes depending on your internet connection.
Note
This process can be completed using a graphical Git client, in that case you will just use the repository address in the URL field provided by your client:
https://projects.blender.org/blender/blender-manual.git
Setting up the Build Environment
Open a Command Prompt. (Run as Administrator)
Enter the
blender-manualfolder which was just added by git clone:cd C:\blender-manual
Inside that folder is a file called
requirements.txtwhich contains a list of all the dependencies we need. Install all the dependencies using Python’spipcommand:pip install -r requirements.txt
If all goes well, you should see the following message when it is finished:
Successfully installed Jinja2 MarkupSafe Pygments Sphinx docutils sphinx-rtd-theme Cleaning up...
During the setup, some warnings may be shown, but do not worry about them. However, if any errors occur, they may cause some problems.
Note
Every now and then you may want to make sure your dependencies are up to date using:
pip install -r requirements.txt --upgrade