Sun Position#
Sun Position allows positioning and animating the Sun (to a certain degree of accuracy), to simulate real-world natural lighting. It uses physical characteristics to position the Sun in the scene: geographic location, time and date. It is based on the Earth System Research Laboratory’s online calculator.
Activation#
Open Blender and go to Preferences then the Add-ons tab.
Click Lighting then Sun Position to enable the script.
Interface#
Located in the .
Usage#
This add-on has two distinct modes of operation: the Normal Mode allows you to animate the Sun realistically, while the Sun + HDRI Texture Mode is useful for synchronizing a sun light to an HDRI texture.
The usage mode can be selected from the top of the Sun Position panel.
Normal Mode#
This is the mode by default. After selecting the time and place, you can set up a sun light, a sky texture, and a collection to serve as visualization.
Use Object#
Select the sun object which will be placed according to the chosen time and place. Its position will be updated every time you change the location or time, and you can thus create animations by setting keyframes on them.
Use Collection#
Select a collection of objects to be placed around the scene for visualization. Two options are available: analemma and diurnal.
Note
It is recommended to create a collection in the scene, and to move the objects into this collection. If you wish to create several visualizations, create as many collections as needed, select them in turn and choose the right settings. Once deselected, a collection will stay in place.
Analemma#
The analemma is a visualization of the position of the Sun in the sky around the year for a given time of the day. In other words, it is like a time lapse picture of the sky over a year, with the Sun appearing multiple times at the same time of the day.
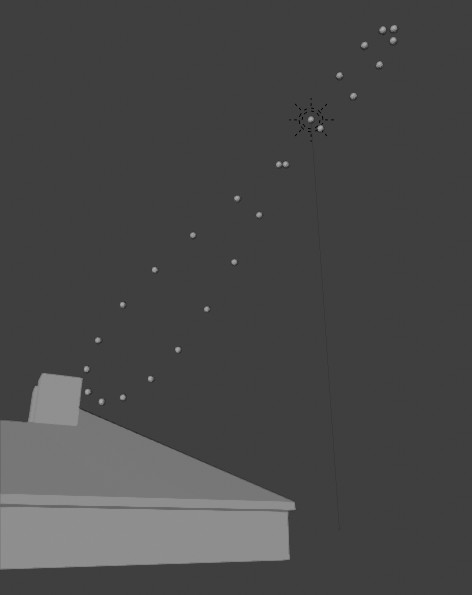
The analemma was used here to match this picture.#
Diurnal#
This option allows you to visualize the trajectory of the Sun in the sky during a single day.
Sky Texture#
Select a Sky Texture node in the World shading node tree. It will be set up to match the sun animation. This is useful if you want to have a simple sky texture matching a sun light’s position.
Location#
In order for the Sun to be placed correctly, you need to choose a place on Earth where the scene is located. This place is represented by two coordinates, Longitude (East / West) and Latitude (North / South). They are expressed in degrees, from -180° to +180° for the longitude, and from -90° to 90° for the latitude. The coordinates match those found on such databases as OpenStreetMap or Google Maps. You may enter and animate them manually, or paste them in.
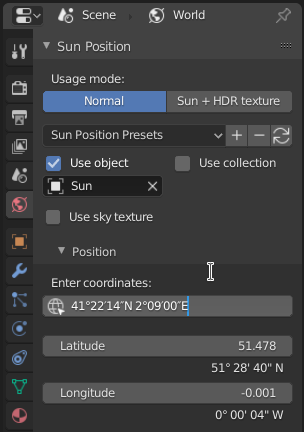
Entering Coordinates#
In the Location panel, enter Latitude and Longitude coordinates corresponding to the location you wish to simulate. A simpler way is to go to an online map such as OpenStreetMap, copy the coordinates from there, and paste them into the Enter Coordinates field. They will be parsed automatically.
Another source is Wikipedia. Suppose you want to render the Barcelona Pavilion by Mies van der Rohe. You can copy the coordinates from the article and paste them into Blender.

North Offset#
By default, the North points to the Y axis in the scene (to the top of the screen in top view). But sometimes, you may have modeled it in another orientation. In that case, you may enter a North Offset, to change the orientation of the scene. Show North toggles a dashed line pointing to the North in the 3D Viewport, to help you visualize the cardinal directions.
Setting the Time#
After selecting the location on Earth, select or animate the date and time. This is fairly straightforward, but care must be taken to match the Time zone and Daylight Saving to the moment you wish to simulate. Time entered is the local time, but the global, UTC time may be displayed below as well.
Note
Time is stored in decimal format instead of hour:minute:second.
To match a time in that format, look at the label Local.
Sun + HDRI Texture Mode#
Instead of simulating the position of the Sun for a real location and time, this mode simply locks an environment texture with a sun light object. It is useful if you want to increase the contrast in a texture, by using an additional sun.
Synchronizing the Sun Object to the HDRI Texture#
Start by selecting the sun object and Environment Texture node. You can then synchronize them by enabling Sync Sun to Texture. Hovering any 3D Viewport will display the environment texture. Use the MMB to pan, scroll wheel to zoom, and Ctrl-MMB to set the exposure. Zoom and click the center of the sun in the texture. After that, the sun object will be locked to it.
You can now rotate both the texture and the light by using the Rotation slider.
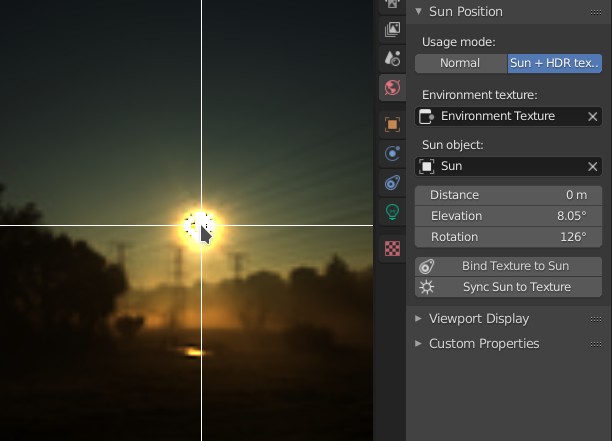
Click the sun in the environment texture in the 3D Viewport to lock it to the sun light object.#
Preferences#
The preferences for the add-on make some features optional, so you can hide those you don’t use.
Reference
- Category:
Lighting
- Description:
Show Sun position with objects and/or sky texture.
- Location:
- File:
sun_position folder
- Author:
Michael Martin (xaire)
- Maintainer:
Damien Picard (pioverfour)
- License:
GPL
- Support Level:
Community
- Note:
This add-on is bundled with Blender.