Clamp To Constraint
The Clamp To constraint clamps an object to a curve. The Clamp To constraint is very similar to the Follow Path constraint, but instead of using the evaluation time of the target curve, Clamp To will get the actual location properties of its owner (those shown in the Transform panel), and judge where to put it by «mapping» this location along the target curve.
One benefit is that when you are working with Clamp To, it is easier to see what your owner will be doing; since you are working in the 3D Viewport, it will just be a lot more precise than sliding keys around on an F-Curve and playing the animation over and over.
A downside is that unlike in the Follow Path constraint, Clamp To does not have any option to track your owner’s rotation (pitch, roll, yaw) to the banking of the targeted curve, but you do not always need rotation on, so in cases like this it’s usually a lot handier to fire up a Clamp To, and get the bits of rotation you do need some other way.
The mapping from the object’s original position to its position on the curve is not perfect, but uses the following simplified algorithm:
A «main axis» is chosen, either by the user, or as the longest axis of the curve’s bounding box (the default).
The position of the object is compared to the bounding box of the curve in the direction of the main axis. So for example if X is the main axis, and the object is aligned with the curve bounding box’s left side, the result is 0; if it is aligned with the right side, the result is 1.
If the cyclic option is unchecked, this value is clamped in the range 0-1.
This number is used as the curve time, to find the final position along the curve that the object is clamped to.
This algorithm does not produce exactly the desired result because curve time does not map exactly to the main axis position. For example an object directly in the center of a curve will be clamped to a curve time of 0.5 regardless of the shape of the curve, because it is halfway along the curve’s bounding box. However, the 0.5 curve time position can actually be anywhere within the bounding box!
Opciones

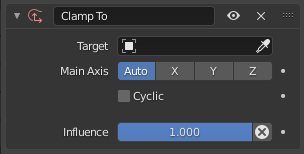
Clamp To panel.
- Destino
The target Identificador de Datos indicates which curve object the Clamp To constraint will track along. The target must be a curve object type. See common constraint properties for more information.
- Main Axis
This button group controls which global axis (X, Y or Z) is the main direction of the path. When clamping the object to the target curve, it will not be moved significantly on this axis. It may move a small amount on that axis because of the inexact way this constraint functions.
For example if you are animating a rocket launch, it will be the Z axis because the main direction of the launch path is up. The default Auto option chooses the axis which the curve is longest in (or X if they are equal). This is usually the best option.
- Cíclica
By default, once the object has reached one end of its target curve, it will be constrained there. When the Cyclic option is enabled, as soon as it reaches one end of the curve, it is instantaneously moved to its other end. This is of course primarily designed for closed curves (e.g. circles), as this allows your owner to go around it over and over.
- Influencia
Controls the percentage of affect the constraint has on the object. See common constraint properties for more information.