Introducción
Materials control the appearance of the Grease Pencil object. They define the base color and texture of the strokes and filled areas.
There is always only one active material in the list (the selected one). When you draw, the new strokes use the active material.
You can override the base material color using the tools in Vertex Mode or the Draw and Tint tool in Draw Mode.
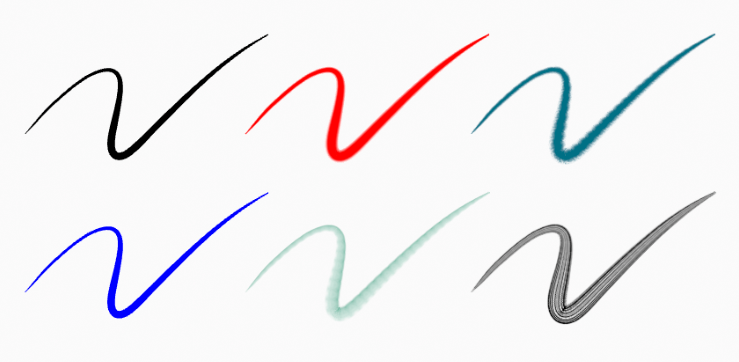
The material always remains linked to the strokes, this means that any change in a material will change the look of already drawn strokes.

Same stroke linked to different materials.
Grease Pencil Shader
The Grease Pencil shader creates a material that can work with strokes and/or filled areas of a Grease Pencil object.
Stroke and fill components has it own section panel and they can be enabled with a checkbox on the panel header.
Stroke only has effect on the lines and Fill only on the areas determined by closed lines (by connecting the lines start and end points).
Nota
The shader is not yet a BSDF capable shader and can only be setting up on the Material Properties panel (it is not a shader node).
Setting Up Materials
Referencia
- Modo
Drawing Mode
- Panel
- Atajo
U
Grease Pencil materials can be created in the Material properties as any other materials in Blender. See Material assignment for more information.
The 3D Viewport can be set to Material Preview or Rendered shading, to interactively preview how the material looks in the scene.
Grease Pencil materials are data-blocks that can be assigned to one or more objects, and different materials can be assigned to different strokes.
In Grease Pencil the brush settings together with the material used will define the look and feel of the final strokes.
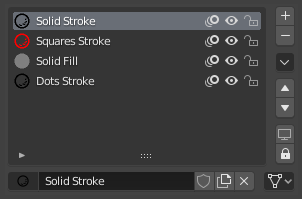
Materials slots in the List view also have some extra controls that help to work with materials while drawing or editing lines.
Common Settings

Grease Pencil material slots panel.
Next to the material name there are three icons buttons that control common properties of the material:
- Bloqueado (icono de candado)
Toggle material from being editable.
- Visibilidad en VIsta/Procesado (icono de ojo)
Toggle material visibility in the viewport and in render.
- Piel de Cebolla (icono de piel de cebolla)
Toggle the use of the material for Onion Skinning.
Especiales
- Show All
Turns on the visibility of every material in the list.
- Hide Others
Turns off the visibility of every material in the list except the active one.
- Lock All
Locks edition of all the materials in the list.
- Unlock All
Unlocks edition of all the materials in the list.
- Lock Unselected
Locks all materials not used in the selected strokes.
- Lock Unused
Locks and hides all unused materials.
- Convert Materials to Vertex Color
Only keeps necessary materials and convert all materials base color to a Color Attribute.
- Extract Palette from Vertex Color
Add all used Color Attributes to a new Color Palette. See Paleta de Color.
- Copy Material to Selected
Copia el material activo al objeto Lápiz de Cera seleccionado.
- Copy All Materials to Selected
Copia todos los materiales al objeto Lápiz de Cera seleccionado.
- Merge Similar
Combines similar materials in the list and replace the strokes that use the one of the merged materials with the new one.
- Remove Unused Slots
Remove all unused materials.
Lock & Visibility General Controls
- Bloqueado (icono de candado)
Toggle whether the active material is the only one that can be edited.
- Visibility (screen icon)
Toggle whether the active material is the only one that can be edited and is visible.
Grease Pencil Shader
Grease Pencil materials use a special shader that define the appearance of the surface of the stroke and fill.