Creación de metarigs
Agregar un hueso desde el menú Agregar –> Esqueleto.
Ir al modo Edición del esqueleto y construir el metarig, mediante los ejemplos disponibles o los tipos de sistemas de control de Rigify.
Define Rigify layers, bone grouping and selection sets.
En las propiedades del esqueleto, hacer clic en el botón Generar sistema de control para generar el sistema de control final.
Cómo funciona Rigify
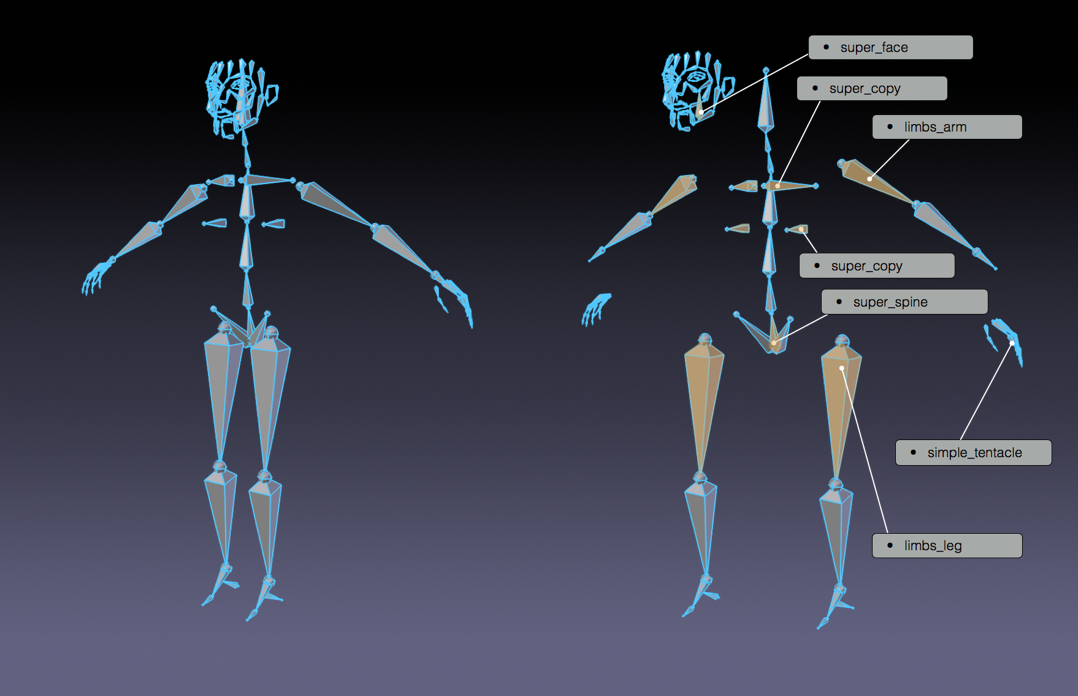
- Los metarigs de Rigify están divididos en múltiples sub sistemas de control
Un metarig es un conjunto de cadenas de huesos. Una cadena de huesos estará identificada con el atributo Conectado. Las cadenas de huesos podrán estar también conectadas mediante el uso de jerarquías, sin tener por qué usar el atributo Conectado (esto es, usando la opción Mantener transformaciones mientras se crea la jerarquía con el operador Asignar superior).
- Se crea un atributo personalizado en el primer hueso de la cadena del sub sistema de control
Cada primer hueso de una cadena de huesos tendrá un atributo personalizado, que será una propiedad personalizada de Rigify, para identificar el tipo de sub sistema de control. En el momento en generar el sistema de control, Rigify determinará qué controles y huesos deformantes serán creados, procesando el metarig desde el primer hueso hasta el último de cada cadena.

Meta-rig humano dividido en sus distintos modelos.
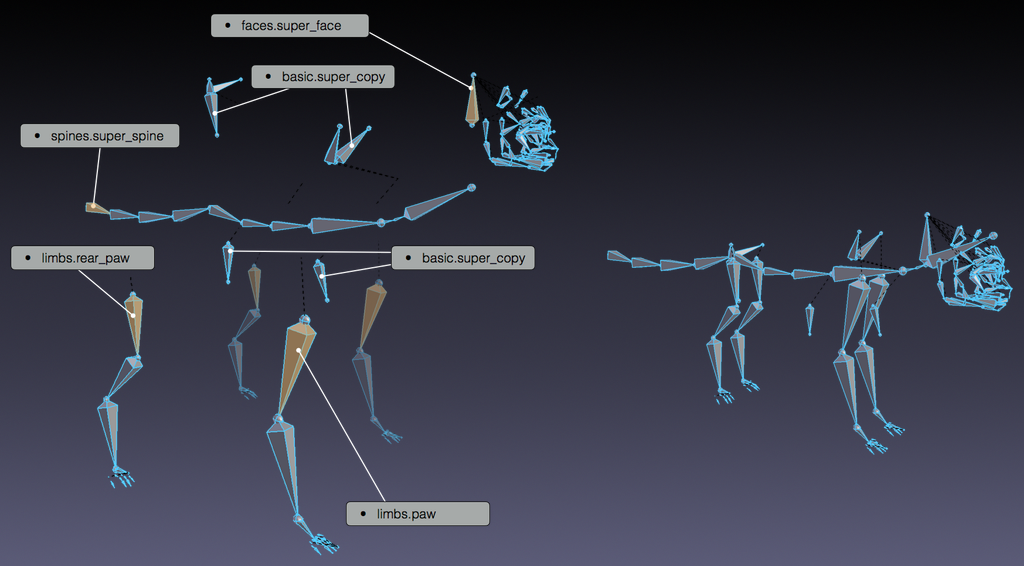
- Nuevos metarigs pueden ser creados ensamblando modelos de sub sistemas de control
Dado que un metarig es sólo una colección de sub sistemas de control, será posible crear nuevos metarigs ensamblando sub sistemas de control de distintas formas. De esta manera, será posible crear un número infinito de metarigs a partir de los mismos bloques de sistemas de control.

Meta-rig humano dividido en sus distintos modelos.
- Todos los mecanismos, huesos deformantes y controles son creados con un solo clic
El metarig contiene más información que los huesos mostrados. En efecto, en el momento de la generación, Rigify identificará cada tipo de sub sistema de control y, dependiendo de las opciones seleccionadas, creará todos los controles, interruptores y huesos deformantes con un solo clic.
Creación de un nuevo metarig
Agregar un nuevo esqueleto
Referencia
- Modo:
Modo Objeto
- Menú:
- Atajo:
Mayús-A
Para crear un metarig desde cero se necesitará un esqueleto con el cual trabajar. Bastará con agregar un Hueso individual desde el menú Agregar.
Truco
At this stage naming the newly added armature «meta-rig» is a good idea. You can do it at any time (or not at all) but it’s suggested to do it before going on so it will always be clear on which armature you have to work when editing the meta-rig structure.
Edición del esqueleto
Ahora que ya hay un esqueleto con el cual trabajar (y con el mismo seleccionado) ingresar al modo Edición. La construcción de un metarig desde cero en modo Edición puede ser hecha de dos maneras:
La adición de modelos de sistemas de control.
La creación de cadenas de huesos.
Adición de modelos (básico)
Adding samples in Edit Mode is a good way to start building a meta-rig. This way you can become familiar with the available building blocks and how they are meant to be used. To add a rig sample:
Ir a la pestaña Esqueleto.
Desplazar hacia abajo, hasta encontrar el panel Rigify.
Seleccionar un modelo de la lista.
Hacer clic en el botón Agregar modelo.
Editar las posiciones de los huesos para que coincidan con el personaje.
Para obtener la lista de modelos disponibles, ver la sección Tipos de sistemas de control.
Uso de tipos de sistemas de control (avanzado)
Create your bone chains in Edit Mode.
Assign the correct rig type to the first bone of each chain in Pose Mode.
Nota
Cada sub sistema de control tendrá uno cierto requerimiento de huesos de entrada. En caso de no estar seguro acerca de cómo usar las propiedades de los tipos de sistemas de control, agregar un modelo de sistema de control al esqueleto para ver cómo se supone que sea usado.
Hueso principal personalizado
If the meta-rig contains a bone called «root», it is used as the root control bone instead of creating a new one. This allows changing the rest position of the root bone, assigning a custom widget, or adding custom properties to the bone.
Un hueso principal personalizado no deberá tener ningún superior y deberá usar el tipo de sub sistema de control basic.raw_copy o no usar ninguno.
Layers, Bone Groups & Selection Sets
Armature Layers are usually used to isolate bones. Rigify can take advantage of armature layer to generate extra features and the user interface for the final rig. Rigify layers are displayed in a vertical layout inside their own separate panel named Rigify Layer Names.
The first column shows the layer number.
The second column is a display toggle.
This toggle controls the armature layer visibility. It has the same effect of enabling/disabling the layer visibility from the top armature layers menu. It is just redrawn here for a simplicity.
The third column sets a specific layer name to be used to build the rig UI of the final rig. If set, a button with the specified name will be created in the
rig_ui_templateto control the visibility of this specific armature layer. If layer contains at least one bone but its name field is empty, a button with no name will be created in the rig UI.The fourth column defines in which UI row the layer button will be created.
This numbers define the layer ordering in the UI and will ignore the effective layer number. If two layer have the same row number their UI buttons will be created in the same row.
The fifth column is a toggle for the selection set.
If checked a selection set with that name will be created and associated to the final rig.
The sixth column defines the Rigify Bone Grouping.
If Rigify Bone Groups are set, the user can make the association between the bones on the layer and the specified bone group from the list. The controls on the final rig will inherit the bone grouping through this value.
The seventh column displays – if set – the associated bone group name.
In order to use the Bone Groups in the Rigify Layer Names fields, Rigify Bone Groups must be set through the specific panel. Usually this panel is displayed just above Rigify Layer Names panel.
Rigify Bone Groups are used to define bone colors on the final rig. The top two rows of the Rigify Bone Groups panel are used to define the bone colors general behavior. Usually color themes use a gradient of colors to define the different bone states: default, selected and active. When multiple color themes are used in the same rig, identifying which bone is selected or active can be tricky since each color will have its corresponding state.
To override this behavior Rigify Bone Groups unifies the active and selected states with the same color. This is defined by two values:
- Unificar colores
When this option is active adding a bone group in the list will always keep the colors consistent. When a color scheme is added as from a theme, the color scheme is loaded as is. Click on the Apply button to force the system to unify selected and active colors.
- Colores seleccionado/activo
This two color fields define respectively Selected and Active colors. By default Rigify reads this colors from the theme defined by the user in the Blender preferences. This way the Selected/Active colors can always have a predictable and consistent behavior in the UI. The colors can be customized by clicking on the relative color field. To reset them to the Blender current theme value just click on the button with the update icon.
Bone Groups can be added and deleted as done in the general Bone Group panel
by clicking on the + or - buttons.
All Bone Groups can be deleted at once by clicking on the Specials menu.
To add the predefined Rigify Default Bone Groups list click on Add Standard button.
Para agregar un tema específico, con su propio esquema de colores, se deberá seleccionar en la lista desplegable y luego hacer clic en el botón Agregar desde tema.