Primitives
Reference
- Mode
Object Mode and Edit Mode
- Menu
- Shortcut
Shift-A
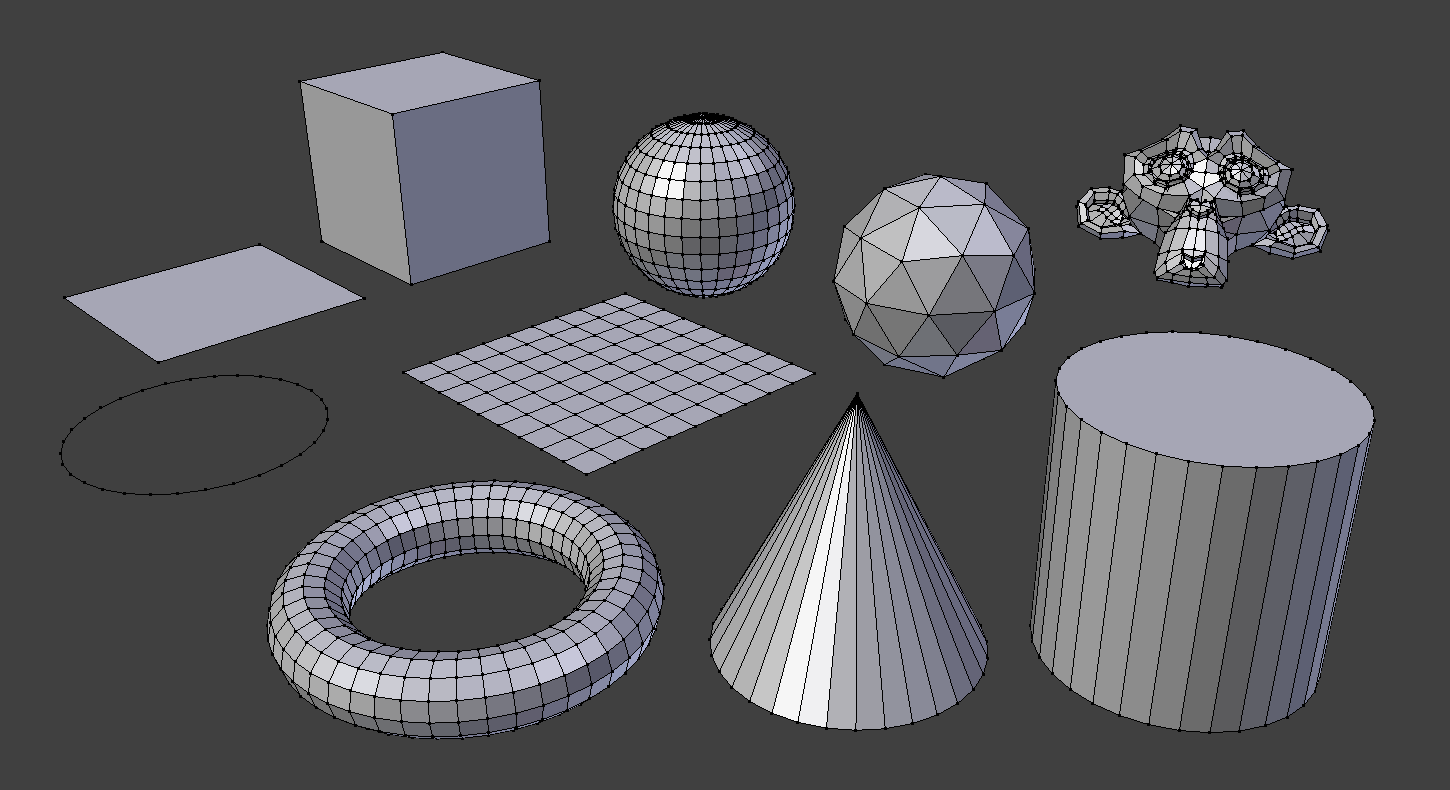
A common object type used in a 3D scene is a mesh. Blender comes with a number of ”primitive” mesh shapes that you can start modeling from. You can also add primitives in Edit Mode at the 3D cursor.

Blender’s standard primitives.
Muista
Planar Primitives
You can make a planar mesh three-dimensional by moving one or more of the vertices out of its plane (applies to Plane, Circle and Grid). A simple circle is often used as a starting point to create even the most complex of meshes.
Common Options
These options can be specified in the Adjust Last Operation panel, which appears when the object is created. Options included in more than one primitive are:
- Generate UVs
Generates a default UV unwrapping of new geometry. This will be defined in the first UV layer (which will get added if needed).
- Radius/Size, Align to View, Location, Rotation
Plane
The standard plane is a single quad face, which is composed of four vertices, four edges, and one face. It is like a piece of paper lying on a table; it is not a three-dimensional object because it is flat and has no thickness. Objects that can be created with planes include floors, tabletops, or mirrors.
Cube
A standard cube contains eight vertices, twelve edges, and six faces, and is a three-dimensional object. Objects that can be created out of cubes include dice, boxes, or crates.
Circle
- Vertices
The number of vertices that define the circle or polygon.
- Fill Type
Set how the circle will be filled.
- Triangle Fan
Fill with triangular faces which share a vertex in the middle.
- N-gon
Fill with a single N-gon.
- Nothing
Do not fill. Creates only the outer ring of vertices.
UV Sphere
A standard UV sphere is made out of quad faces and a triangle fan at the top and bottom. It can be used for texturing.
- Segments
Number of vertical segments. Like the Earth’s meridians, going pole to pole.
- Rings
Number of horizontal segments. These are like the Earth’s parallels.
Muista
Rings are face loops and not edge loops, which would be one less.
Icosphere
An icosphere is a polyhedral sphere made up of triangles. Icospheres are normally used to achieve a more isotropical layout of vertices than a UV sphere, in other words, they are uniform in every direction.
- Subdivisions
How many recursions are used to define the sphere. At level 1 the icosphere is an icosahedron, a solid with 20 equilateral triangular faces. Each increase in the number of subdivisions splits each triangular face into four triangles.
Muista
Subdividing an icosphere raises the vertex count very quickly even with few iterations (10 times creates 5,242,880 triangles), Adding such a dense mesh is a sure way to cause the program to crash.
Cylinder
Objects that can be created out of cylinders include handles or rods.
- Vertices
The number of vertical edges between the circles used to define the cylinder or prism.
- Depth
Sets the starting height of the cylinder.
- Cap Fill Type
Similar to circle (see above). When set to none, the created object will be a tube. Objects that can be created out of tubes include pipes or drinking glasses (the basic difference between a cylinder and a tube is that the former has closed ends).
Cone
Objects that can be created out of cones include spikes or pointed hats.
- Vertices
The number of vertical edges between the circles or tip, used to define the cone or pyramid.
- Radius 1
Sets the radius of the circular base of the cone.
- Radius 2
Sets the radius of the tip of the cone. Which will create a frustum (a pyramid or cone with the top cut off). A value of 0 will produce a standard cone shape.
- Depth
Sets the starting height of the cone.
- Base Fill Type
Similar to circle (see above).
Torus
A doughnut-shaped primitive created by rotating a circle around an axis. The overall dimensions can be defined by two methods.
- Operator Presets
Torus preset settings for reuse. These presets are stored as scripts in the proper presets directory.
- Major Segments
Number of segments for the main ring of the torus. If you think of a torus as a ”spin” operation around an axis, this is how many steps are in the spin.
- Minor Segments
Number of segments for the minor ring of the torus. This is the number of vertices of each circular segment.
- Dimensions Mode
Change the way the torus is defined.
Major/Minor, Exterior/Interior
- Major Radius
Radius from the origin to the center of the cross sections.
- Minor Radius
Radius of the torus’ cross section.
- Exterior Radius
If viewed along the major axis, this is the radius from the center to the outer edge.
- Interior Radius
If viewed along the major axis, this is the radius of the hole in the center.
Grid
A regular quadratic grid which is a subdivided plane. Example objects that can be created out of grids include landscapes and organic surfaces.
- X Subdivisions
The number of spans in the X axis.
- Y Subdivisions
The number of spans in the Y axis.
Monkey
This adds a stylized monkey head to use as a test mesh, use Subdivision Surface for a refined shape.
This is intended as a test mesh, similar to:
Vihje
History
This is a gift from old NaN to the community and is seen as a programmer’s joke or ”Easter Egg”. It creates a monkey’s head once you press the Monkey button. The Monkey’s name is ”Suzanne” and is Blender’s mascot.
Muista
Add-ons
In addition to the basic geometric primitives, Blender has a number of script generated meshes to offer as pre-installed add-ons. These are available when enabled in the Preferences (select the Category Add Mesh, then check any desired items).