Introduction
Les groupes de sommets peuvent potentiellement avoir u n très grand nombre de sommets associés et de là un grand nombre de poids (un poids par sommet assigné). Weight Painting est une méthode pour conserver une grande quantité d’informations de poids de manière très intuitive.
Elle est essentiellement utilisée pour les maillages de rigging, où les groupes de sommets sont utilisés pour définir les influences d’os relatives sur le maillage. Mais nous utilisons aussi pour le contrôle d’émission de particules, la densité de cheveux, un grand nombre de contrôleurs, de clés de forme, etc.
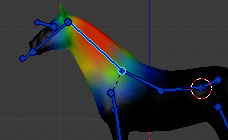
Groupe de sommets en Mode Weight Paint.
Vous pouvez entrer dans le mode Weight Paint à partir du sélecteur de mode Ctrl-Tab. L’objet mesh sélectionné est affiché légèrement ombré avec un spectre de couleurs arc-en-ciel. La couleur visualise les poids associés à chaque sommet dans le groupe de sommets actifs. Par défaut, bleu signifie non pondéré et rouge signifie entièrement pondéré.
Vous assignez des poids aux sommets de l’objet en peignant dessus avec des brosses de poids. Le fait de commencer à peindre sur un maillage ajoute automatiquement des poids au groupe de sommets actif (un nouveau groupe de sommets est créé si nécessaire).
The Weighting Color Code
Les poids sont visualisés par un gradient utilisant un système de couleurs froides/chaudes, telles que les zones de faible valeur (avec des poids proches de 0.0) sont affichées en bleu (froid) et les zones de haute valeur (avec des poids proches de 1.0) sont affichées en rouge (chaud). Et toutes les valeurs intermédiaires sont affichées dans les couleurs de l’arc-en-ciel (bleu, vert, jaune, orange, rouge).
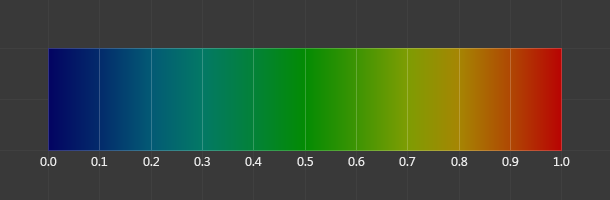
Le spectre de couleurs et leur poids respectif.
En plus du code de couleurs décrit ci-dessus, Blender a une notation visuelle spéciale (comme option) pour des sommets non référencés. Ils sont dessinés en noir. Ainsi vous pouvez voir les zones référencées (dessinées en couleur froides/chaudes) et des zones non référencées (en noir) en même temps. C’est plus pratique quand vous recherchez des erreurs de poids. Voir Options.
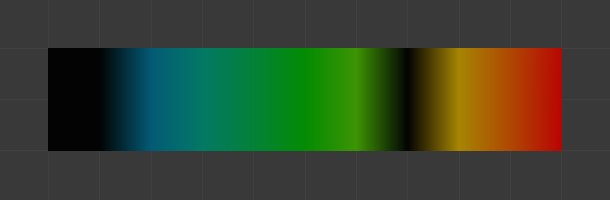
Exemple de sommets non référencés.
Note
Vous pouvez personnaliser les couleurs dans le gradient de poids en activant Custom Weight Paint Range dans l’onglet System des Preferences.
Normalized Weight Workflow
In order to be used for things like deformation, weights usually have to be normalized, so that all deforming weights assigned to a single vertex add up to 1. The Armature modifier in Blender does this automatically, so it is technically not necessary to ensure that weights are normalized at the painting stage.
However, while more complicated, working with normalized weights has certain advantages, because it allows use of certain tools designed for them, and because when weights are normalized, understanding the final influence of the current group does not require knowing weights in other groups on the same vertex.
These tools are provided to aid working with normalized weights:
- Normalize All
In order to start working with normalized weights it is first necessary to normalize the existing weights. The Normalize All tool can be used for that. Make sure to select the right mode and disable Lock Active.
- Auto Normalize
Once the weights are initially normalized, the Auto Normalize option can be enabled to automatically maintain normalization as you paint. This also tells certain tools that the weights are supposed to be already normalized.
- Vertex group locking
Any vertex group can be locked to prevent changes to it. This can be done via the lock icon in the vertex group list, or using bone selection and the locks pie menu.
This setting prevents accidental edits to groups. However, since it is also respected by Auto Normalize, in the normalized weight workflow it has a more significant meaning of locking the current influence of chosen bones, so that when you paint other bones, the weight is redistributed only between the unlocked groups.
In locations affected by more than two bones this allows more precise tweaking and re-balancing of weights by temporarily focusing on a subset of bones. This can also be aided by the Lock Relative option, which displays weights as if re-normalized with the locked groups deleted, thus making it appear as if the locked groups didn’t even exist.
- Multi-Paint
Finally, the Multi-Paint option allows treating multiple selected bones as if they were one bone, so that the painting operations change the combined weight, preserving the ratio within the group. Combined with locking, this allows balancing between one set of bones versus the rest, excluding a third set that has its influence not affected in any way due to locks.
Technically, this option does not require the normalized workflow, but since non-normalized weights can add to more than 1, the weight display behaves best with Auto Normalize enabled.
Astuce
For example, when dealing with a bone loop, e.g. mouth or an eye, selecting the loop with Multi-Paint exposes the falloff between the loop as a whole and surrounding bones, while locking the surrounding bones and using Lock Relative displays the falloff between bones within the loop. Thus the complex two-dimensional falloff of each bone can be viewed and edited as two independent one-dimensional gradients.