Creating Meta-rigs
Add a single bone from the menu.
Go in armature Edit Mode and build the meta rig by samples or Rigify-types.
Define Rigify layers, bone grouping and selection sets.
In the armature properties click on the Generate button to generate the rig.
How Rigify Works
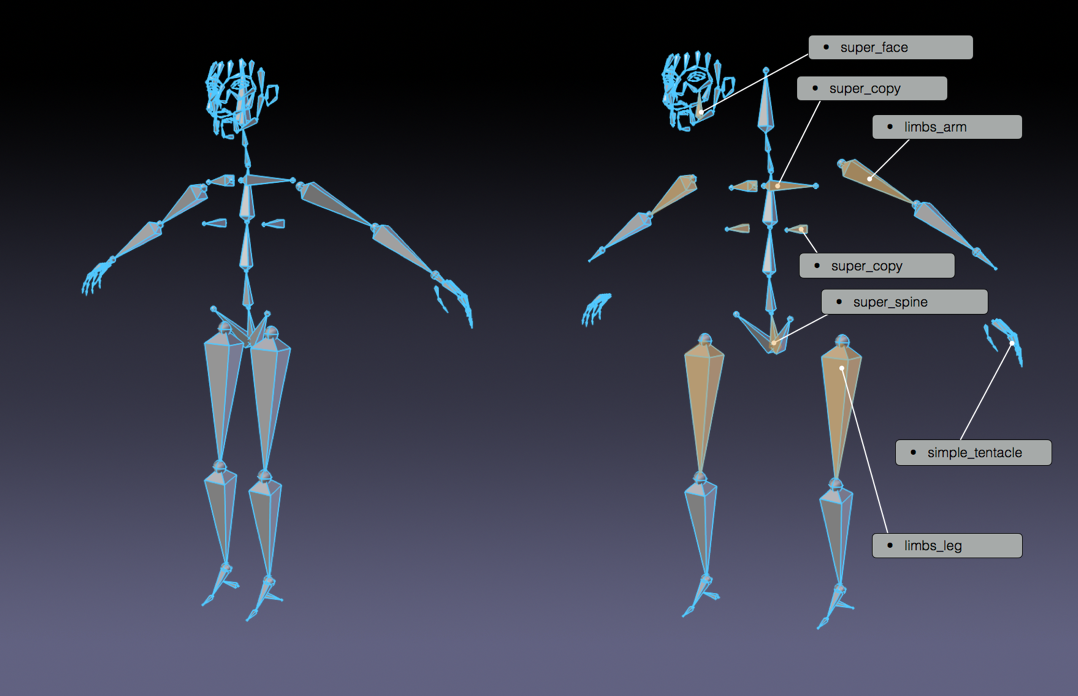
- Rigify Meta-Rigs are split in multiple Sub-Rigs
A meta-rig is an assembly of bone chains. A bone chain is identified by the Connected attribute. Bone chains can be further connected together by parenting them without using the Connected attribute (i.e. using the Keep Offset option while parenting).
- A custom attribute is set on the first bone of the sub-rig chain
Each first bone of a bone chain has a custom attribute on it which is a Rigify custom property that identifies the sub-rig type. At rig generation time Rigify will determine which controls and deform bones will be created processing the meta-rig from the first bone to the last of each chain.

Human meta-rig split by samples.
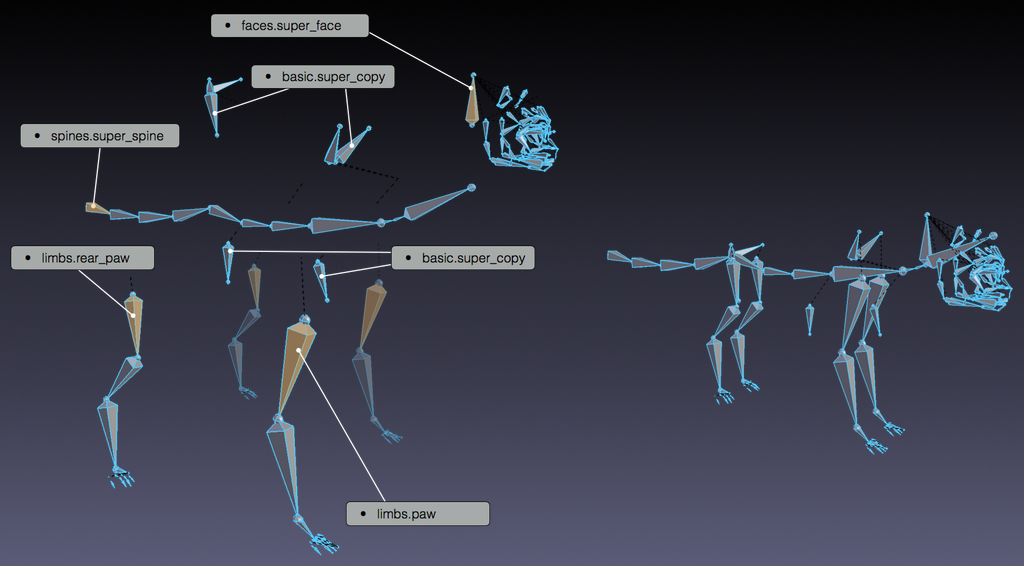
- New meta-rigs are created assembling sub-rigs samples
Since a meta-rig is just a collection of sub-rigs, new meta-rigs can be built assembling sub-rigs in different ways. This way an infinite number of meta-rigs can be built from the same rigging blocks.

Human meta-rig split by samples.
- All the mechanics, deformation bones and widget are created on a single click
The meta-rig contains more information than the visualized bones. In fact at generation time Rigify will identify each sub-rig type and depending on the selected options will create all the sophisticated controls, switches, and deforming bones with a single click.
Creating a new Meta-rig
Add a new Armature Object
Riferimento
- Modalità
Object Mode
- Menu
- Scorciatoia
Shift-A
Building your own meta-rig from scratch requires an armature object to work with. Just add a single bone from the Add menu.
Suggerimento
At this stage naming the newly added armature «meta-rig» is a good idea. You can do it at any time (or not at all) but it’s suggested to do it before going on so it will always be clear on which armature you have to work when editing the meta-rig structure.
Editing the Armature
Now that there is an armature object to work – with the armature selected – enter armature Edit Mode. Building a meta-rig from scratch in Edit Mode can be done in two ways:
Adding rig samples.
Creating bone chains.
Adding Samples (Basic)
Adding samples in Edit Mode is a good way to start building a meta-rig. This way you can become familiar with the available building blocks and how they are meant to be used. To add a rig sample:
Go in the armature tab.
Scroll down to Rigify panel.
Select a sample from the list.
Click on the Add sample button.
Edit the bone positions to match your character.
For the list of available samples, see the Rig Types page.
Using Rig Types (Advanced)
Create your bone chains in Edit Mode.
Assign the correct rig type to the first bone of each chain in Pose Mode.
Nota
Each sub rig has a required number of bones as input. If you are unsure on how to use rig-types properties, add a rig sample to your armature to see how it is supposed to be used.
Custom Root Bone
If the meta-rig contains a bone called «root», it is used as the root control bone instead of creating a new one. This allows changing the rest position of the root bone, assigning a custom widget, or adding custom properties to the bone.
The custom root bone must have no parent, and use the basic.raw_copy sub-rig type or none.
Layers, Bone Groups & Selection Sets
Armature Layers are usually used to isolate bones. Rigify can take advantage of armature layer to generate extra features and the user interface for the final rig. Rigify layers are displayed in a vertical layout inside their own separate panel named Rigify Layer Names.
The first column shows the layer number.
The second column is a display toggle.
This toggle controls the armature layer visibility. It has the same effect of enabling/disabling the layer visibility from the top armature layers menu. It is just redrawn here for a simplicity.
The third column sets a specific layer name to be used to build the rig UI of the final rig. If set, a button with the specified name will be created in the
rig_ui_templateto control the visibility of this specific armature layer. If layer contains at least one bone but its name field is empty, a button with no name will be created in the rig UI.The fourth column defines in which UI row the layer button will be created.
This numbers define the layer ordering in the UI and will ignore the effective layer number. If two layer have the same row number their UI buttons will be created in the same row.
The fifth column is a toggle for the selection set.
If checked a selection set with that name will be created and associated to the final rig.
The sixth column defines the Rigify Bone Grouping.
If Rigify Bone Groups are set, the user can make the association between the bones on the layer and the specified bone group from the list. The controls on the final rig will inherit the bone grouping through this value.
The seventh column displays – if set – the associated bone group name.
In order to use the Bone Groups in the Rigify Layer Names fields, Rigify Bone Groups must be set through the specific panel. Usually this panel is displayed just above Rigify Layer Names panel.
Rigify Bone Groups are used to define bone colors on the final rig. The top two rows of the Rigify Bone Groups panel are used to define the bone colors general behavior. Usually color themes use a gradient of colors to define the different bone states: default, selected and active. When multiple color themes are used in the same rig, identifying which bone is selected or active can be tricky since each color will have its corresponding state.
To override this behavior Rigify Bone Groups unifies the active and selected states with the same color. This is defined by two values:
- Unified Selected/Active Colors
When this option is active adding a bone group in the list will always keep the colors consistent. When a color scheme is added as from a theme, the color scheme is loaded as is. Click on the Apply button to force the system to unify selected and active colors.
- Selected/Active Colors
This two color fields define respectively Selected and Active colors. By default Rigify reads this colors from the theme defined by the user in the Blender preferences. This way the Selected/Active colors can always have a predictable and consistent behavior in the UI. The colors can be customized by clicking on the relative color field. To reset them to the Blender current theme value just click on the button with the update icon.
Bone Groups can be added and deleted as done in the general Bone Group panel
by clicking on the + or - buttons.
All Bone Groups can be deleted at once by clicking on the Specials menu.
To add the predefined Rigify Default Bone Groups list click on Add Standard button.
To add a specific theme with its own color scheme, select it from the list and click on the Add From Theme button.