Draw Brush
Draw brushes are the special type of brushes that uses Grease Pencil for drawing tools. The brush can be changed in the Tool Settings.
The different draw brushes (pencil, Ink, marker, etc.) are settings variations of the same Draw Brush. You can create many brushes, each with unique settings to get different artistic result while drawing.
Tool Settings
Brushes
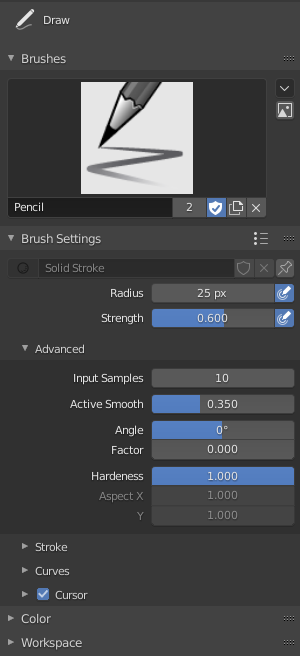
Brush data-block panel.
- Brush
The データブロックメニュー to select a preset brush type or a custom brush.
- Add Brush
When you add a brush, the new brush is a clone of the current one.
- Brush Specials
- Reset Brush
Reset the current brush to its default settings.
- Reset All Brushes
Reset all brushes to their default settings.
- Custom Icon
Allows definition of a custom brush icon.
- Image Path
Defines the path to the image to use as custom icon.
注釈
In order to save a custom brush in a blend-user, enable Fake User.
Brush Settings
- Material
Data-block selector for the material.
- Radius
The radius of the brush in pixels.
F allows you to change the brush size interactively by dragging the mouse/pen or by typing a number then confirm.
- Use Pressure (pressure sensitivity icon)
Uses stylus pressure to control how strong the effect is. The gradient of the pressure can be customized using the curve widget.
- Strength
Control the stroke transparency (alpha). From totally transparent (0.0) to fully opaque (1.0).
You can change the brush strength interactively by pressing Shift-F in the 3D Viewport and then moving the mouse/pen and then LMB. You can also enter the size numerically.
- Use Pressure (pressure sensitivity icon)
Uses stylus pressure to control how strong the effect is. The gradient of the pressure can be customized using the curve widget.
Advanced
- Input Samples
Controls how often the input device is read to generate points on the stroke. Higher values give a higher precision (more points) but produce an irregular stroke, while lower values give a lower precision (fewer points) but produce a soften stroke. (0 disabled extra input device samples.)
You have to set up this value according to your input device to obtain the right balance between accuracy and softness for your strokes. See Input Device for more information.
- Active Smooth
The number of smoothing iterations to apply to the stroke while drawing.
- Angle
Direction of the input device that gives the maximum thickness to the stroke (0° for horizontal).
- Factor
Amount of thickness reduction when the stroke is perpendicular to the Angle value.
- Hardness
Amount of transparency (alpha) to apply from the border of the point to the center. Works only when the brush is using stroke materials of Dot or Box style.
- Aspect Ratio
Controls the width and height of the alpha gradient.
X, Y
Stroke
Post-Processing
Post-processing methods that are executed on the strokes when you finished drawing, right after releasing the LMB or Pen tip. You can toggle the use of post-processing using the checkbox in the section panel header.
- Smooth
Strength of smoothing process on the points location along the stroke.
- Iterations
The number of smoothing iterations to apply to the stroke.
- Subdivision Steps
Number of subdivisions to apply to newly created strokes.
- Simplify
Reduces final points numbers in the stroke with an adaptive algorithm.
- Trim Strokes End
Automatically trim intersection strokes ends.
Randomize
Adds randomness to the position of the points along the stroke. You can toggle the use of Randomize using the checkbox in the section panel header.
- Radius
The amount of randomness to apply using the pressure of the input device.
- Stroke Random (stroke icon)
Use randomness only at stroke level.
- Use Pressure (pressure sensitivity icon)
Uses the stylus pressure to control how strong the effect is. The gradient of the pressure can be customized using the curve widget.
- Strength
The amount of randomness to apply to the stroke strength value (alpha).
- Stroke Random (stroke icon)
Use randomness only at stroke level.
- Use Pressure (pressure sensitivity icon)
Uses the stylus pressure to control how strong the effect is. The gradient of the pressure can be customized using the curve widget.
- UV
The amount of randomness to apply to the UV rotation.
- Stroke Random (stroke icon)
Use randomness only at stroke level.
- Use Pressure (pressure sensitivity icon)
Uses the stylus pressure to control how strong the effect is. The gradient of the pressure can be customized using the curve widget.
- Hue, Saturation, Value
Randomizes the hue, saturation, and value of the stroke's Color.
- Stroke Random (stroke icon)
Use randomness only at stroke level.
- Use Pressure (pressure sensitivity icon)
Uses the stylus pressure to control how strong the effect is. The gradient of the pressure can be customized using the curve widget.
- Jitter
The amount of jittering to add to the stroke.
- Stroke Random (stroke icon)
Use randomness only at stroke level.
- Use Pressure (pressure sensitivity icon)
Uses the stylus pressure to control how strong the effect is. The gradient of the pressure can be customized using the curve widget.
Stabilize Stroke
Stabilize Stroke helps to reduce jitter of the strokes while drawing by delaying and correcting the location of points. You can toggle the use of Stabilize Stroke using the checkbox in the section panel header.
- Radius
Minimum distance from the last point before the stroke continues.
- Factor
A smooth factor, where higher values result in smoother strokes but the drawing sensation feels like as if you were pulling the stroke.
Cursor
The cursor can be disabled by toggling the checkbox in the Cursor header.
- Show Fill Color While Drawing
Shows the brush linked material color in the viewport.