Timeline
Timeline エディタは、時計のアイコンで示され、キーフレームを操作し、プレイヘッドをスクラブするために使用されます。

Timeline 。
Timeline を使用すると現在のフレームやアクティブオブジェクトのキーフレーム、アニメーションシーケンスの開始フレームと終了フレーム、およびユーザーが設定したマーカーが表示され、それによりシーンのアニメーションの概要を把握できます。
Timeline には、アニメーションシーケンスを再生、一時停止、およびスキップするための Transport コントローラ が含まれています。
また、 Keyframe、Keying Set および Marker を操作するためのツールが含まれています。
メインビュー
Timeline のメインリージョン には、時間に沿ったアニメーションフレームが表示されます。

Keyframe (ダイヤモンドの形)、Playhead (青いハンドル)、Scrollbar (下に横たわるボタン) があります。
ビューの調整
Timeline は、MMB を押したままを左右にドラッグすることで、その領域をパンすることができます。
Timeline をズームするには Ctrl-MMB や Wheel 、または NumpadMinus や NumpadPlus を使用します。
エディターの下部または右側にあるスクロールバーを使用して、ビューをパンおよびズームすることもできます。
プレイヘッド
Playhead は、現在のフレーム番号が上に書かれている青い縦線です。

プレイヘッド。
Playhead は、タイムライン上部にあるスクラブ領域内で LMB を押すか、押したまま左右にドラッグすることで、新しい位置に移動できます。
Left または Right を押すことで Playhead を 1 フレーム単位で移動させることができます。また、Shift-Left または Shift-Right を押すことで、先頭または最終フレームにジャンプできます。
フレームレンジ
デフォルトでは、Frame Range はフレーム 1 で始まり、フレーム 250 で終了するように設定されています。Frame Range は、タイムラインのヘッダー右上または Output Properties で変更できます。
キーフレーム
選択がアクティブになっているオブジェクトは、Keyframe が菱形で表示されます。
Keyframe はクリックによる単一選択、Shift を押したままでのクリックによる複数選択、キーフレームの周りを矩形にドラッグすることでの複数選択が可能です。選択後、単一のキーはドラッグで、複数のキーは G で移動できます。また、S で複数キーのスケーリングができます。
Timeline --> View --> Only Selected Channels を有効にすることで、選択した対象のチャンネルのみが表示 されます。Armature の場合はオブジェクトの Keyframe と、ポーズモードで選択されているボーンの Keyframe が表示されます。
マーカー
詳細については Markers page を参照してください。
ヘッダー
ポップオーバー
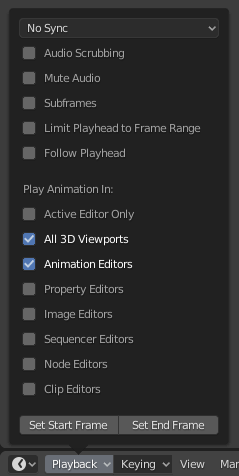
Playback ポップオーバー

Playback ポップオーバーには、アニメーションの再生を制御するオプションが含まれています。
- Audio
- Sync Mode

3D Viewport red FPS.
When you play an animation, the frame rate is displayed at the top left of the 3D Viewport. If the scene is detailed and playback is slower than the set Frame Rate (see Dimensions Panel), these options are used to synchronize the playback.
- No Sync
同期させず、すべてのフレームを再生します。
- Frame Dropping
Playback が遅すぎる場合に、フレームを飛ばします。
- AV-sync
(Audio/Video 同期) 。オーディオクロックに同期させ、Playback が遅い場合にはフレームを飛ばします。
- Scrubbing
アニメーションにサウンドが含まれる場合にはこのオプションにより、Playhead を LMB またはキーボードの矢印で移動させている間、サウンドのビットを再生します。(Playhead を操作する感覚です) 。
- Mute
オーディオソースからのサウンドをミュートします。
- Playback
- Limit Playback to Frame Range
マウスを使用した再生範囲外フレームの選択をできなくします。
- Follow Current Frame
Animation editors can be setup to always follow the time indicator as animation is being played back. Following will be done when animating and changing frame: When the cursor reaches the end of the screen, the next range of frames of the same width will be displayed.
- Play In
- Active Editor
Animation Editors および All 3D Viewports が無効になっている場合、再生中に Timeline を更新します。
- 3D Viewport
While playing, updates the 3D Viewport and the Timeline.
- Animation Editors
再生中に Timeline、Dope Sheet、Graph Editor、Video Sequencer を更新します。
- Image Editor
Image Editor の Mask モードの更新をします。
- Properties Editor
アニメーションの再生中に、UI のプロパティ値が更新されます。
- Movie Clip Editor
再生中に Movie Clip Editor を更新します。
- Node Editors
再生中にノード エディタ内の、ノードのプロパティを更新します。
- Video Sequencer
再生中に Video Sequencer を更新します。
- Show
- Subframes
Display and allow changing the current scene subframe.
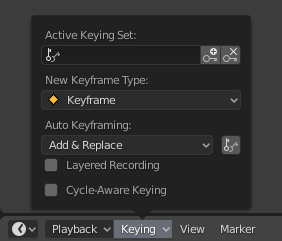
Keying ポップオーバー

Keying ポップオーバーには、Keyframe の挿入に関係するオプションがあります。
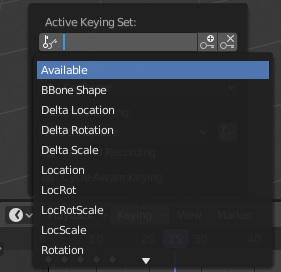
- Active Keying Set

Timeline Keying Set 。
Keying Set は、複数の Keyframe チャンネルを 1 つにまとめたものです。これを使用することで、複数のプロパティに対して同時に値を記録させることができます。Keying Set が選択されている状態で Keyframe の挿入を行うと、Blender により、選択中の Keying Set に登録されている全てのプロパティに Keyframe が挿入されます。Keying Set は LocRotScale など、予め登録済みのものがいくつかある他、Properties --> Scene --> Keying Sets + Active Keying Set のパネル内で定義できます。
- Insert Keyframes (プラスアイコン)
アクティブな Keying Set のプロパティに対し、カレントフレームへ Keyframe を挿入します。
- Delete Keyframes (マイナスアイコン)
アクティブな Keying Set のプロパティから、カレントフレームの Keyframe を削除します。
- New Keyframe Type
挿入する Keyframe Types を指定します。
Auto Keying Popover

Timeline の Auto Keyframe 。
The record button (⏺) enables Auto Keyframe: It will add and/or replace existing keyframes for the active object when you transform it in the 3D Viewport. For example, when enabled, first set the Playhead to the desired frame, then move an object in the 3D Viewport, or set a new value for a property in the UI.
When you set a new value for the properties, Blender will add keyframes on the current frame for the transform properties. Other use cases are Fly/Walk Navigation to record the walk/flight path and Lock Camera to View to record the navigation in camera view.
注釈
Note that Auto Keyframe only works for transform properties (objects and bones), in the 3D Viewport (i.e. you can't use it e.g. to animate the colors of a material in the Properties...).
- Add & Replace / Replace
Auto Keyframe モード時の動作を設定します。同時に有効にできるモードは 1 つだけです。
- Add & Replace
Keyframe の追加または置き換えをします。
- Replace
既存 Keyframe への置き換えのみを行います。
- Only Active Keying Set
When enabled, new keyframes for properties will be inserted into the active Keying Set.
- Layered Recording
Adds a new NLA Track and strip for every loop/pass made over the animation to allow non-destructive tweaking.
- Cycle-Aware Keying
Trivially cyclic curves に対して Keyframe を挿入する時、Cycle の整合性を保ったままハンドルが適用されます。(既存の Cycle を微調整する際にとても便利です):
キー挿入を Cycle の基本周期の外側で行った際に、周期の内側へのキー挿入に変換されます。
片方の端点でキーを上書きすると、もう片方の端点も適切に更新されます。
ヘッダー
Timeline ヘッダーのコントローラ。

Timeline ヘッダーのコントローラ。
1. Popovers for Playback and Keying, 2. Transport Controls, 3. Frame Controls
Transport コントローラ
各ボタンは Playhead の設定、再生、逆送りに使用されます。

Transport コントローラ。
- Jump to Start (❙⏴) Shift-Left
カーソルをフレーム範囲の先頭に位置させます。
- Jump to Previous Keyframe (◆⏴) Down
カーソルを前の Keyframe の場所へ移動させます。
- Rewind (◀) Shift-Ctrl-Spacebar
アニメーションシーケンスを逆方向に再生します。ボタンを押すと、表示が Pause に切り替わります。
- Play (▶) Spacebar
アニメーションシーケンスを再生します。ボタンを押すと、表示が Pause に切り替わります。
- Jump to Next Keyframe (⏵◆) Up
カーソルを次の Keyframe の場所へ移動させます。
- Jump to End (⏵❙) Shift-Right
カーソルをフレーム範囲の末尾に位置させます。
- Pause (⏸) Spacebar
アニメーションを停止させます。
Frame コントローラ
- Current Frame Alt-Wheel
Animation/Playback の範囲での、現在のフレームです。Playhead の位置でもあります。
- Preview Range (時計アイコン)
全体ではなく狭い範囲をプレビューするために使用される、一時的な Frame Range です。プレビュー範囲はビューポートのみに影響し、レンダリングの出力には影響しません。Preview Range を参照してください。
- Start Frame
Animation/Playback 範囲の先頭フレームです。
- End Frame
Animation/Playback 範囲の最終フレームです。

