Layout Workflow
Transferring UV Maps
You can copy a UV map from one mesh to another mesh provided both meshes have the same geometry/vertex order. This is useful for example when you want to recreate a UV map from an earlier version of your model with intact UVs. This works by:
Select the target mesh (to which you want to copy the UV map).
Shift select the source mesh (that contains the intact UV map).
(Shortcut: Ctrl-L ...).
The target mesh will now have a UV map that matches the original mesh.
Multiple UV Maps
You are not limited to one UV map per mesh. You can have multiple UV maps for parts of the mesh by creating new UV maps. This can be done by clicking the Add button next to UV maps list and unwrapping a different part of the mesh. UV maps always include the whole mesh.
Optimizing the UV Layout
When you have unwrapped, possibly using seams, your UV layout may be quite disorganized and chaotic. You may need to proceed with the following tasks: Orientation of the UV mapping, arranging the UV maps, stitching several maps together.
The next step is to work with the UV layouts that you have created through the unwrap process. If you do add faces or subdivide existing faces when a model is already unwrapped, Blender will add those new faces for you. In this fashion, you can use the UV texture image to guide additional geometry changes.
When arranging, keep in mind that the entire view is your workspace, but only the UV coordinates within the grid are mapped to the image. So, you can put pieces off to the side while you arrange them. Also, each UV unwrap is its own linked set of coordinates.
You can lay them on top of one another, and they will onion skin (the bottom one will show through the top one). To move only one though, RMB select one of the UV coordinates, and use , Ctrl-L to select connected UVs, not box select because UVs from both will be selected.
Combining UV Maps
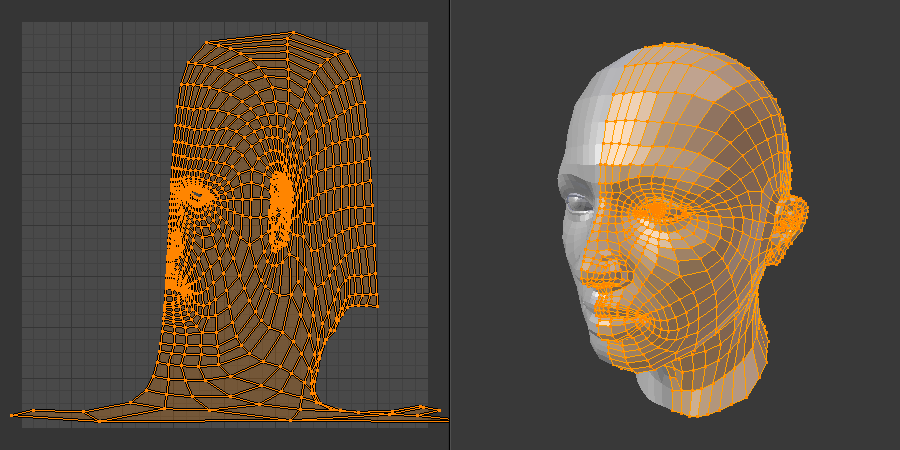
Bad unwrap, note ear and neck.
Very often you will unwrap an object, such as the face example we have been using, and get it "mostly right" but with parts of the mesh that did not unwrap properly, or are horribly confusing. The picture to the right shows an initial unwrap of the face using the Unwrap from sphere option. The issues are with the ear; it is just a mush of UVs, and the neck, it is stretched and folded under. Too much work to clean up.
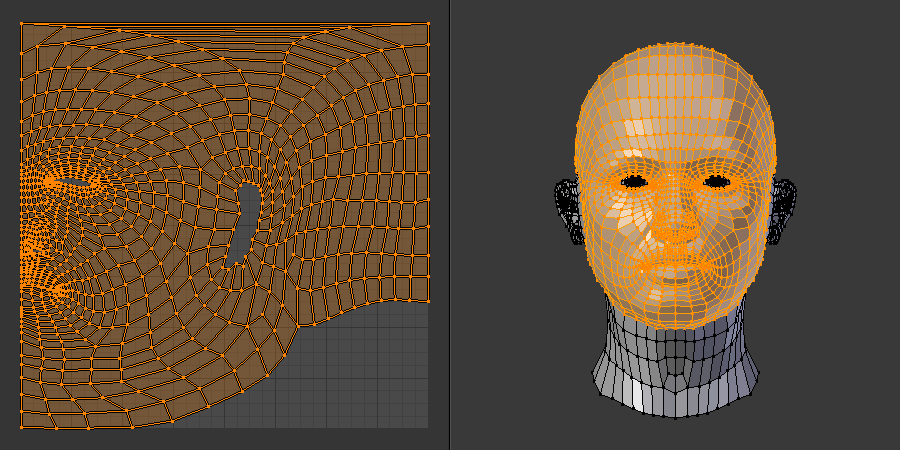
Unwrap face only, without ear or neck.
We can tell that the ear would unwrap nicely with just a straightforward projection from the side view, and the neck with a tubular unwrap. So, our general approach will be to unwrap different parts of the object (face, ears, and so on) using different unwrap tool, selecting each tool according to which one works best for that part. So let us begin: We select only the "face" faces, unwrap them using the Sphere projection, and scale and rotate them a bit to fit logically within the image area of the UV Editor.
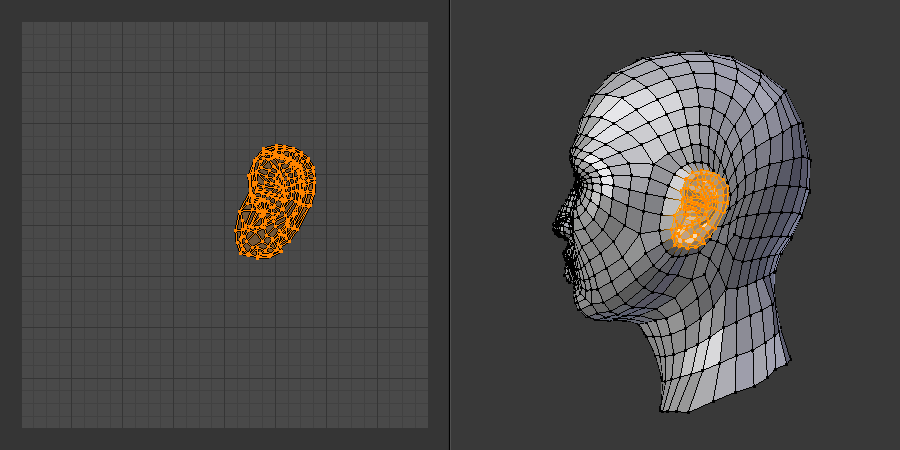
Unwrap ear only, using Project from View.
Once we are satisfied with the face, it is time to turn our attention to the ear. First, unselect the faces you were working with. Their UVs will disappear from the UV Editor, but they are still there, just not shown. (To verify this, you can select a few faces in 3D Viewport and it will show up in the UV Editor.)
To work on the ear, in the 3D Viewport, we now select only the "ear" faces. You can use vertex groups to select the ear faces. Selecting sub-meshes is easy too, since they are not connected to the rest of the mesh. Simply selecting linked vertices will select that entire submesh. Basically, since you are in Edit Mode, all the selecting/deselecting features are available to you.
Now unwrap the ear again using the Project tool from side view, and scale and rotate them a bit (discussed in the next section), and place them off to the side. You can do this repetitively, using different unwrapping algorithms; each re-apply just puts those UVs for the selected faces somewhere else. Choose the tool for each part that gives you the best fit and most logical layout for subsequent painting of that part.
When all parts of the mesh have been unwrapped using the various methods, you should end up with something that looks like the example to the right. All sections of the mesh have been mapped, and all those maps are laid out in the same UV texture map. Congratulations! From here, it is a simple matter of "stitching" (discussed in the next section) to construct the entire UV map as a single map.
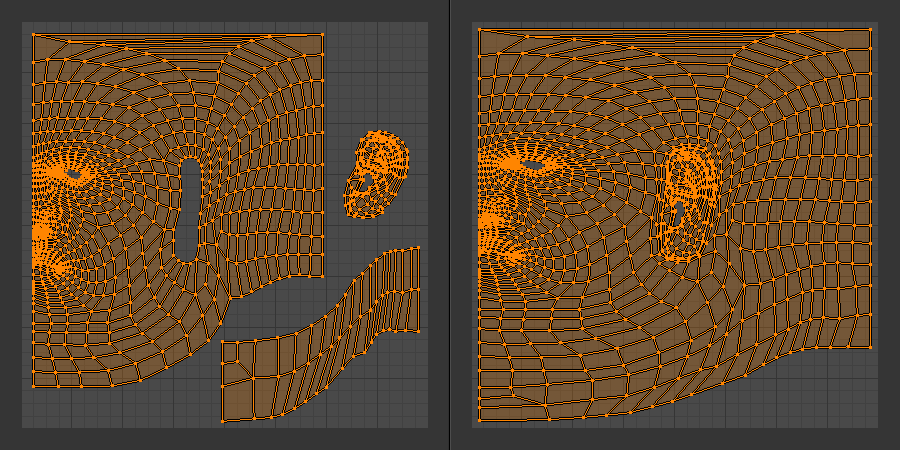
UV maps arranged together and stitched.
When you have completed arranging and stitching, you will end up with a consolidated UV map, like that shown to the right, arranged such that a single image will cover, or paint, all of the mesh that needs detailed painting. All the detailed instructions on how to do this are contained in the next section. The point of this paragraph is to show you the ultimate goal. Note that the mesh shown is Mirrored along the Z axis, so the right side of the face is virtual; it is an exact copy of the right, so only one set of UVs actually exist. (If more realism is desired, the Mirror Modifier would be applied, resulting in a physical mirror and a complete head. You could then make both side physically different by editing one side and not the other. Unwrapping would produce a full set of UVs (for each side) and painting could thus be different for each side of the face, which is more realistic).
Iteration & Refinement
At least for common people, we just do not "get it right the first time." It takes building on an idea and iterating our creative process until we reach that magical milestone called "Done". In software development, this is called the 'spiral methodology'.
Applied to computer graphics, we cycle between modeling, texturing, animating, and then back to making modifications to mesh, UV mapping, tweaking the animation, adding a bone or two, finding out we need a few more faces, so back to modeling, etc. We continue going round and round like this until we either run out of time, money, or patience, or, in rare cases, are actually happy with our results.
Refining the Layout
Refinement comes into play when we finally look at our character, and realize that we need more detail in a particular spot. For example, areas around the eyes might need crow's feet, or we need to add a logo to the vest. As you start to edit the image, you realize that there just are not enough pixels available to paint the detail that you want.
Your only choice is to expand the size (scale out) that UV face. Using the Minimize Stretch or Scale tools, you expand the UV faces around the eyes or chest, allocating more pixels to those areas, but at the same time taking away pixels (detail) from somewhere else, like the back of the head. After refining the UV map, you then edit the image so that it looks right and contains the details you want.
Reusing Textures
Another consideration is the need to conserve resources. Each image file is loaded in memory. If you can reuse the same image on different meshes, it saves memory. So, for example, you might want to have a generic face painting, and use that on different characters, but alter the UV map and shape and props (sunglasses) to differentiate.
You might want to have a "faded blue jeans" texture, and unwrap just the legs of characters to use that image. It would be good to have a generic skin image, and use that for character's hands, feet, arms, legs, and neck. When modeling a fantasy sword, a small image for a piece of the sword blade would suffice, and you would Reset Unwrap the sword faces to reuse that image down the length of the blade.