はじめに
Brush cursor.
Brush Control
F ブラシのサイズを変更
Shift-F ブラシのstrength(強さ)の変更
Rotate brush texture Ctrl-F
Invert stroke toggle Ctrl
You can then either adjust the value interactively or by typing in numbers. After pressing the hotkey move the mouse to increase/reduce the value (additionally with precision and/or snapping activated). Finally confirm (LMB, Return) or cancel (RMB, Esc).
Selection Masking(選択マスク)
If you have a complex mesh, it is sometimes not easy to paint on all vertices. Suppose you only want to paint on a small area of the Mesh and keep the rest untouched. This is where "selection masking" comes into play. When this mode is enabled, a brush will only paint on the selected vertices or faces. The option is available from the header of the 3D Viewport (see icons surrounded by the yellow frame):

You can choose between Face Selection masking (left button) and Vertex selection masking (right button).
Selection masking(選択マスク) には通常のペイントモードには無い利点がいくつかあります:
モディファイアがアクティブな状態でも、元のメッシュの辺が表示されます。
You can select faces to restrict painting to the vertices of the selected faces.
Details About Selecting(選択の詳細)
以下の標準的なオペレーションがサポートされています:
RMB -- Single faces. Use Shift-RMB to select multiple.
A -- All faces, also to deselect.
B -- ボックス選択。
C -- ブラシでの円選択。
L -- Pick linked (under the mouse cursor).
Ctrl-L -- Select linked.
Ctrl-I -- Invert selection Inverse.
Vertex Selection Masking(頂点選択マスク)
参照
- Mode(モード)
頂点ペイントとウェイトペイントモード
- ヘッダー
- ショートカットキー
V
このモードでは1つ以上の選択をした頂点だけにペイントすることが出来ます。全ての選択されていない頂点は意図しない変更から守られます。
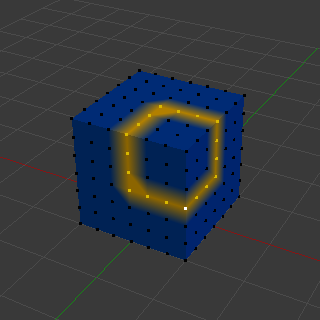
Vertex Selection Masking(頂点選択マスク)。
Face Selection Masking(面選択マスク)
参照
- Mode(モード)
テクスチャペイント、頂点ペイント、ウェイトペイントモード
- ヘッダー
面選択マスクは頂点選択マスクととても似ており、ペイントする範囲を選択した面だけに制限することが出来ます。
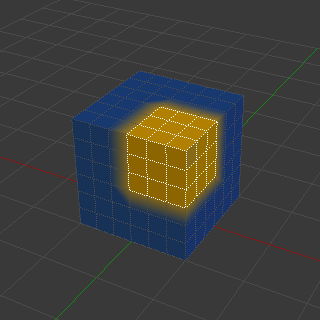
Face Selection Masking(面選択マスク)。
Hide/Unhide Faces(面の非表示/再表示)
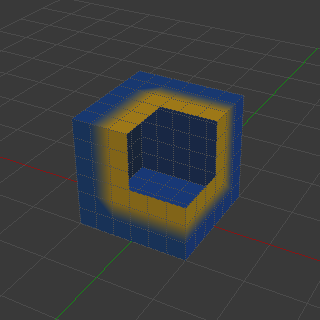
非表示になっている面。
エディトモードでキーボードショートカット H を用いて選択した面を非表示にできます。その上で見えている残りの面にペイントをし、 Alt-H で非表示になっていた面を再表示できます。
Hide/Unhide Vertices(頂点の非表示/再表示)
You cannot directly hide selected faces in vertex mask selection mode. However, you can use a trick:
First go to Face selection mask mode.
Select the areas you want to hide and then hide the faces (as explained above).
Switch back to Vertex Selection mask mode.
Now the vertices belonging to the hidden Faces will remain hidden.
The Clipping Region
To constrain the paint area further you can use the Clipping Region. Press Alt-B and LMB-drag a rectangular area. The selected area will be "cut out" as the area of interest. The rest of the 3D Viewport gets hidden.
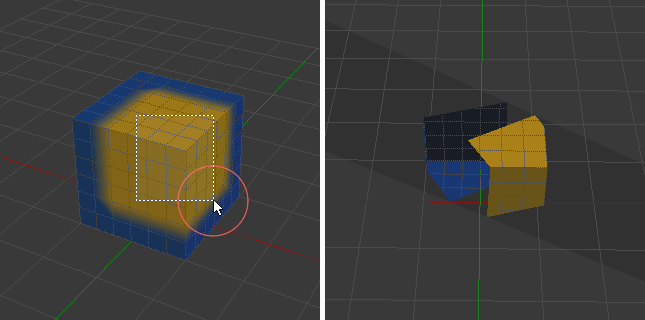
The Clipping Region is used to select interesting parts for local painting.
You make the entire mesh visible again by pressing Alt-B a second time.
All paint tools that use the view respect this clipping, including box select, and of course brush strokes.