Introduction
Blender includes advanced physics simulation in the form of the Bullet Physics Engine (Bullet Physics). Most of your work will involve setting the right properties on the objects in your scene, then you can sit back and let the engine take over. The physics simulation can be used for games, but also for animation.
The Blender Game Engine (BGE) is based on rigid body physics, which differs significantly from the complementary set of tools available in the form of soft body physics simulations. Though the BGE does have a soft body type, it is not nearly as nuanced as the non-BGE soft body. The inverse is even more true: it is difficult to get the non-BGE physics to resemble anything like a stiff shape. Rigid body physics does not have, as an effect or a cause, any mesh deformations. For a discussion on how to partially overcome this, see: Mesh Deformations.
Global Options
The global Physics Engine settings can be found in the World Properties, which include the Gravity constant and some important engine performance tweaks.

Material Physics
Physics can be associated with a material on the material properties tab. These are settings that one would normally associate with a material, such has its friction and they are meant to be used in conjunction with the object physics settings, not replace it.
Constraints
It is imperative to understand that the Blender constraints generally do not work inside the BGE. This means interesting effects such as Copy Rotation are unavailable directly.
Your options include:
- Parenting – But not Vertex Parenting.
- Rigid Body Joint –
This is the one constraint that you can set up through the UI that works in the BGE.
It has several options, and can be very powerful – see ITS page for a detailed description and demo blend-file.
Do not forget that you can loop through objects using
bpyinstead of clicking thousands of times to set up chains of these constraints. - Rigid body joints on-the-fly –
You can add/remove them after the BGE starts by using
bge.constraints.createConstraint(). This can be good either to simply automate their setup, or to truly make them dynamic. A simple demo can be viewed in: BGE-Physics-DynamicallyCreateConstraint.blend - Python Controllers – As always, in the BGE,
you can get the most power when you drop into Python and start toying with the settings directly.
For instance, the Copy Rotation mentioned above is not hard –
All you have to do is something to the effect of
own.worldOrientation = bge.logic.getCurrentScene().objects['TheTargetObject'].worldOrientation
Visualizing Physics

Go to to show lines representing various attributes of the Bullet representation of your objects. Note that these might be easier to see when you turn on Wireframe Mode Z before you press P. Also note that you can see how the Bullet triangulation is working (it busts all your Quads to Tris at run-time, but the BGE meshes are still quads at run-time).
- RGB/XYZ Widget – Representing the object’s Local Orientation and Origin.
- Green – «sleeping meshes» that are not moving, saving calculations until an external event «wakes» them.
- White – White lines represent active bounding meshes at are undergoing physics calculations, until such calculations are so small that the object is put to rest. This is how you can see the effects of the Collision Bounds. - Thick, or Many White Lines – A compound collision mesh/meshes.
- Violet – Bounding meshes for soft bodies.
- Red – The bounding box, the outer boundary of object. It is always aligned with global X, Y and Z, and is used to optimize calculations. Also represents meshes that have been forced into «no sleep» status.
- Yellow – Normals.
- Black – When in wireframe, this is your mesh’s visual appearance.
If you want finer-grained control over the display options, you can add this as a Python Controller and uncomment whichever pieces you want to see:
import bge
debugs = (
    bge.constraints.DBG_DRAWAABB,
    )
for d in debugs:
   bge.constraints.setDebugMode(d)
For all debug modes, API docs for bge.constraints.
Show Framerate and Profile
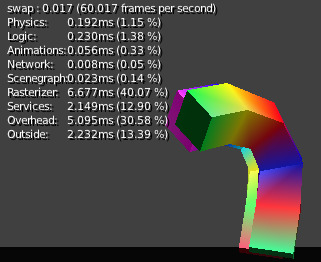
A shot of Manual-BGE-Physics-DancingSticks.blend with enabled.
If you enable , it will put some statistics in the upper left area of the game window.
Se også
These can be very informative, but also a bit cryptic. Moguri has elaborated on their meanings, for us: Moguri’s blog.
Mesh Deformations
As mentioned above, rigid body physics do not affect mesh deformations, nor do they account for them in the physics model. This leaves you with a few options:
Actions
To use an Action Actuator
to do the deformation, you have to make a choice. If you use shape keys in the Action,
you will be fine as far as the overall collisions (but see below for the note on reinstancePhysicsMesh()).
The mesh itself is both a display and a physics mesh, so there is not much to configure.
To use an armature as the deformer will require a bit of extra thought and effort. Basically the armature will only deform a mesh if the armature is the parent of that mesh. But at that point, your mesh will lose its physics responsiveness, and only hang in the air (it is copying the location/rotation of the armature). To somewhat fix this you can then parent the armature to a collision mesh (perhaps a simple box or otherwise very low-poly mesh). This «Deformation Mesh» will be the physics representative, being type: Dynamic or Rigid Body, but it will be set to Invisible. Then «display mesh» will be the opposite set to No Collision, but visible. This still leaves the problem mentioned in the previous paragraph.
When you deform a display mesh, it does not update the corresponding physics mesh.
You can view this evidently when you
enable physics visualization (Visualizing Physics) – the collision bounds will remain exactly as when they began.
To fix this, you must call own.reinstancePhysicsMesh() in some form.
Currently this only works on Triangle Mesh bounds, not Convex Hull.
We have prepared a demonstration file in
Manual-BGE-Physics-DancingSticks.blend.
Note that, we had to increase
the to make the collisions work well.
The more basic case is the case of a shape-keyed Action, which you can see in the back area of the scene.
Since it is the only object involved, you can call reinstancePhysicsMesh() unadorned,
and it will do the right thing.
The more complicated case is the cluster,
which you can see in the front of the scene.
What it does in the blend-file is call reinstancePhysicsMesh(viz),
that is, passing in a reference to the visual mesh.
If we tried to establish this relationship without the use of Python,
we would find that Blender’s dependency check system would reject it as a cyclic setup.
This is an example of where Blender’s checking is too coarsely-grained,
as this circle is perfectly valid: the grandparent object (the collision mesh)
controls the location/rotation, while the middle object (the armature)
receives the animated Action, where the child (the Display Mesh) receives the deformation,
and passes that on up to the top, harmlessly. Something to note is that the collision mesh is
merely a plane – that is all it requires for this,
since it will be getting the mesh data from viz.
Ragdolls
A third option is to create your items out of many sub-objects, connected together with rigid body joints or similar. This can be quite a bit more work, but the results can be much more like a realistic response to collisions. For an add-on that can help you out in the process, check out the Blender Ragdoll Implementation Kit.
Digging Deeper
Sometimes you will want to look at:
- The main Bullet Physics page
- The Bullet Wiki
- The Bullet API Docs
- The Bullet Forums
Recording to Keyframes
Beyond gaming, sometimes you wish to render a complex scene that involves collisions, multiple forces, friction between multiple bodies, and air drag or even a simple setup that is just easier to achieve using the real-time physics.
Blender provides a way to ’’bake’’ or ’’record’’ a physics simulation into keyframes allowing it then to be played as an action either for animation or games. Keep in mind that the result of this method is a recording, no longer a simulation. This means that the result is completely deterministic (the same every time it is run) and unable to interact with new objects that are added to the physics simulation after it was recorded. This may, or not, be desired according to the situation.
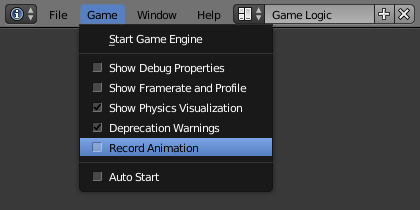
Menu to record Keyframes to the Dope Sheet.
All you have to do to achieve this effect is go to the Info Editor (the bar at the top of the window) , and it will lock away your keyframes for use in Blender Render mode. You can go back to the 3D View and press Alt-A to play it back, or Ctrl-F12 to render it out as an animation.
Note that you can also use Game Logic Bricks and scripting. Everything will be recorded.
Keyframe Clean-up
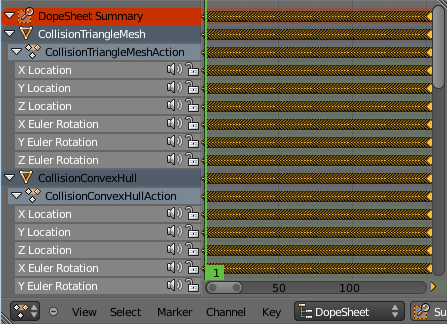
Resulting recorded animation.
Record Animation keys redundant data (data that was did not change relative to the last frame). Pressing O while in the Dope Sheet will remove all superfluous keyframes. Unwanted channels can also be removed.
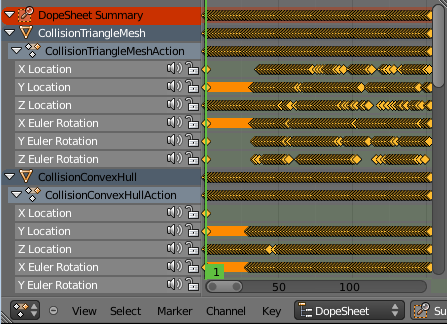
Cleaned up recording.
Exporting
.bullet / Bullet Compatible Engines
You can snapshot the physics world at any time with the following code:
import bge
bge.constraints.exportBulletFile("test.bullet")
This will allow importing into other Bullet-based projects. See the Bullet Wiki on Serialization for more.