Screens
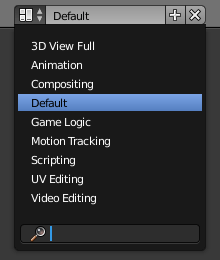
The Screen data-block menu with pop-up.
Screens are essentially predefined window layouts. Blender’s flexibility with areas lets you create customized working environments for different tasks such as modeling, animating, and scripting. It is often useful to quickly switch between different environments within the same file. See area controls for how to move frame borders, split and consolidate areas.
The Screen data-block menu, that lets you select the layouts, is located in the Info Editors header.
Controls
- Screen Layout
- A list of available Screen layouts. See Default Screens.
- Add
+ - Click on the Add button and a new frame layout will be created based on your current layout.
- Delete
X - You can delete the selected screen by using the Delete button.
Hint
By default, each screen layout ’remembers’ the last scene it was used on. Selecting a different screen layout will switch to the layout and jump to that scene.
Shortcuts
To cycle between screens use Ctrl-Right and Ctrl-Left.
Obs
On macOS you may need to disable the shortcuts for «Mission Control» in your computer’s preferences. These can be found in .
Default Screens
| 3D View Full: | A full screen 3D View, used to preview your scene. |
|---|---|
| Animation: | Making actors and other objects move about, change shape or color, etc. |
| Compositing: | Combining different parts of a scene (e.g. background, actors, special effects) and filter them (e.g. color correction). |
| Default: | The default layout used by Blender for new files. Useful for modeling new objects. |
| Game Logic: | Planning and programming of games within Blender. |
| Motion Tracking: | |
| Used for motion tracking with the Movie Clip editor. | |
| Scripting: | Documenting your work and/or writing custom scripts to automate Blender. |
| UV Editing: | Flattening a projection of an object mesh in 2D to control how a texture maps to the surface. |
| Video Editing: | Cutting and editing of animation sequences. |
Save and Override
The screen layouts are saved in the blend-file. When you open a file, enabling the Load UI in the File Browser indicates that Blender should use the file’s screen layouts and overriding the current layout. See Load UI.
A custom set of screen layouts can be saved as a part of the Startup File.
Additional Layouts
As you become more experienced with Blender, consider adding some other screen layouts to suit your workflow as this will help increase your productivity. Some examples could include:
| Modeling: | Four 3D Views (top, front, side and perspective), Properties editor for Editing. |
|---|---|
| Lighting: | 3D Views for moving lights, UV/Image editor for displaying Render Result, Properties editor for rendering and lamp properties and controls. |
| Materials: | Properties editor for Material settings, 3D View for selecting objects, Outliner, Library script (if used), Node Editor (if using Node-based materials). |
| Painting: | UV/Image Editor for texture painting image, 3D View for painting directly on object in UV Face Select mode, three mini-3D Views down the side that have background reference pictures set to full strength, Properties editor. |