Naming
Reference
| Mode: | Edit Mode |
|---|---|
| Panel: | , |
You can rename your bones, either using the name field of the Item panel in the 3D Views, for the active bone, or using the name field in each bone of the Bones tab in Edit Mode.
Blender also provides you some tools that take advantage of bones named in a left/right symmetry fashion, and others that automatically name the bones of an armature. Let us look at this in detail.
Naming Conventions
Naming conventions in Blender are not only useful for you in finding the right bone, but also to tell Blender when any two of them are counterparts.
In case your armature can be mirrored in half (i.e. it is bilaterally symmetrical), it is worthwhile to stick to a left/right naming convention. This will enable you to use some tools that will probably save you time and effort (like the X-Axis Mirror editing tool).
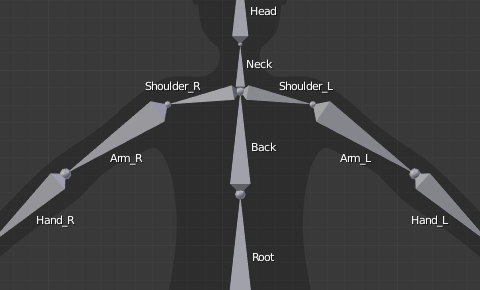
An example of left/right bone naming in a simple rig.
First you should give your bones meaningful base-names, like «leg», «arm», «finger», «back», «foot», etc.
If you have a bone that has a copy on the other side (a pair), like an arm, give it one of the following separators:
- Left/right separators can be either the second position «L_calfbone» or last-but-one «calfbone.R»
- If there is a lower or upper case «L», «R», «left» or «right», Blender handles the counterpart correctly. See below for a list of valid separators. Pick one and stick to it as close as possible when rigging; it will pay off.
Examples of valid separators:
- (nothing): handLeft –> handRight
_(underscore): hand_L –> hand_R.(dot): hand.l –> hand.r-(dash): hand-l –> hand-r- `` `` (space): hand LEFT –> hand RIGHT
Obs
Note that all examples above are also valid with the left/right part placed before the name. You can only use the short «L»/ «R» code if you use a separator (e.g. «handL»/ «handR» will not work!).
Before Blender handles an armature for mirroring or flipping, it first removes the number extension, e.g. «.001».
You can copy a bone named «bla.L» and flip it over using . Blender will name the copy «bla.L.001» and flipping the name will give you «bla.R».
Flip Name
Reference
| Mode: | Edit Mode |
|---|---|
| Menu: | , |
You can flip left/right markers (see above) in selected bone names, using . This can be useful if you have constructed half of a symmetrical rig (marked for a left or right side) and duplicated and mirrored it, and want to update the names for the new side. Blender will swap text in bone names according to the above naming conventions, and remove number extensions if possible.
AutoName
Reference
| Mode: | Edit Mode |
|---|---|
| Menu: | , , |
The three AutoName entries of the Armature and Specials menu W allow you to automatically add a suffix to all selected bones, based on the position of their root relative to the armature center and its local coordinates:
- AutoName Left/Right
- will add the «.L» suffix to all bones with a positive X-coordinate root, and the «.R» suffix to all bones with a negative X-coordinate root. If the root is exactly at 0.0 on the X axis, the X coordinate of the tip is used. If both joints are at 0.0 on the X axis, the bone will just get a period suffix, with no «L»/ «R» (as Blender cannot decide whether it is a left or right bone…).
- AutoName Front/Back
- will add the «.Bk» suffix to all bones with a positive Y-coordinate root, and the «.Fr» suffix to all bones with a negative Y-coordinate root. The same as with AutoName Left-Right goes for 0.0 Y-coordinate bones…
- AutoName Top/Bottom
- will add the «.Top» suffix to all bones with a positive Z-coordinate root, and the «.Bot» suffix to all bones with a negative Z-coordinate root. The same as with AutoName Left-Right goes for 0.0 Z-coordinate bones…