Aproximar pesos dos vértices
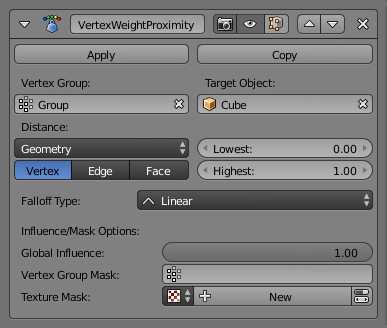
O painel do modificador Aproximar pesos dos vértices.
This modifier sets the weights of the given vertex group, based on the distance between the object (or its vertices), and another target object (or its geometry).
Aviso
This modifier does implicit clamping of weight values in the standard (0.0 to 1.0) range. All values below 0.0 will be set to 0.0, and all values above 1.0 will be set to 1.0.
Opções
- Grupo de vértices
- O grupo de vértices que será afetado.
- Objeto alvo
- O objeto a partir do qual computar as distâncias.
- Modo de proximidade
- Distância do objeto
- Use the distance between the modified mesh object and the target object as weight for all vertices in the affected vertex group.
- Distância da geometria
Use the distance between each vertex and the target object, or its geometry.
- Vértices
- This will set each vertex’s weight from its distance to the nearest vertex of the target object.
- Arestas
- This will set each vertex’s weight from its distance to the nearest edge of the target object.
- Faces
- This will set each vertex’s weight from its distance to the nearest face of the target object.
Nota
If you enable more than one of them, the shortest distance will be used. If the target object has no geometry (e.g. an empty or camera), it will use the location of the object itself.
- Mais baixa
- Distance mapping to 0.0 weight.
- Mais alta
- Distance mapping to 1.0 weight.
Dica
Lowest can be set above Highest to reverse the mapping.
- Tipo de decaimento
Tipo de mapeamento:
- Linear
- Sem mapeamento.
- Curva personalizada
- Allows the user to manually define the mapping using a curve.
- Sharp, Smooth, Root and Sphere
- These are classical mapping functions, from spikiest to roundest.
- Aleatório
- Uses a random value for each vertex.
- Passos em média
- Creates binary weights (0.0 or 1.0), with 0.5 as cutting value.
Opções de Influência e máscara
- Influência global
The overall influence of the modifier (0.0 will leave the vertex group’s weights untouched, 1.0 is standard influence).
Aviso
Influence only affects weights, adding/removing of vertices to/from vertex group is not prevented by setting this value to 0.0.
Máscara de grupo de vértices
- Máscara de grupo de vértices
- An additional vertex group, the weights of which will be multiplied with the global influence value for each vertex. If a vertex is not in the masking vertex group, its weight will not be affected.
Máscara de textura
- Máscara de textura
An additional texture, the values of which will be multiplied with the global influence value for each vertex.
This is a standard texture data-block control. When set, it reveals other settings:
- Coordenadas de textura
How the texture is mapped to the mesh.
- Local
- Usa as coordenadas locais dos vértices.
- Global
- Use vertex coordinates in global space.
- Objeto
Use vertex coordinates in another object’s space.
- Objeto
- The object to be used as reference for Object mapping.
- UV
Usa as coordenadas definidas no mapa UV.
- Mapa UV
- O mapa UV que será usado para o mapeamento UV.
- Usar canal
Which channel to use as weight factor source.
- Red/Green/Blue/Alpha
- Um dos valores dos canais de cor.
- Intensidade
- The average of the RGB channels (if RGB(1.0, 0.0, 0.0) value is 0.33).
- Valor
- The highest value of the RGB channels (if RGB(1.0, 0.0, 0.0) value is 1.0).
- Matiz
- Uses the hue value from the standard color wheel (e.g. blue has a higher hue value than yellow).
- Saturação
- Uses the saturation value (e.g. pure red’s value is 1.0, gray is 0.0).
Nota
All of the channels above are gamma corrected, except for Intensity.
Nota
You can view the modified weights in Weight Paint Mode. This also implies that you will have to disable the Vertex Weight Proximity Modifier if you want to see the original weights of the vertex group you are editing.
Exemplo
Usando a distância a partir do objeto alvo.
In this example let us dynamically control a Wave Modifier with a modified vertex group:
Add a Grid mesh with (100×100) X/Y subdivisions and a 5 BU Radius.
Switch to Edit Mode Tab, and in the Object Data properties, Vertex Groups panel, add a vertex group. Assign to it all your mesh’s vertices with 1.0 weight.
Go back to Object Mode. Then, go to the Modifiers properties, and add a Vertex Weight Proximity Modifier. Set the Distance mode to Object. Select your vertex group, and the target object you want.
You will likely have to adjust the linear mapping of the weights produced by the Vertex Weight Proximity Modifier. To do so, edit Lowest Distance and Highest Distance so that the first corresponds to the distance between your target object and the vertices you want to have lowest weight, and similarly with the second and highest weight…
If your lamp is at Z height of 2 then set the settings for the Weight Proximity Modifier to: Lowest: 2 and highest: 7 (this will stop the waves under the lamp). If you want waves to be only under the lamp, set the lowest to 7 and highest to 2.
Now add a Wave Modifier, set it to your liking, and use the same vertex group to control it. Example settings: Speed: 0.10, Height: 1.0, Width 1.50, Narrowness: 1.50.
Animate your target object, making it move over the grid. As you can see, the waves are only visible around the reference object! Note that you can insert a Vertex Weight Edit modifier before the Wave one, and use its Custom Curve mapping to get larger/narrower «wave influence’s slopes».
The blend-file, TEST_1 scene.