Properties
Shape
Reference
- Mode:
Todos Modos
- Panel:
Most of the settings in the Shape panel are shared with those of Curves data-blocks, please refer to those for details.
- Edição rápida
Does not fill the letters in Edit Mode, only show their outline.
Espaço de textura
Each Object can have an automatically generated UV map, these maps can be adjusted here.
See Generated UV Properties for more information.
Geometria
Reference
- Mode:
Todos Modos
- Panel:
- Deslocamento
Offset the control points of the curves defining the letters, which will make them thinner or thicker. Use with care, it can quickly lead to artifacts…
Extrusion, Taper & Bevel
The remaining settings of that panel, which are used to give volume to the letters, are also shared with the Curves data-blocks, please refer to those for details.
Nota
How the Taper object effect works depends on how the curves defining the letters are built. The results can often look quite random…
Nota
Bevel is applied to the curves defining the letters, which means that usually it will follow their outlines (there will be two parallel beveled curves, and not a single one, as one might expect).
Font
Reference
- Mode:
Todos Modos
- Panel:
O Blender vem de fábrica com uma fonte embutida por padrão e que é exibida em cada um dos quatro menus de blocos de dados de estilos de fonte. A fonte embutida está sempre presente e é mostrada nesta lista como «Bfont». O menu de bloco de dados contém uma lista mostrando as fontes atualmente carregadas. Selecione uma fonte para cada tipo de estilo.
To load a different Font, click one of the Load buttons in the Font panel and navigate to a font file. The File Browser will give all valid fonts a capital «F» icon.
Caso você selecione uma fonte que o Blender não pode reconhecer como válida, você receberá o seguinte aviso de erro: Não é uma fonte válida. (Not a valid font, em Inglês).
Nota
Localização das fontes em sistemas *nix (Unix, Linux, etc)
As fontes são tipicamente localizadas dentro da pasta /usr/lib/fonts, ou outras variantes como /usr/lib/X11/fonts, mas nem sempre. Elas podem estar em outras localizações também, como nas pastas /usr/share/local ou``/usr/local/share``, e possivelmente em outras pastas nas árvores de diretórios relacionados abaixo das mesmas.
Remember that the same font will be applied to all chars with same style in a text, but that a separate font is required for each style. For example, you will need to load an Italics font in order to make characters or words italic. Once the font is loaded you can apply that font «Style» to the selected characters or the whole object. In all, you would need to load a minimum of four different types of fonts to represent each style (Normal, Italics, Bold, Bold & Italics).
É importante entender, que o Blender não se preocupa qual fonte você irá carregar para os estilos «normal», «negrito», etc. Esta é a maneira a qual você poderá ter até quatro diferentes fontes em um único texto, mas você terá que escolher entre os diferentes estilos de uma mesma fonte, ou escolher diferentes fontes. O Blender possui um número de controles tipográficos para a alteração do estilo e do esquema de texto, encontrados dentro do painel Fonte.
- Negrito
Toggled with the Bold button before typing. Text can also be set to bold by selecting it then using the Bold entry in the Text menu of the 3D Viewport.
- Itálico
Toggled with the Italic button before typing. Text can also be set to italic by selecting it then using the Italic entry in the Text menu of the 3D Viewport.
- Sublinhado
Enables underlining, as controlled by the underline settings below.
- Versaletes
Enable this option to type characters as small caps.
The size of the Small Caps can be changed with the Small Caps Scale setting.
Transform
- Tamanho
Controla o tamanho do texto como um todo ( não há maneiras de controlar cada um dos caracteres independentemente). Note contudo, que os caracteres com diferentes fontes (diferentes estilos, veja abaixo) podem ter diferentes tamanhos visíveis.
- Aparar
Controls the inclination of the whole text. As similar as it may seem, this is not the same thing as italics style.
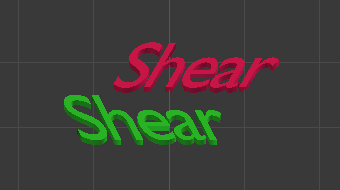
Shear example.
- Object Font
Allows individual objects to be used to render fonts, you can create/model your own complex font inside Blender! This field is used to select the objects prefix name (object «family») to be used to locate the individual characters used for typing. This is quite a complex process, so here are detailed steps to follow:
Create the font characters, each character can be any object type (mesh, curve, etc.). They must all have a name following the naming schema: «common prefix» followed by the «character name» (e.g. «ft.a», «ft.b», etc.).
For the text object, enable Instancing Vertices.
In the Font tab, fill the Object Font field with the «common prefix» of your «font» objects. Now, each time a character in your text matches the suffix part of a «font» object’s name, this object is duplicated on this character.
Nota
The objects are duplicated so that their center is positioned at the lower right corner of the corresponding characters.
- Texto em curvas
Select a curve object for the text object to follow.
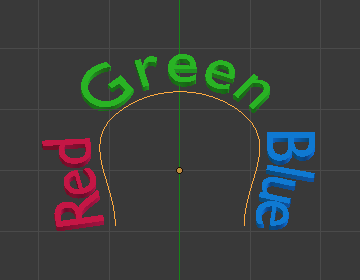
Texto em curva.
Dica
You should rather use the Curve modifier, which offers more control, and is the standard way to achieve such effects in modern Blender.
- Sublinhado
Toggled with the Underline button before typing. Text can also be set to Underlined by selecting it then using the Underline entry in the Text menu of the 3D Viewport.
- Underline Position
Isto permite que você altere verticalmente a posição do sublinhado.
- Underline Thickness
Isto controla a espessura do sublinhado.
- Small Caps Scale
The scaling applied to capital letters to turn them into small caps.
Parágrafo
Reference
- Mode:
Todos
- Panel:
O painel Parágrafo possui definições para o alinhamento e espaçamento dos textos.
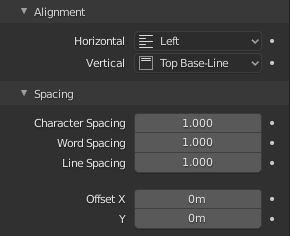
O painel Parágrafo.
Alignment
- Horizontal
- Esquerda:
Aligns text to the left of the frames when using them, else uses the origin of the text object as the starting point of the text (which grows to the right).
- Center:
Centers text in the frames when using them, else uses the origin of the text object as the mid-point of the text (which grows equally to the left and right).
- Direita:
Aligns text to the right of the frames when using them, else uses the origin of the text object as the ending point of the text (which grows to the left).
- Justificar:
Only flushes a line when it is terminated by a word wrap (not by a newline), and uses whitespace instead of character spacing (kerning) to fill lines.
- Fluir:
Always flushes the line, even when it is still being typed-in. It uses character spacing (kerning) to fill lines.
Nota
Tanto as opções Justificar quanto Fluir funcionam somente em quadros de texto.
- Vertical
- Top:
With text boxes, aligns the top of the text to the top of the frames.
With no text box, aligns the top of the text to the origin of the object, and grows to the bottom.
- Top Baseline:
With text boxes, aligns the “top” baseline of the text to the top of the frames.
With no text box, aligns the actual baseline of the text to the origin of the object, and grows to the bottom.
Nota
That difference of reference point in the first line depending on usage of boxes or not is indeed confusing.
- Middle:
With text boxes, centers the text in the frames.
With no text box, centers the text on the origin of the object, and grows in both top and bottom directions equally.
- Bottom Baseline:
With text boxes, aligns the baseline of the text to the bottom of the frames.
With no text box, aligns the baseline of the text to the origin of the object, and grows to the top.
- Bottom:
With text boxes, align the bottom of the text to the bottom of the frames.
With no text box, align the bottom of the text to the origin of the object, and grows to the top.
Espaçamento
- Caractere
A factor by which space between each character (kerning) is scaled in width.
In Edit Mode in the 3D Viewport, you can also control individual kerning at text cursor position by pressing Alt-Left / Alt-Right to decrease/increase it.
- Espaçamento
A factor by which whitespace between words is scaled in width.
- Espaçamento
Um fator pelo qual o espaço vertical entre cada uma das linhas é escalonado.
- Offset X, Y
These settings control the X and Y offset of the text position within the object. This applies relatively to the object’s origin, either to the whole text or, when using text boxes, to each frame.
Caixas de texto
Reference
- Mode:
Todos
- Panel:
Text boxes (or frames) allow you to distribute the text among rectangular areas within a single text object. An arbitrary number of freely movable and re-sizable text frames are allowed per text object.
The text flows continuously from the lowest-numbered frame to the highest-numbered frame with text inside each frame word-wrapped. It flows between frames when a lower-numbered frame cannot fit any more text. If the last frame is reached, text overflows out of it (by default, see options below).
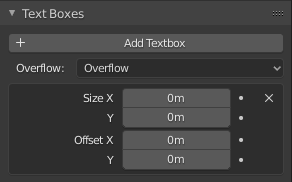
O painel Formato.
- Add Textbox
Inserts a new frame, just after the current one (in text flow order). The new frame will have the same size and position as the selected one.
- Apagar
X Delete the current frame.
- Overflow
How to handle text overflowing available space in the defined boxes.
- Overflow:
Just keep text running out of the last box.
- Scale to Fit:
Scale text to fit into the available space.
- Truncate:
Hide the end of the text that does not fit into the available space.
Nota
It will only truncate in Object Mode, in Edit Mode the whole text remains visible (and overflows as needed).
- Size X, Y
Specifies the width and height of the text box, if set to zero no word wrapping happens (it is ignored, and the whole text box system is disabled if all are set to a null size).
- Offset X, Y
Controls the X and Y offset of the frame, i.e. its position.
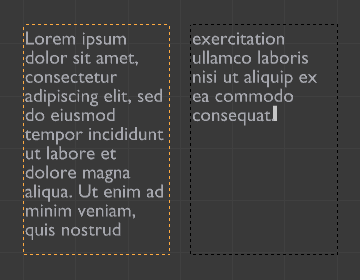
Multiple columns, text flowing between boxes.