Вступ – Introduction
Групи Вершин – Vertex Groups можуть потенційно мати дуже велику кількість асоційованих вершин, і звідси, велику кількість вагомостей (одна вагомість на призначену у групу вершину). Weight Painting – «Малювання Вагомостей» – це метод для підтримання великої кількості інформації про вагомості дуже інтуїтивним способом.
Воно, перш за все, використовується для оснащення сітей, де групи вершин вживаються для визначення відносних впливів кісток на сіті. Але ми використовуємо його також для керування емісією частинок, щільністю волосся, багатьма модифікаторами, ключами форм тощо.
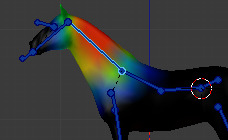
Група Вершин у режимі Weight Paint Mode.
Ви можете переходити у режим Weight Paint Mode з вибірника режимів Mode selector Ctrl-Tab. Вибраний сітьовий об’єкт показується дещо відтіненим зі спектром кольорів веселки. Ці кольори візуалізуються вагомості, асоційовані з кожною вершиною в активній групі вершин. Стандартно, синій означає невиважене, а червоний означає повністю виважене.
Ви можете призначати вагомості для вершин об’єкта шляхом малювання по них пензлями вагомості. Початок малювання по сіті автоматично додає вагомості в активну групу вершин (при потребі створюється нова група вершин).
Колірний Код Виважування – The Weighting Color Code
Вагомості візуалізуються градієнтом, що використовує колірну систему «холодно/гаряче», так що області з низьким значенням (вагомості близькі до 0.0) показуються синім (холодно), а області з високим значенням (вагомості близькі до 1.0) малюються червоним (гаряче). Усі проміжні значення показуються відповідними проміжними кольорами веселки (синій, зелений, жовтий, оранжевий, червоний).
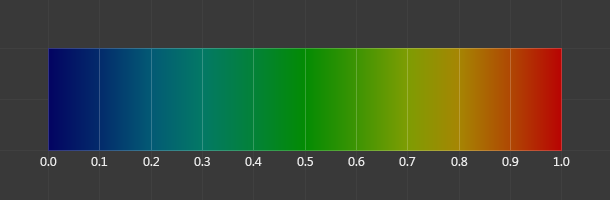
Спектр кольорів та їх відповідні вагомості.
На додаток до описаного вище колірного коду Blender має спеціальне візуальне позначення (як опцію) для незадіяних у групу (ті, що поза даною групою) вершин: Вони показуються чорним. Таким чином, ви можете бачити задіяні області (показувані як холодні/гарячі кольори) та незадіяні області (чорним) одночасно. Це найбільш практично, коли ви шукаєте помилки виваження. Дивіться Опції – Options.
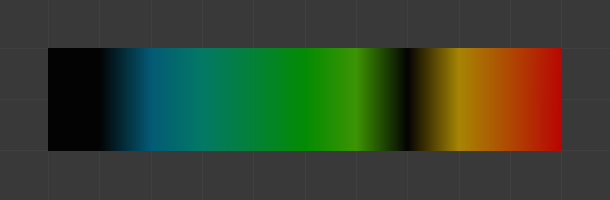
Приклад незадіяних вершин.
Примітка
Ви можете кастомізувати ці кольори градієнта вагомості, увімкнувши опцію «Власний Діапазон Малювання Вагомостей» – Custom Weight Paint Range у вкладці «Система» – System в «Уподобання» – Preferences.
Normalized Weight Workflow
In order to be used for things like deformation, weights usually have to be normalized, so that all deforming weights assigned to a single vertex add up to 1. The Armature modifier in Blender does this automatically, so it is technically not necessary to ensure that weights are normalized at the painting stage.
However, while more complicated, working with normalized weights has certain advantages, because it allows use of certain tools designed for them, and because when weights are normalized, understanding the final influence of the current group does not require knowing weights in other groups on the same vertex.
These tools are provided to aid working with normalized weights:
- Normalize All
In order to start working with normalized weights it is first necessary to normalize the existing weights. The Normalize All tool can be used for that. Make sure to select the right mode and disable Lock Active.
- Auto Normalize
Once the weights are initially normalized, the Auto Normalize option can be enabled to automatically maintain normalization as you paint. This also tells certain tools that the weights are supposed to be already normalized.
- Vertex group locking
Any vertex group can be locked to prevent changes to it. This can be done via the lock icon in the vertex group list, or using bone selection and the locks pie menu.
This setting prevents accidental edits to groups. However, since it is also respected by Auto Normalize, in the normalized weight workflow it has a more significant meaning of locking the current influence of chosen bones, so that when you paint other bones, the weight is redistributed only between the unlocked groups.
In locations affected by more than two bones this allows more precise tweaking and re-balancing of weights by temporarily focusing on a subset of bones. This can also be aided by the Lock Relative option, which displays weights as if re-normalized with the locked groups deleted, thus making it appear as if the locked groups didn’t even exist.
- Multi-Paint
Finally, the Multi-Paint option allows treating multiple selected bones as if they were one bone, so that the painting operations change the combined weight, preserving the ratio within the group. Combined with locking, this allows balancing between one set of bones versus the rest, excluding a third set that has its influence not affected in any way due to locks.
Technically, this option does not require the normalized workflow, but since non-normalized weights can add to more than 1, the weight display behaves best with Auto Normalize enabled.
Порада
For example, when dealing with a bone loop, e.g. mouth or an eye, selecting the loop with Multi-Paint exposes the falloff between the loop as a whole and surrounding bones, while locking the surrounding bones and using Lock Relative displays the falloff between bones within the loop. Thus the complex two-dimensional falloff of each bone can be viewed and edited as two independent one-dimensional gradients.