插件教程
目标读者
本篇教程旨在帮助技术型艺术家或者开发者学习如何扩展Blender。对于通读全文的读者,需要通晓Python的基础知识。
前提
阅读本教程前,用户需要:
熟悉Blender中的基础功能。
知道如何在Blender的文本编辑器中运行脚本。
Have an understanding of Python primitive types (integer, Boolean, string, list, tuple, dictionary, and set).
熟悉Python模块的概念。
对Python中的类(面向对象)有基础认知。
学习本教程前建议阅读。
深入Python 章节(1, 2, 3, 4, 和 7)。
Blender API快速入门 有助于更加熟悉Blender/Python基础。
为了在编写脚本时更好的排查Python打印的错误,可以从终端启动Blender。参见 使用终端。
文档链接
在阅读教程时,用户可能需要查找参考文档。
blender_api:Blender API概述. - 这份文档相当详细,不过如果你想对某个话题了解更多的话,这很有用。
bpy.contextAPI参考. - 可以方便地获得脚本可以调用的选项。bpy.types.Operator. - 下文的插件会定义操作,这些文档提供了更多操作的范例和细节。
何为插件?
插件是附加一些额外要求的Python模块,这样Blender可以列表形式显示有用信息。
下面的例子是一个最简单的插件:
bl_info = {
    "name": "My Test Add-on",
    "blender": (2, 80, 0),
    "category": "Object",
}
def register():
    print("Hello World")
def unregister():
    print("Goodbye World")
bl_info一个字典,包含插件元数据如标题、版本和作者,这些信息会显示在用户设置的插件列表。它还指定了运行该脚本的最低版本要求;更老的版本无法在插件列表中显示该插件。
register仅在启用插件时运行的函数,这意味着无需激活插件即可加载模块。
unregister用于卸载
register建立的数据的函数,在禁用插件时调用。
注意:该插件不会进行任何Blender相关操作(比如不会载入 bpy 模块)。
这是一个刻意设计的插件示例,用于说明插件的基础要求其实很简单。
插件通常会注册操作、面板、菜单选项等,不过这没有多大价值,从文本编辑器,甚至交互控制台执行的脚本也可以做到 -- 插件与Blender的结合方式并没有本质上的不同, 这些功能都是 bpy 模块提供的,任何脚本都可以访问。
所以,插件仅仅是一种封装Python模块的方法,以方便用户使用。
Note
在文本编辑器运行这个脚本不会有任何输出,必须通过用户设置安装该脚本才能看到输出。启用和禁用时均会打印提示信息。
第一个插件
上文中的最简插件除举例外别无它用。下面的插件也很简单,不过演示了如何使用一个 Operator 将脚本集成到Blender,Operator 是用于定义可从菜单、按钮和快捷键访问的工具的特有方法。
首先,写一个移动场景内所有物体的脚本。
写脚本
在文本编辑器添加下面的脚本:
import bpy

scene = bpy.context.scene
for obj in scene.objects:
    obj.location.x += 1.0
按下 运行脚本按钮, 活动场景内的所有物体均会移动1个Blender单位。
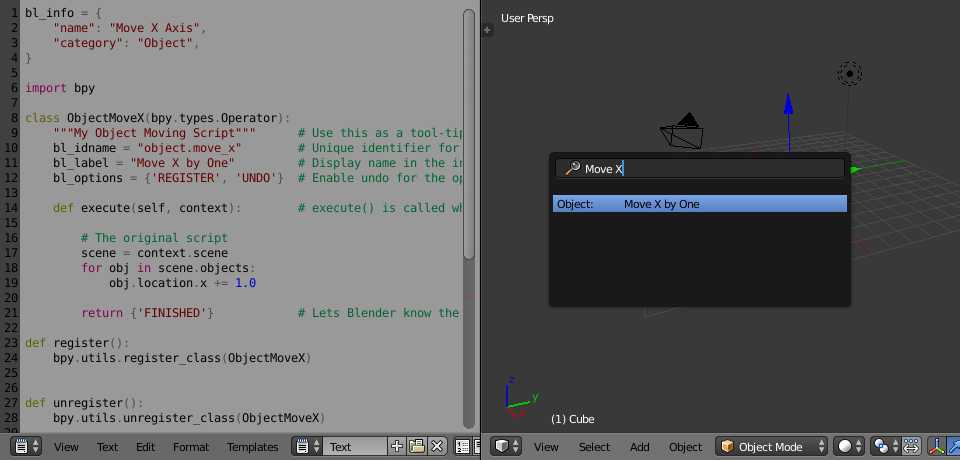
写插件 (简易)
这个插件使用了上面的脚本,并将其添加到一个operator的 execute() 函数中。:
bl_info = {
    "name": "Move X Axis",
    "blender": (2, 80, 0),
    "category": "Object",
}

import bpy


class ObjectMoveX(bpy.types.Operator):
    """My Object Moving Script"""      # Use this as a tooltip for menu items and buttons.
    bl_idname = "object.move_x"        # Unique identifier for buttons and menu items to reference.
    bl_label = "Move X by One"         # Display name in the interface.
    bl_options = {'REGISTER', 'UNDO'}  # Enable undo for the operator.

    def execute(self, context):        # execute() is called when running the operator.

        # The original script
        scene = context.scene
        for obj in scene.objects:
            obj.location.x += 1.0

        return {'FINISHED'}            # Lets Blender know the operator finished successfully.

def register():
    bpy.utils.register_class(ObjectMoveX)


def unregister():
    bpy.utils.unregister_class(ObjectMoveX)


# This allows you to run the script directly from Blender's Text editor
# to test the add-on without having to install it.
if __name__ == "__main__":
    register()
Note
bl_info 被分割成多行,这仅仅是一种编程风格,可以方便添加元素。
Note
这里传递给 execute() 的参数是 context.scene ,而非 bpy.context.scene 。大多数情况下,两者是一致的。然而在一些情况下,传递给operators的是自定义context,所以脚本作者更愿意传递 context 参数至operator。
要测试这段脚本,你可以将其复制粘贴到Blender文本编辑器,并运行。这将直接执行脚本,并立即调用register函数。
不过,运行该脚本不能直接移动物体。你需要执行新注册的operator。
操作搜索菜单。
Open the Operator Search menu
and type in "Move X by One" (the bl_label), then Return.
物体将与前文一样移动。
不要关闭文本编辑器,下一步安装需要用到
安装插件
在Blender文本编辑器写好插件后,你可能想要安装该插件,这样就可以在用户设置中启用启动时加载插件。
尽管上面的插件只是一个测试,但还是把这些步骤都走一遍,这样以后就知道该怎么做了。
要安装Blender文本编辑器里写的插件,首先需要存盘,注意遵守Python模块的命名限制, 并以 .py 作为扩展名。
存盘之后,就可以跟从网上下载的插件一样安装了。
打开 ,并选择该文件。
现在插件就添加到了插件列表,可以勾选启用,如果要在下次启动时加载,可以 保存用户设置 。可以按照 上一节 中讲的方法运行该操作。
启用加载项后,Blender 将执行代码并运行 register() 函数。禁用加载项后,Blender则运行 unregister() 函数。
Note
插件的安装位置取决于你的Blender配置。安装插件时,控制台会提示插件的原始和目标路径。在Python控制台运行下面的脚本,也可以查找插件目标路径:
import addon_utils
print(addon_utils.paths())
更多这方面内容见: 目录布局。
第二个插件
第二个插件是关于物体实例化 -- 亦即 -- 以与阵列修改器类似的方法生成物体的关联副本。
写脚本
和前面一样,我们从一段脚本开始,然后将其转化为插件:
import bpy
from bpy import context

# Get the current scene
scene = context.scene

# Get the 3D cursor location
cursor = scene.cursor.location

# Get the active object (assume we have one)
obj = context.active_object

# Now make a copy of the object
obj_new = obj.copy()

# The new object has to be added to a collection in the scene
scene.collection.objects.link(obj_new)

# Now we can place the object
obj_new.location = cursor
现在,把这段脚本复制到Blende文本编辑器,选择立方体并运行脚本。运行脚本前记得单击将3D游标移动一旁,副本物体将出现在游标位置。
运行过后,进入 编辑模式 修改立方体后 -- 所有的副本会同时变化,这在Blender里称作 关联副本。
下一步,把这段脚本加到循环里,在活动物体与游标之间生成物体阵列。:
import bpy
from bpy import context

scene = context.scene
cursor = scene.cursor.location
obj = context.active_object

# Use a fixed value for now, eventually make this user adjustable
total = 10

# Add 'total' objects into the scene
for i in range(total):
    obj_new = obj.copy()
    scene.collection.objects.link(obj_new)

    # Now place the object in between the cursor
    # and the active object based on 'i'
    factor = i / total
    obj_new.location = (obj.location * factor) + (cursor * (1.0 - factor))
将3D游标远离活动物体,运行脚本,查看结果。
在这段脚本里,对物体和游标位置做了一点数学运算,这是因为两者都是3D mathutils. Vector 实例, mathutils 模块提供了这个方便的类, 并且允许向量与数值和矩阵做乘法运算。
如果你对这方面感兴趣的话,可以进一步阅读 mathutils.Vector -- 这里有很多方便的工具函数如计算向量夹角、叉乘、点乘, mathutils.geometry 还提供了更高级的函数如 Bézier 样条曲线插值和射线-三角形相交。
现在我们专心将这段脚本编程插件,不过知道这个3D数学模块也是不错的,以后更高级的功能可能用到它。
写插件
首先将脚本转换为插件:
bl_info = {
    "name": "Cursor Array",
    "blender": (2, 80, 0),
    "category": "Object",
}

import bpy


class ObjectCursorArray(bpy.types.Operator):
    """Object Cursor Array"""
    bl_idname = "object.cursor_array"
    bl_label = "Cursor Array"
    bl_options = {'REGISTER', 'UNDO'}

    def execute(self, context):
        scene = context.scene
        cursor = scene.cursor.location
        obj = context.active_object

        total = 10

        for i in range(total):
            obj_new = obj.copy()
            scene.collection.objects.link(obj_new)

            factor = i / total
            obj_new.location = (obj.location * factor) + (cursor * (1.0 - factor))

        return {'FINISHED'}

def register():
    bpy.utils.register_class(ObjectCursorArray)


def unregister():
    bpy.utils.unregister_class(ObjectCursorArray)


if __name__ == "__main__":
    register()
接下来的步骤上文已经介绍过了,不过你还是可以运行脚本,再考虑一下如何改进这插件的功能。
这个插件明显缺少两项功能 -- 总数固定为10,从 Search 访问该操作也不是很方便。
下文将讲解如何改进,并给出最终脚本代码。
操作属性
There are a variety of property types that are used for tool settings, common property types include: int, float, vector, color, Boolean and string.
这些属性与Python类的属性用法不同,因为Blender需要在界面显示、保存其键位映射设置,并保留设置供下次使用。
尽管这是相当Python化的方式,但是记住,实际上你定义的工具设置会被加载到Blender,并被Blender的其他部分从Python外部访问。
要消除 总数 为10的问题, 会用到一个操作属性。操作属性是通过 bpy.props模块定义的,将下面的代码加到operator类的主体中:
# moved assignment from execute() to the body of the class...
total: bpy.props.IntProperty(name="Steps", default=2, min=1, max=100)

# and this is accessed on the class
# instance within the execute() function as...
self.total
这些来自 bpy.props 的属性会被Blender特别处理,当(operator)类被注册后,会在界面显示属性按钮。可以传递很多参数给属性,如设置上下界、修改默认值和显示工具提示。
See also
bpy.props.IntProperty
这篇文档不会详细介绍如何使用其他属性类型,不过上面的链接包含了更高级的属性用法范例。
菜单选项
插件可以添加到现有的面板、标题栏和菜单等Python定义的用户界面中。
这个例子里,我们将其添加到现有菜单。
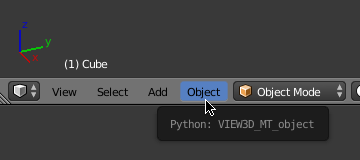
菜单标识符。
先在用户设置中启用 Python工具提示,鼠标在菜单上方停留,会出现提示,就能找到菜单标识符了。
添加菜单选项的方式是,在给现有类追加一个绘制函数:
def menu_func(self, context):
    self.layout.operator(ObjectCursorArray.bl_idname)

def register():
    bpy.utils.register_class(ObjectCursorArray)
    bpy.types.VIEW3D_MT_object.append(menu_func)
扩展菜单的文档,请参考 bpy.types.Menu。
键位映射
在Blender中,插件可以有自己的键位映射,以避免与Blender内置键位映射冲突。
在下面的例子中,添加了一个新的物体模式 bpy.types.KeyMap ,接着向该键位映射添加了一个 bpy.types.KeyMapItem ,指向新添加的操作,使用 Shift-Ctrl-T 作为快捷键
# store keymaps here to access after registration
addon_keymaps = []

def register():

    # handle the keymap
    wm = bpy.context.window_manager
    km = wm.keyconfigs.addon.keymaps.new(name='Object Mode', space_type='EMPTY')

    kmi = km.keymap_items.new(ObjectCursorArray.bl_idname, 'T', 'PRESS', ctrl=True, shift=True)
    kmi.properties.total = 4

    addon_keymaps.append((km, kmi))


def unregister():

    # handle the keymap
    for km, kmi in addon_keymaps:
        km.keymap_items.remove(kmi)
    addon_keymaps.clear()
值得注意的是,键位映射的 total 值与operator的默认值不同,这样就可以通过不同按键组合访问不同设置的同一operator。
Note
While Shift-Ctrl-T is not a default Blender key shortcut, it is hard to make sure add-ons will not overwrite each other's keymaps. Thus at least take care when assigning keys that they do not conflict with important functionality of Blender (see also Is Key Free).
上文所用函数的API文档,见:
bpy.types.KeyMaps.new,bpy.types.KeyMapItems.new,
合二为一
bl_info = {
    "name": "Cursor Array",
    "blender": (2, 80, 0),
    "category": "Object",
}

import bpy


class ObjectCursorArray(bpy.types.Operator):
    """Object Cursor Array"""
    bl_idname = "object.cursor_array"
    bl_label = "Cursor Array"
    bl_options = {'REGISTER', 'UNDO'}

    total: bpy.props.IntProperty(name="Steps", default=2, min=1, max=100)

    def execute(self, context):
        scene = context.scene
        cursor = scene.cursor.location
        obj = context.active_object

        for i in range(self.total):
            obj_new = obj.copy()
            scene.collection.objects.link(obj_new)

            factor = i / self.total
            obj_new.location = (obj.location * factor) + (cursor * (1.0 - factor))

        return {'FINISHED'}


def menu_func(self, context):
    self.layout.operator(ObjectCursorArray.bl_idname)

# store keymaps here to access after registration
addon_keymaps = []


def register():
    bpy.utils.register_class(ObjectCursorArray)
    bpy.types.VIEW3D_MT_object.append(menu_func)

    # handle the keymap
    wm = bpy.context.window_manager
    # Note that in background mode (no GUI available), keyconfigs are not available either,
    # so we have to check this to avoid nasty errors in background case.
    kc = wm.keyconfigs.addon
    if kc:
        km = wm.keyconfigs.addon.keymaps.new(name='Object Mode', space_type='EMPTY')
        kmi = km.keymap_items.new(ObjectCursorArray.bl_idname, 'T', 'PRESS', ctrl=True, shift=True)
        kmi.properties.total = 4
        addon_keymaps.append((km, kmi))

def unregister():
    # Note: when unregistering, it's usually good practice to do it in reverse order you registered.
    # Can avoid strange issues like keymap still referring to operators already unregistered...
    # handle the keymap
    for km, kmi in addon_keymaps:
        km.keymap_items.remove(kmi)
    addon_keymaps.clear()

    bpy.utils.unregister_class(ObjectCursorArray)
    bpy.types.VIEW3D_MT_object.remove(menu_func)


if __name__ == "__main__":
    register()
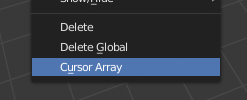
菜单选项。
运行该脚本(或保存后通过用户设置安装),操作会出现在 物体 菜单中。
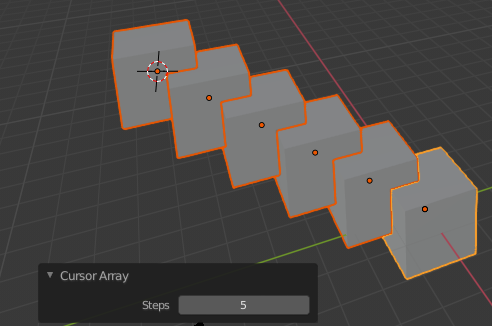
操作属性。
从菜单执行操作后,你还可以选择添加的立方体数量。
Note
直接运行脚本多次,会添加多个菜单选项。不过这没什么好担心的,因为从用户设置启用插件是不会出现重复注册的问题的。
结语
插件可以整洁地封装特定功能,用于编写工具改善工作流,或者编写功能供其他人使用。
尽管Blender中Python可以做的还存在一些限制,不过已经可以实现相当多的功能,使用户免于钻研Blender的 C/C++ 源码。
教程里可以给出的范例始终是有限的,不过已经演示了用于常见任务的Blender API,用户可以借此延伸出自己的工具。
扩展阅读
Blender附带了一些注释过的模板,可以在文本编辑器标题栏找到,如果你需要某个方面的示例代码,从这里开始是一个不错的选择。
看完上面的教程过后,这里提供了几个你可能用到的网址。
Blender/Python API 概述 -- 关于Blender/Python整合的更多背景细节。
如何像计算机科学家一样思考 -- 给哪些仍在学习Python的资料
Blender开发 (Wiki) -- Blender开发、基本信息和有用链接。
DevTalk -- Forum where people ask Python development questions.