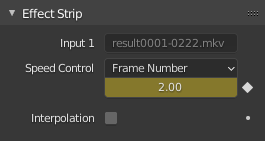
Speed Control Strip
Speed Control time-warps the strip, making it play faster or slower than it normally would. Playing faster means that some frames are skipped, and the strip will run out of frames before the end frame. When the strip runs out of frames to display, it will just keep repeating the last one action that will appear to be frozen. To avoid this, position the next strip under the original at a point where you want the motion to continue.
选项
- Speed Control
The method used to adjust the speed of the strip.
- 拉伸
Automatically calculates the speed effect based on the length of the input strip. If you scale a strip to 1/2 the original size the sequence will play back at 2 times the speed.
- 正片叠底(相乘)
Multiplies the current speed of the sequence by a Multiply Factor. Thus a value of 0.5 will make the sequence half as fast while 2 would make the sequence twice as fast. Negative values will reverse the input while also adjusting the speed, so a value of negative two will play in reverse and twice as fast as normal.
Note
你将不得不相应地手动重新调整片段的长度。
- 帧号
Specifies a frame to remap the current frame to, for example, setting the Frame Number value to 50 displays the 50th frame. This can then be manually keyframed to recreate the animation.
- 长度
Maps the frame range on a percentage scale. For example, using this and a value of 50% will select the frame halfway through the sequence.
- 插值
Crossfades between frames to reduce screen tearing when the speed is slower than the original frame rate.
示例
创建一个慢动作效果
Suppose you want to slow your strip down. You need to affect the speed of the video clip without affecting the overall frame rate. Select the clip and effect strip.
Choose the Multiply option in the Effect Strip panel in the Sidebar. Set the Multiply Factor to be the factor by which you want to adjust the speed. To cut the displayed speed by 50%, enter 0.5. Now, a 275-frame clip will play at half speed, and thus display only the first 137 frames.
如果您希望在显示第一个集合后以慢动作显示其余帧,请将源片段的长度加倍(因为效果片段边界由其源片段控制)。如果你使用的速度系数不是0.5,则使用以下公式:
new_length = real_length / speed_factor
就是这样,设置你的渲染到所有550帧动画(在这个例子中)。
关键帧速度控制

关键帧帧数量。
To get even finer control over your clip timing, you can use curves! While it is possible to keyframe the Multiply factor, usually you want to keyframe the Frame number directly.
Choose the Frame Number option. You now have a Frame number field which you can keyframe. If you want the strip to animate at all you will have to insert some keyframes, otherwise it will look like a still. In most cases you will want to use the Graph editor view to set the curve interpolation to Linear since the default Bézier will rarely be what you want.
Tip
如果选择按速度因子控制关键帧,记得 刷新全部 ,否则修改不会生效。
更改视频帧速率
You can use the speed control to change the frame rate in frames per second (fps) of a video. If you are rendering your video to a sequence set, you can effectively increase or decrease the number of individual image files created, by using a Multiply value less than or greater than one, respectively.
For example, if you captured a five-minute video at 30 fps and wanted to transfer that to film,
which runs at 24 fps, you would enter a Multiply Factor of 30/24, or 1.25
(and enable Interpolation frame blending to create a film blur effect).
Instead of producing 5 × 60 × 30 = 9000 frames,
Blender would produce 9000 / 1.25 = 7200 = 5 × 60 × 24 frames.
In this case, you set a start = 1 and end = 7200, set your Format output to jpeg 30fps,
and image files 0001.jpg through 7200.jpg would be rendered out,
but those images cover the entire 9000 frames. The image file 7200.jpg is the same at frame 9000.
When you read those images back into your film blend-file at 24 fps, the strip will last exactly 5 minutes.