运算

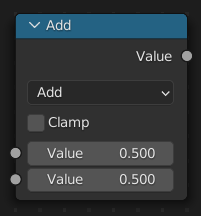
运算 节点的功能是执行数学运算。
输入
The inputs of the node are dynamic. Some inputs are only available in certain operations. For instance, the Addend input is only available in the Multiply Add operator.
- 数值
输入值。可以输入三角法则定义的弧度数值。
- 加数
输入加数。
- 基础(基数)
输入底数。
- 指数
输入幂(指数)。
- Epsilon
输入对数的基数。
- 距离
输入距离。
- 最小值
输入最小值。
- 最大值
输入最大值。
- 增量
输入增量。
- 比例|缩放
输入比例。
- 角度
输入角度。
- 弧度
输入弧度。
属性
- 操作
数学运算符将两侧的输入值按运算符表示的含义进行数学运算:
- 功能
- 相加:
将运算符两侧的数值进行加法运算。
- 相减:
对两侧的输入值进行减法运算。
- 正片叠底(相乘):
将两个输入值进行相乘运算。
- 相除:
将第一个输入值作为被除数,第二个值作为除数进行相除数学运算。
- 乘后再加:
将两个乘积值再次进行相加运算。
- 能量(乘方):
将 底数 进行 乘方 运算。
- 对数:
以 基数 为基数的值的对数。
- 平方根:
求输入值的平方根。
- 平方取倒:
即用数字1除以一个数值的平方根所得的结果。
- 绝对:
读取输入值而不考虑其符号。这会将负值转换为正值。
- 指数:
提升 欧拉数 为输入值的N次幂。备注:e,作为数学常数,是自然对数函数的底数。有时称它为欧拉数(Euler number)
- 比较
- 圆滑(取舍)
- 圆(四舍五入):
将输入值向上取整到最接近的整数值。
- 基面:
将输入值向下取最接近的整数值。
- 向上取整:
将输入值向上取整到最接近的整数值。
- 截短:
将一个 "输入值" 的整数部分进行输出,小数部分舍弃。
- 分数:
返回输入值的分数部分。
- 截断模数:
将第一个输入值被第二个输入值相除,输出所得结果的余数值。(备注:取模运算( "Modulus Operation" )和取余运算( "Remainder Operation " )两个概念有重叠的部分但又不完全一致。主要的区别在于对负整数进行除法运算时操作不同。取模主要是用于计算机术语中。取余则更多是数学概念。参看百度百科 "取模运算" )
- 向下取模:
Returns the positive remainder of a division operation.
- 循环:
在输入值和小于最大值的最大整数倍数值之间,最小值 和 最大值 绝对值的差值之间取值进行输出。
- 吸附:
将输入值向下取最接近的整数值。
- 乒–乓:
The output value is moved between 0.0 and the Scale based on the input value.
- 三角函数
- 转换
- 到弧度:
将输入值从角度数值转换为弧度数值。
- 到角度:
将输入值从弧度数值转换为角度数值。
- 钳制
限定输出数值的范围(0到1)。参见 钳制。
输出
- 数值
数值输出。
示例
自定义Z深度通道节点设置

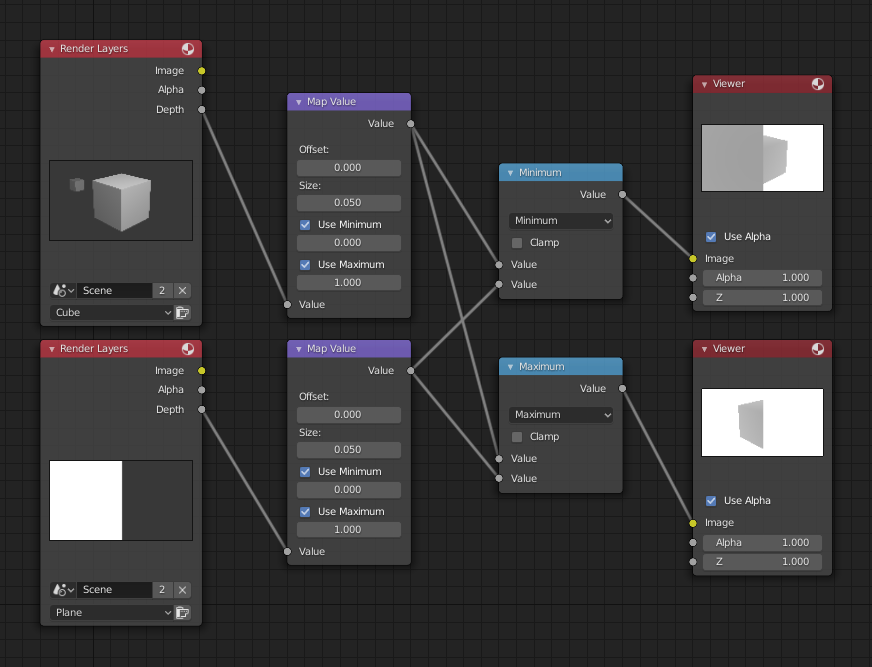
最大值与最小值功能举例。
This example has one scene input by the top Render Layers node, which has a cube that is about 10 units from the camera. The bottom Render Layers node inputs a scene with a plane that covers the left half of the view and is 7 units from the camera. Both are fed through their respective Map Value nodes to divide the Z-buffer by 20 (multiply by 0.05, as shown in the Size field) and clamped to be a min/max of 0.0/1.0 respectively.
For the minimum function, the node selects those Z values where the corresponding pixel is closer to the camera; so it chooses the Z values for the plane and part of the cube. The background has an infinite Z value, so it is clamped to 1.0 (shown as white). In the maximum example, the Z values of the cube are greater than the plane, so they are chosen for the left side, but the plane Render Layers Z are infinite (mapped to 1.0) for the right side, so they are chosen.
使用正弦功能得到不断循环的变化数

使用正弦功能举例。
范例中采用一个 时间 节点,其时间范围从1-101之间。在第25帧,输出为0.25。此数值转为由 2 × pi (6.28) 进行相乘运算并由正弦函数转换映射到1.0范围,用数学公式表示为 \(sin(2 × pi/ 4) = sin(pi/ 2) = +1.0\).
Since the sine function can put out values between (-1.0 to 1.0), the Map Value node scales that to 0.0 to 1.0 by taking the input (-1 to 1), adding 1 (making 0 to 2), and multiplying the result by one-half (thus scaling the output between 0 to 1). The default Color Ramp converts those values to a gray-scale. Thus, medium gray corresponds to a 0.0 output by the sine, black to -1.0, and white to 1.0. As you can see, \(sin(pi/ 2) = 1.0\). Like having your own visual color calculator! Animating this node setup provides a smooth cyclic sequence through the range of grays.
将这个功能引申,比如,图片的alpha通道形成渐入/渐出特效。改变Z深度通道的景深位置。改变颜色通道值使其有规律的进行色彩变化。
提亮(缩放)通道

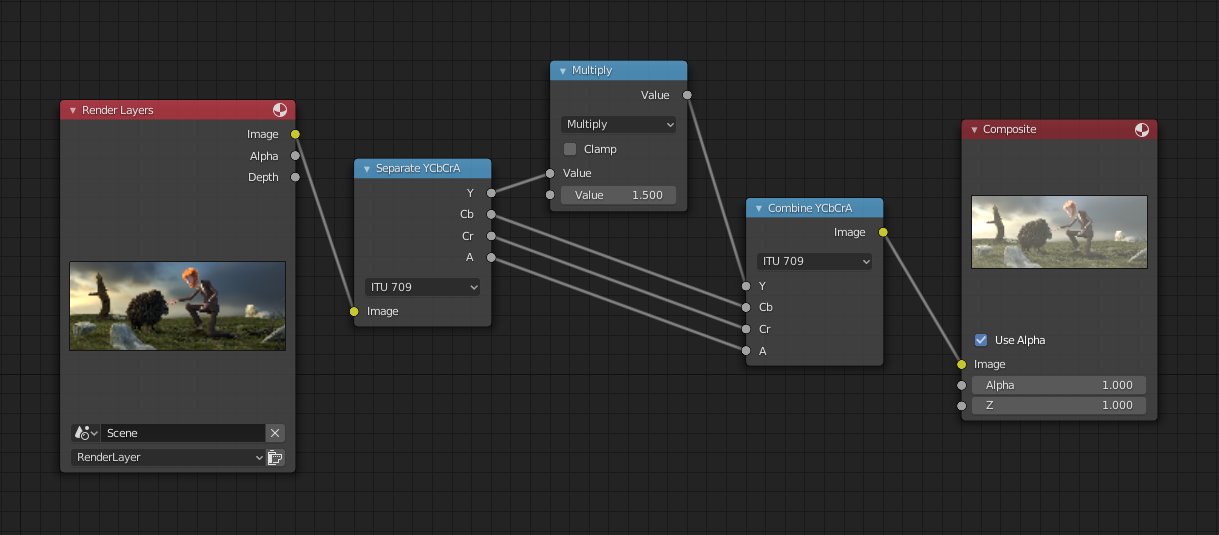
比例缩放单一通道范例。
This example has a Math (Multiply) node increasing the luminance channel (Y) of the image to make it brighter. Note that you should use a Map Value node with min() and max() enabled to clamp the output to valid values. With this approach, you could use a logarithmic function to make a high dynamic range image. For this particular example, there is also a Brightness/Contrast node that might give simpler control over brightness.
重新限定颜色选择(色调分离)

色调分离范例。
此范例中,我们重新限定颜色值为以下数值中之一:0, 0.2, 0.4, 0.6, 0.8, 1。
To split up a continuous range of values between 0 and 1 to certain set of values, the following function is used: \(round(x × n - 0.5) / (n - 1)\), where "n" is the number of possible output values, and "x" is the input pixel color. Read more about this function.
要在Blender中执行该运算,可以考虑上图中的节点连线方式。我们通过将运算节点串连为一个函数,接受颜色值输入(取值范围从 0 到 1),分别乘以6,则现有的数值分布(取值范围从0 到 6 ),再将此结果偏移0.5 (-0.5到5.5), 然后四舍五入数值到最邻近的整数 (结果值为 0, 1, 2, 3, 4, 5), 然后将颜色像素值除以5,得到(0.0, 0.2, 0.4, 0.6, 0.8, 1.0)。
In the case of a color image, you need to split it into separate RGB channels using Separate/Combine RGBA nodes and perform this operation on each channel independently.