Modelling with lattices
Relevant to Blender v2.31
A Lattice consists of a non-renderable three-dimensional grid of vertices. Their main use is to give extra deformation to any child object they might have. These child objects can be Meshes, Surfaces and even Particles.
Why would you use a Lattice to deform a mesh instead of deforming the mesh itself in EditMode?
There are a couple of reasons for that:
First of all: It's easier. Since your mesh could have a zillion vertices, scaling, grabbing and moving them could be a hard task. Instead, if you use a nice simple lattice your job is simplified to move a couple of vertices.
It's nicer. The deformation you get looks a lot better!
It's fast! You can put all or several of your child objects in a hidden layer and deform them all at once.
It's a good practice. A lattice can be used to get different versions of a mesh with minimal extra work and consumption of resources. This leads to an optimal scene design, minimizing the amount of modelling job. A Lattice does not affect the texture coordinates of a Mesh Surface. Subtle changes to mesh objects are easily facilitated in this way, and do not change the mesh itself.
How does it work?
A Lattice always begins as a 2 x 2 x 2 grid of vertices (which looks like a simple cube). You can scale it up and down in Object Mode and change its resolution through the Lattice Panel in the Editing Context Buttons U, V, W.
After this initial step you can deform the Lattice in Edit Mode. If there is a Child Object, the deformation is continually displayed and modified. Changing the U, V, W values of a Lattice returns it to a uniform starting position.
Now we are going to see a very simple case in which having a lattice will simplify and speed up our modelling job.
I have modelled a very simple fork using a plane subdivided couple of times. It looks really ugly but it's all I need. Of course it is completely flat from a Side View. Wow, it is really ugly (Figure 41). The only important detail is that it has been subdivided enough to ensure a nice deformation in the Lattice step. You cannot bend a two vertices segment!

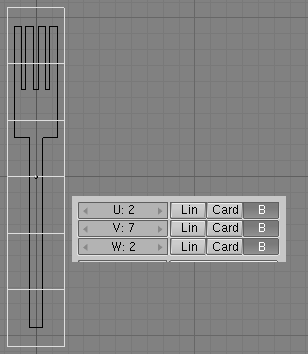
In Top View, now add a Lattice. Before changing its resolution, scale it up so it completely envelopes the fork's width (Figure 42). This is very important. Since I want to keep the lattice vertices count low (it doesn't make sense it has the same number of vertices than the mesh, right?) I need to keep resolution low but still set the lattice to convenient size.

Adjust the Lattice resolution to complete the fork's length (Figure 43).
Now, we are ready for the fun part. Parent the fork to the lattice, by selecting the fork and the lattice and pressing CTRL-P. Enter Edit Mode for the lattice and start selecting and scaling vertices (Figure 44). You might want to scale in X or Y axis separately to have more control over the lattice depth (to avoid making the fork thicker or thinner).

Note that if you move the fork up ad down inside the lattice, the deformation will apply in different parts of the mesh.
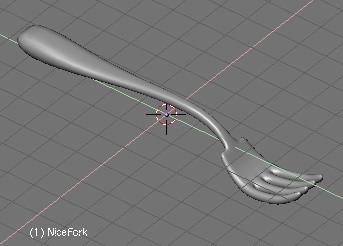
Once you're done in Front View, switch to Side View. Select and move different vertices sections to give the fork the suitable bends (Figure 45).

You can get rid of the lattice now if you're not adding any other child object. But before doing it, you might want to keep your deformations! Just select the fork and press CTRL-SHIFT-A and click on the Apply Lattice Deform? menu entry.
 | Mad vertices |
|---|---|
On rare occasions, for fairly complex meshes, application of CTRL-SHIFT-A will look like it has screwed your mesh completely. This is false. Just step in and out of EditMode (TAB) and the mesh will be back nicely deformed as you expected. |
You can use a lattice to model an object following another object's shape. For instance take a look at the following scene. I have modelled a bottle, and now I would like to confine a character inside it. He deserves it (Figure 47).

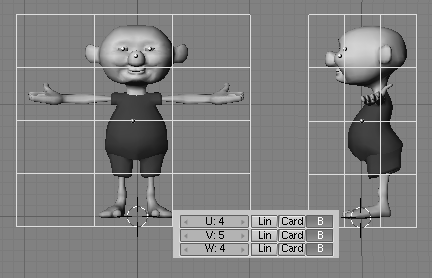
Add a lattice around the character. I didn't use a too high resolution for the lattice. I scaled it in X and Y to fit the lattice to the character (Figure 48).
Parent the character to the lattice, and then scale the lattice again to fit the dimensions of the bottle (Figure 49).

Now enter Edit Mode for the lattice. Press the Outside button in the Lattice Panel in the Editing Context to switch off the inner vertices of the lattice. We will switch them on later. Move and scale the vertices in front and side views until the character perfectly fits the bottle's shape (Figure 50).

You can select the lattice and do the modelling in one 3D window using Local View and see the results in another window using Global View to make your modelling comfortable (Figure 51).

Hadn't we used a lattice it would have taken a lot more of vertex picking-and-moving work to deform the character (Figure 52).
Since lattices also supports RVK for vertex animation, quite interesting effects can be achieved with this tool.

Lattices can be used in many applications which require a "liquid-like" deformation of a mesh. Think of a genie coming out of his lamp, or a cartoon character with its eyes popping out exaggeratedly. And have fun!