Preparing your work for video
Relevant to Blender v2.31
Once you have mastered the trick of animation you will surely start to produce wonderful animations, encoded with your favourite codecs, and possibly you'll share them on the Internet with the rest of the community.
But, sooner or later, you will be struck by the desire of building an animation for Television, or maybe burning you own DVDs.
To spare you some disappointment, here are some tips specifically targeted at Video preparation. The first and principal one is to remember the double dashed white lines in the camera view!
If you render for PC then the whole rendered image, which lies within the outer dashed rectangle will be shown. For Television some lines and some part of the lines will be lost due to the mechanics of the electron beam scanning in your TV's cathode ray tube. You are guaranteed that what is within the inner dashed rectangle in camera view will be visible on the screen. Everything within the two rectangles may or may not be visible, depending on the given TV set you watch the video on.
Furthermore the rendering size is strictly dictated by the TV standard. Blender has three pre-set settings for your convenience:
PAL 720x576 pixels at 54:51 aspect ratio.
NTSC 720x480 pixels at 10:11 aspect ratio.
PAL 16:9 720x576 at 64:45 aspect ratio, for 16:9 widescreen TV renderings.
Please note the "Aspect Ratio" stuff. TV screens do not have the square pixels which Computer monitors have, their pixels are somewhat rectangular, so it is necessary to generate pre-distorted images which will look bad on a computer but which will display nicely on a TV set.
Colour Saturation
Most video tapes and video signals are not based on the RGB model but on the YUV (or YCrCb) model in Europe and YIQ in the USA, this latter being quite similar to the former. Hence some knowledge of this is necessary too.
The YUV model sends information as 'Luminance', or intensity (Y) and two 'Crominance' signals, red and blue. Actually a Black and White TV set shows only luminance, while colour TV sets reconstruct colour from Crominances. It is:
Y = 0.299R + 0.587G + 0.114B
U = Cr = R-Y
V = Cb = B-Y
Whereas a standard 24 bit RGB picture has 8 bits for each channel, to keep bandwidth down, and considering that the human eye is more sensitive to luminance than to crominance, the luminance signal is sent with more bits than the two crominance signals.
This results in a smaller dynamic of colours, in Video, than that which you are used to on Monitors. You hence have to keep in mind not all colours can be correctly displayed. Rule of thumb is to keep the colours as 'greyish' or 'unsaturated' as possible, this can be roughly converted in keeping the dynamics of your colours within 0.8.
In other words the difference between the highest RGB value and the lowest RGB value should not exceed 0.8 ([0-1] range) or 200 ([0-255] range).
This is not strict, something more than 0.8 is acceptable, but a RGB=(1.0,0,0) material will be very ugly.
Rendering to fields
The TV standards prescribe that there should be 25 frames per second (PAL) or 30 frames per second (NTSC). Since the phosphorous of the screen does not maintain luminosity for very long, this could produce a noticeable flickering. To minimize this TVs do not represent frames as a Computer does but rather represents half-frames, or fields at a double refresh rate, hence 50 half frames per second on PAL and 60 half frames per second on NTSC. This was originally bound to the frequency of power lines in Europe (50Hz) and the US (60Hz).
In particular fields are "interlaced" in the sense that one field presents all the even lines of the complete frame and the subsequent field the odd ones.
Since there is a non-negligible time difference between each field (1/50 or 1/60 of a second) merely rendering a frame the usual way and splitting it into two half frames does not work. A noticeable jitter of the edges of moving objects would be present.
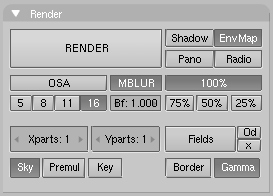
To optimally handle this issue Blender allows for field rendering. When the Fields button in the Render Panel is pressed (Figure 38), Blender prepares each frame in two passes. On the first it renders only the even lines, then it advances in time by half a time step and renders all the odd lines.
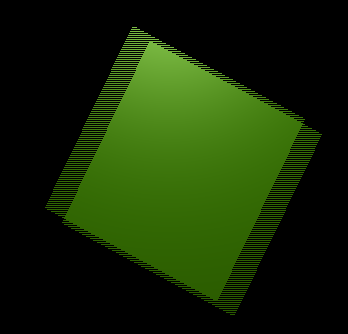
This produces odd results on a PC screen (Figure 39) but will show correctly on a TV set.
One of the two buttons next to the Fields button forces the rendering of Odd fields first (Odd) and the other disables the half-frame time step between fields (x).
 | Setting up the correct field order |
|---|---|
Blender's default setting is to produce Even fields before Odd fields, this complies with European PAL standards. Odd fields are scanned first on NTSC. Of course, if you make the wrong selection things are even worse than if no Field rendering at all was used. |

