Radiosity Rendering
Relevant to Blender v2.31
Let's assume you have a scene ready, and that you want to render it with the Radiosity Rendering. The first thing to grasp when doing Radiosity is that no Lamps are necessary, but some meshes with an Emit material property greater than zero are required, since these will be the light sources.
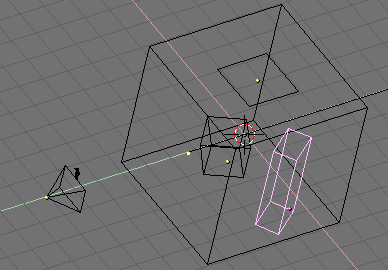
You can build the test scene shown in , it is rather easy. Just make a big cube for the room, give different materials to the side walls, add a cube and a stretched cube within it, and add a plane with a non-zero Emit value next to the roof, to simulate the area light (Figure 2).
You assign Materials as usual to the input models. The RGB value of the Material defines the Patch colour. The 'Emit' value of a Material defines if a Patch is loaded with energy at the start of the Radiosity simulation. The 'Emit' value is multiplied with the area of a Patch to calculate the initial amount of unshot energy.
 | Emitting faces |
|---|---|
Check the number of 'emitters' on Blender console! If this is zero nothing interesting can happen. You need at least one emitting patch to have light and hence a solution. |
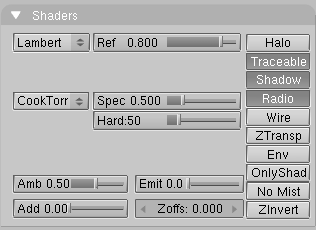
When assigning materials be sure that all of them have the Radio toggle on to enable the Shader Panel of the Material subcontext buttons (Figure 3).
Please note that the light emission is governed by the direction of the normals of a mesh, so the light emitting plane should have a downward pointing normal and the outer cube (the room) should have the normals pointing inside, (flip them!).
Switch to the Radiosity
 sub-context of the Shading Context. The Panels, shown in
Figure 4, are two: Radio Rendering
which governs Radiosity when used as a rendering tool (present case) and
Radio Tool, which governs Radiosity as a modelling tool (next section).
sub-context of the Shading Context. The Panels, shown in
Figure 4, are two: Radio Rendering
which governs Radiosity when used as a rendering tool (present case) and
Radio Tool, which governs Radiosity as a modelling tool (next section).
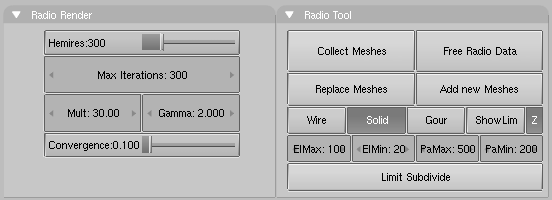
The buttons define:
Hemires: - The hemicube resolution; the color-coded images used to find the Elements that are visible from a 'shoot Patch', and thus receive energy. Hemicubes are not stored, but are recalculated each time for every Patch that shoots energy. The 'Hemires' value determines the Radiosity quality and adds significantly to the solving time.
Max Iterations: - The maximum number of Radiosity iterations. If set to zero Radiosity will go on until the convergence criterion is met. You are strongly advised to set this to some non-zero number, usually greater than 100.
Mult:, Gamma: - The colourspace of the Radiosity solution is far more detailed than can be expressed with simple 24 bit RGB values. When Elements are converted to faces, their energy values are converted to an RGB colour using the Mult and Gamma values. With the Mult value you can multiply the energy value, with Gamma you can change the contrast of the energy values.
Convergence: - When the amount of unshot energy in an environment is lower than this value, the Radiosity solving stops. The initial unshot energy in an environment is multiplied by the area of the Patches. During each iteration, some of the energy is absorbed, or disappears when the environment is not a closed volume. In Blender's standard coordinate system a typical emitter (as in the example files) has a relatively small area. The convergence value is divided by a factor of 1000 before testing for that reason.
Set the Max Iterations: to 100 and turn to the Scene Context and Render Sub-context (F10).
Locate the Radio Tog Button (Figure 5) in the Render Panel and set it 'on' to enable Radiosity, then Render! (F12).

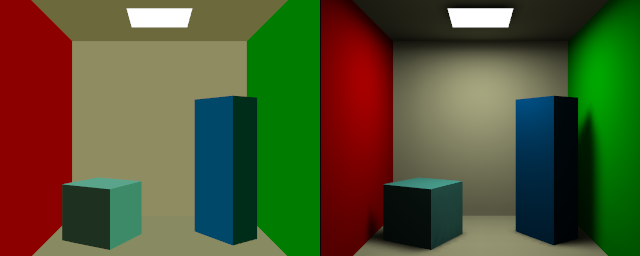
The rendering will take more time than usual, in the console you will notice a counter going up. The result will be quite poor (Figure 6, left) because the automatic radiosity render does not do adaptive refinement!
Select all meshes, one after the other, and in EditMode subdivide them at least three times. The room, which is much bigger than the other meshes, you can even subdivide four times. Set the Max Iterations a bit higher, 300 or more. Try Rendering again (F12). This time the rendering will take even longer but the results will be much nicer, with soft shadows and colour leakage (Figure 6, right).
 | In the Radiosity Rendering Blender acts as for a normal rendering, this means that textures, Curves, Surfaces and even Dupliframed Objects are handled correctly. |