Editing
Transform
Referenz
- Modus
Edit Mode
- Menü
An F-curve can be edited by transforming the locations of the keyframes.
- Move, Rotate, Scale
Like other elements in Blender, keyframes can be moved, rotated, or scaled as described in Basic Transformations.
- Extend
Moves keyframes relative to the current frame. If the mouse is to the left of the Playhead, this operator only affects the selected keyframes that are to the left of the Playhead. On the contrary, if the mouse is to the right of the Playhead, this operator only affects the selected keyframes that are to the right of the Playhead.
Tipp
For precise control of the keyframe position and value, you can set values in the Active Keyframe of the Sidebar region.
Snap
Referenz
- Menü
- Tastenkürzel
Shift-S
Keyframes can be snapped to different properties by using the Snap Keys tool.
- Selection to Current Frame
Snap the selected keyframes to the current frame.
- Selection to Cursor Value
Snap the selected keyframes to the 2D Cursor.
- Selection to Nearest Frame
Snap the selected keyframes to their nearest frame individually.
- Selection to Nearest Second
Snap the selected keyframes to their nearest second individually, based on the FPS of the scene.
- Selection to Nearest Marker
Snap the selected keyframes to their nearest marker individually.
- Flatten Handles
Flatten the Bézier handles for the selected keyframes.
Flatten Handles snapping example. 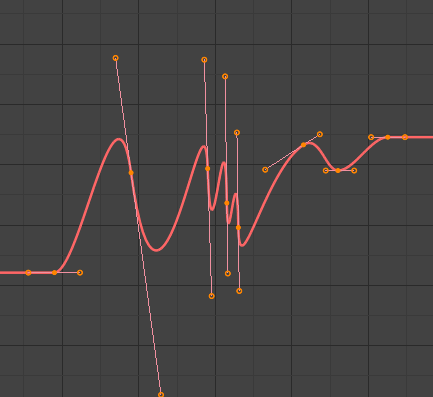
Before Flatten Handles.
After Flatten Handles.
- Equalize Handles
Ensure selected keyframes‘ handles have equal length.
- Side
Side of the keyframes‘ Bézier handles to affect
- Left
Equalize selected keyframes‘ left handles.
- Right
Equalize selected keyframes‘ right handles.
- Both
Equalize both of a keyframe’s handles.
- Handle Length
Length to make selected keyframes‘ Bézier handles.
- Flatten
Make the values of the selected keyframes‘ handles the same as their respective keyframes.
- Cursor to Selected Ctrl-G
Places the cursor at the midpoint between selected keyframes.
- Cursor Value to Selection
Places the cursor value on the average value of selected keyframes.
Mirror
Referenz
- Menü
- Tastenkürzel
Ctrl-M
Selected keyframes can be mirrored over different properties using the Mirror Keys tool.
- By Times over Current Frame
Mirror horizontally over the current frame.
- By Values over Cursor Value
Mirror vertically over the 2D cursor.
- By Times over Time 0
Mirror horizontally over frame 0.
- By Values over Value 0
Mirror vertically over value 0.
- By Times over First Selected Marker
Mirror horizontally over the first selected marker.
Insert Keyframes
Referenz
- Menü
- Tastenkürzel
Ctrl-RMB, Shift-Ctrl-RMB
Inserts a keyframe to the active F-curve at the mouse position. The newly added keyframes will be selected, making it easier to quickly tweak the newly added keyframes. All previously selected keyframes are kept selected by using Shift-Ctrl-RMB.
Add F-Curve Modifier
Referenz
- Menü
- Tastenkürzel
Shift-Ctrl-M
Opens a pop-up allowing you to add modifiers to the active F-curve. Settings for the modifier can be found in the tab.
Bake Sound to F-Curves
Referenz
- Menü
The Bake Sound to F-Curves operator takes a sound file and uses its sound wave to create the animation data.
- Lowest Frequency
Cutoff frequency of a high-pass filter that is applied to the audio data.
- Highest Frequency
Cutoff frequency of a low-pass filter that is applied to the audio data.
- Attack Time
Value for the hull curve calculation that tells how fast the hull curve can rise. The lower the value the steeper it can rise.
- Release Time
Value for the hull curve calculation that tells how fast the hull curve can fall. The lower the value the steeper it can fall.
- Threshold
Minimum amplitude value needed to influence the hull curve.
- Accumulate
Only the positive differences of the hull curve amplitudes are summarized to produce the output.
- Additive
The amplitudes of the hull curve are summarized. If Accumulate is enabled, both positive and negative differences are accumulated.
- Square
Gives the output as a square curve. Negative values always result in -1, and positive ones in 1.
- Square Threshold
All values lower than this threshold result in 0.
Jump to Keyframes
Referenz
- Menü
- Tastenkürzel
Ctrl-G
Places the 2D cursor at the center of the selected keyframes.
Copy/Paste
Referenz
- Menü
,
- Tastenkürzel
Ctrl-C, Ctrl-V
Use Ctrl-C to copy selected keyframes and Ctrl-V to paste the previously copied keyframes. During the paste action, the Adjust Last Operation panel provides some options in how the paste is applied.
- Offset
- No Offset
Pastes the keyframes in the location they were copied from.
- Frame Relative
Pastes the keyframe relative to the current frame based on the locations of the keyframes relative to the current frame when they were copied.
- Frame Start
Pastes the keyframes with the first keyframe of the copied set placed at the current frame.
- Frame End
Pastes the keyframes with the last keyframe of the copied set placed at the current frame.
- Type
- Mix
Integrates the pasted keyframes in with existing keyframes only overwriting keyframes that share a frame.
- Overwrite All
Removes all previous keyframes and replaces them with the pasted keyframes.
- Overwrite Range
Overwrite keys in pasted range.
- Overwrite Entire Range
Overwrite keys in pasted range, using the range of all copied keys.
- Flipped
Paste keyframes from mirrored bones if they exist.
Duplicate
Referenz
- Menü
- Tastenkürzel
Shift-D
Duplicates the selected keyframes. You can reposition them by moving the mouse.
Delete Keyframes
Referenz
- Menü
- Tastenkürzel
X, Delete
Pressing X or Delete opens a pop-up menu from where you can delete the selected keyframes.
Handle Type
Referenz
- Menü
- Tastenkürzel
V
Sets the handle type of the selected keyframes.
Interpolation Mode
Referenz
- Menü
- Tastenkürzel
T
Sets the interpolation mode between the selected keyframes.
Easing Mode
Referenz
- Menü
- Tastenkürzel
Ctrl-E
Sets the easing mode of the selected keyframes.
Decimate
Referenz
- Menü
- Menü
The Decimate tool simplifies an F-curve by removing keyframes that influence the curve shape the least.
- Modus
Controls which method is used pick the number of keyframes to use.
- Ratio
Deletes a defined percentage of keyframes, the amount of keyframes to delete is define by the Remove property.
- Error Margin
Deletes keyframes which only allowing the F-curve to change by a defined amount. The amount of change is controlled by the Max Error Margin which controls how much the new decimated curve is allowed to deviate from the original.
Slider Operators
Breakdown
Referenz
- Menü
Moves the selected keyframes to an in between position relative to the adjacent keyframes. Drag the mouse left or right to adjust the operator’s Factor property.
- Factor
The amount to favor either the left or the right key. Values less than 0.5 favor the left keyframe, values greater than 0.5 favor the right keyframe, a value of 0.5 results in no change.
Blend to Neighbor
Referenz
- Menü
Transitions the current keyframe with the neighboring keyframes in the timeline. In order for this operator to work, there must be a keyframe before and after the current frame. Drag the mouse left or right to adjust the operator’s Blend property.
- Blend
The amount to favor either the left or the right key. Values less than 0.5 favor the left keyframe, values greater than 0.5 favor the right keyframe, a value of 0.5 results in no change.
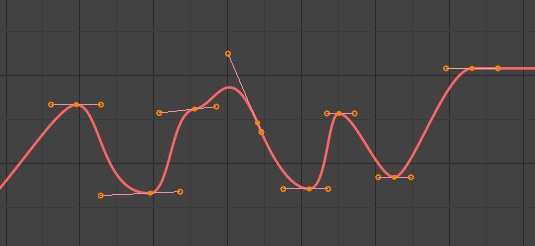
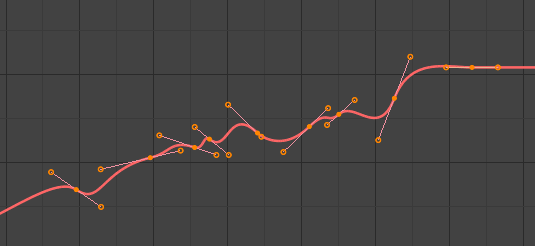
Clean Keyframes
Referenz
- Menü
- Tastenkürzel
X
Clean Keyframes resets the keyframe tangents on selected keyframes to their auto-clamped shape, if they have been modified.

F-Curve before cleaning. |
F-Curve after cleaning. |
Clean Channels
Referenz
- Menü
- Tastenkürzel
X
Acts like the Clean Keyframes tool but will also delete the channel itself if it is only left with a single keyframe containing the default property value and it’s not being used by any generative F-curve modifiers or drivers.
Bemerkung
The modified curve left after the Clean tool is run is not the same as the original, so this tool is better used before doing custom editing of F-curves and after initial keyframe insertion, to get rid of any unwanted keyframes inserted while doing mass keyframe insertion (by selecting all bones and pressing I for instance).
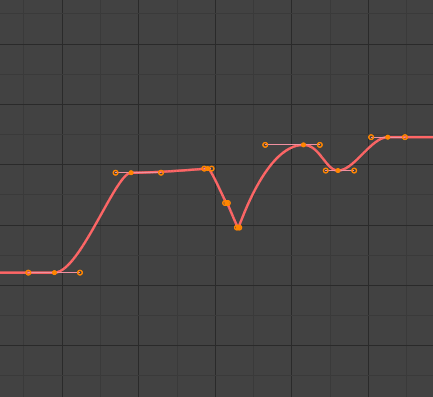
Smooth Keys
Referenz
- Menü
- Tastenkürzel
Alt-O
There is also an option to smooth the selected curves, but beware: its algorithm seems to be to divide by two the distance between each keyframe and the average linear value of the curve, without any setting, which gives quite a strong smoothing! Note that the first and last keys seem to be never modified by this tool.
|
F-Curve before smoothing. |
F-Curve after smoothing. |
Sample Keyframes
Referenz
- Menü
- Tastenkürzel
Shift-Alt-O
Sampling a set of keyframes replaces interpolated values with a new keyframe for each frame.
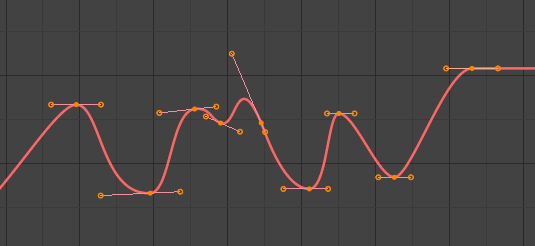
F-Curve before sampling. |
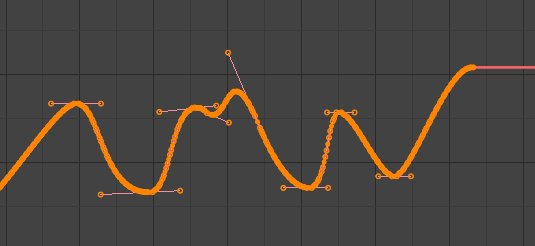
F-Curve after sampling. |
Bake Curve
Referenz
- Menü
- Tastenkürzel
Alt-C
Baking a curve replaces it with a set of sampled points, and removes the ability to edit the curve.
Un-Bake Curve
Referenz
- Menü
Unbaking a curve replaces the baked curve with an unbaked curve, adding the ability to edit it.
Discontinuity (Euler) Filter
Todo.