Display Panel
Reference
| Mode: | Object and Pose Mode |
|---|---|
| Panel: |
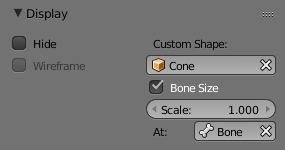
The Display panel.
Display panel lets you customize the look of your bones taking the shape of another existing object.
- Hide
- Hides the selected bone.
- Wireframe
- When enabled, bone is displayed in wireframe mode regardless of the viewport drawing mode. Useful for non-obstructive custom bone chains.
Custom Shape
Blender allows you to give to each bone of an armature a specific shape (in Object Mode and Pose Mode), using another object as “template”. In order to be visible the Shapes checkbox has to be enabled ( panel).
Options
- Custom Shape
- Object that defines the custom shape of the selected bone.
- Bone Size
- Option not to use bones length, so that changes in Edit Mode don’t resize the custom shape.
- Scale
- Avoids having multiple custom shapes at different sizes.
- At
- Bone that defines the display transform of this shape bone.
Workflow
To assign a custom shape to a bone, you have to:
- Switch to Pose Mode Ctrl-Tab.
- Select the relevant bone by clicking on it with RMB.
- Go to the Display panel Custom Shape field and select the 3D object previously created in the scene; in this example we are using a cube and a cone. You can optionally set the At field to another bone.
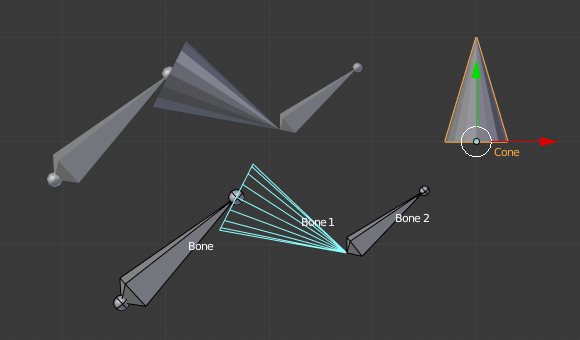
The armature with shape assigned to bone. Note the center of the Cone object.
Note
- These shapes will never be rendered, like any bone, they are only visible in 3D Views.
- Even if any type of object seems to be accepted by the Object field (meshes, curves, even metas…), only meshes really work. All other types just make the bone invisible; nothing is drawn…
- The center of the shape object will be at the root of the bone (see the bone page for root/tip).
- The object properties of the shape are ignored (i.e. if you make a parallelepiped out of a cube by modifying its dimensions in Object Mode, you will still have a cube-shaped bone…).
- The “along bone” axis is the Y one, and the shape object is always scaled so that one Blender Unit stretches along the whole bone length.
- If you need to remove the custom shape of the bone, just right-click in the Custom Shape field and select Reset to default value in the pop-up menu.
So to summarize all this, you should use meshes as shape objects, with their center at their lower -Y end, and an overall Y length of 1.0 BU.