Output Options
The first step in the rendering process is to determine and set the output options. This includes render size, frame rate, pixel aspect ratio, output location, and file type.
Dimensions Panel
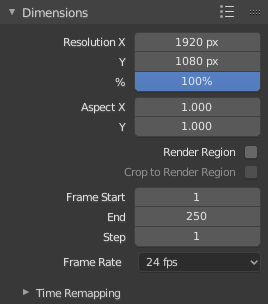
Dimensions panel.
- Render Presets
- Common format presets for TVs and screens.
- Resolution
- X/Y
- The number of pixels horizontally and vertically in the image.
- Percentage
- Slider to reduce or increase the size of the rendered image relative to the X/Y values above. This is useful for small test renders that have the same proportions as the final image.
- Aspect Ratio
Older televisions may have non-square pixels, so this can be used to control the shape of the pixels along the respective axis. This will pre-distort the images which will look stretched on a computer screen, but which will display correctly on a TV set. It is important that you use the correct pixel aspect ratio when rendering to prevent re-scaling, resulting in lowered image quality.
See Video Output for details on pixel aspect ratio.
- Render Region
Renders just a portion of the view instead of the entire frame. See the Render Region documentation to see how to define the size of the render region.
Note
This disables the Save Buffers option in Performance and Full Sample option in Anti-Aliasing.
- Crop Render Region
- Crops the rendered image to the size of the render region, instead of rendering a transparent background around it.
- Frame Range
- Set the Start and End frames for Rendering Animations. Step controls the number of frames to advance by for each frame in the timeline.
- Frame Rate
- For an Animation the frame rate is how many frames will be displayed per second.
- Time Remapping
- Use to remap the length of an animation.
Output Panel
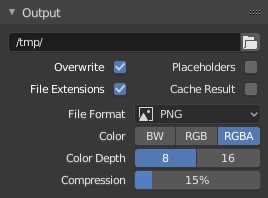
Output panel.
This panel provides options for setting the location of rendered frames for animations, and the quality of the saved images.
- File Path
Choose the location to save rendered frames.
When rendering an animation, the frame number is appended at the end of the file name with four padded zeros (e.g.
image0001.png). You can set a custom padding size by adding the appropriate number of#anywhere in the file name (e.g.image_##_test.pngtranslates toimage_01_test.png).This setting expands Relative Paths where a
//prefix represents the directory of the current blend-file.- Overwrite
- Overwrite existing files when rendering.
- Placeholders
- Create empty placeholder frames while rendering.
- File Extensions
- Adds the correct file extensions per file type to the output files.
- Cache Result
- Saves the rendered image and passes to a multi-layer EXR file in temporary location on your hard drive. This allows the Compositor to read these to improve the performance, especially for heavy compositing.
- File Format
Choose the file format to save to. Based on which format is used, other options such as channels, bit depth and compression level are available.
For rendering out to images see: saving images, for rendering to videos see rendering to videos.
- Color Mode
Choose the color format to save the image to. Note that RGBA will not be available for all image formats.
BW, RGB, RGBA
Hint
Primitive Render Farm
An easy way to get multiple machines to share the rendering workload is to:
- Set up a shared directory over a network file system.
- Disable Overwrite, enable Placeholders in the Render Output panel.
- Start as many machines as you wish rendering to that directory.
Post Processing Panel
Reference
| Panel: |
|---|
The Post Processing panel is used to control different options used to process your image after rendering.

Post Processing panel.
- Sequencer
- Renders the output of the Video Sequence editor, instead of the view from the 3D scene’s active camera. If the sequence contains scene strips, these will also be rendered as part of the pipeline. If Compositing is also enabled, the Scene strip will be the output of the Compositor.
- Compositing
- Renders the output from the compositing node setup, and then pumps all images through the Composite node map, displaying the image fed to the Composite Output node.
Dithering
Dithering is a technique for blurring pixels to prevent banding that is seen in areas of gradients, where stair-stepping appears between colors. Banding artifacts are more noticeable when gradients are longer, or less steep. Dithering was developed for graphics with low bit depths, meaning they had a limited range of possible colors.
Dithering works by taking pixel values and comparing them with a threshold and neighboring pixels then does calculations to generate the appropriate color. Dithering creates the perceived effect of a larger color palette by creating a sort of visual color mixing. For example, if you take a grid and distribute red and yellow pixels evenly across it, the image would appear to be orange.
The Dither value ranges from 0 to 2.