Proxy & Cache Settings
Cache Settings Panel
Reference
- Panel
The Cache is used to save frames in memory for preview, so they can be later displayed much faster than rendered from scratch. Cache capacity can be set in System tab of the Preferences.
In this panel you can set up types of images that will be cached for all strips.
- Cache Raw
Cache raw images read from drive, for faster tweaking of strip parameters at the cost of memory usage.
- Cache Preprocessed
Cache preprocessed images, for faster tweaking of effects at the cost of memory usage.
- Cache Composite
Cache intermediate composited images, for faster tweaking of stacked strips at the cost of memory usage.
- Cache Final
Cache final image for each frame.
- Recycle Up To Cost
Only frames with cost lower than this value will be recycled.
Each stored image has a cost assigned. Cost is calculated as ratio of time spent on rendering to maximum possible time to keep up with chosen frame rate. The higher the cost, the harder it is to render image.
Maximum image cost is limited to arbitrary value of 10.
Strip Cache Panel
Reference
- Panel
Similar to Cache Settings Panel, this panel sets the types of images that will be cached for the active strip.
- Enable Strip Cache
Enable overriding the cache defaults. When disabled, Cache Settings will be used.
- Cache Raw
Cache raw images read from drive, for faster tweaking of strip parameters at the cost of memory usage.
- Cache Preprocessed
Cache preprocessed images, for faster tweaking of effects at the cost of memory usage.
- Cache Composite
Cache intermediate composited images, for faster tweaking of stacked strips at the cost of memory usage.
Proxy Settings Panel
Reference
- Panel
- Storage
Defines whether the proxies are for individual strips or the entire sequence.
- Per Strip
Proxies are stored in the directory of the input.
- Project
All proxies are stored in one directory.
- Proxy Directory
The location to store the proxies for the project.
- Set Selected Strip Proxies
Set proxy size and overwrite flag for all selected strips.
- Rebuild Proxy and Timecode Indices
Generates Proxies and Timecodes for all selected strips, same as doing .
Strip Proxy & Timecode Panel
Reference
- Panel
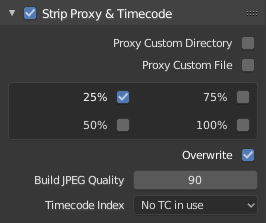
Proxy
Once you have chosen the Proxy/Timecode parameters, you need to select all strips for which you want proxies to be built. Then use , or button in Proxy Settings Panel. Once all proxies are built, they will be ready to use.
In order to use proxies, you have to select matching Proxy Render Size in Sequencer preview Sidebar panel.
- Proxy Custom Directory
By default, all generated proxy images are storing to the
<path of original footage>/BL_proxy/<clip name>folder, but this location can be set by hand using this option.- Proxy Custom File
Allows you to use pre-existing proxies.
- Size
Buttons to control how big the proxies are. The available options are 25%, 50%, 75%, 100 percent of original strip size.
- Overwrite
Saves over any existing proxies in the proxy storage directory.
- Quality
Defines the quality of the JPEG images used for proxies.
- Timecode Index
See Timecode.
Timecode
When you are working with footage directly copied from a camera without pre-processing it, there might be bunch of artifacts, mostly due to seeking a given frame in sequence. This happens because such footage usually does not have correct frame rate values in their headers. This issue can still arise when the source clip has the same frame rate as the scene settings. In order for Blender to correctly calculate frames and frame rate there are two possible solutions:
Preprocess your video with e.g. MEncoder to repair the file header and insert the correct keyframes.
Use Proxy/Timecode option in Blender.
The following timecodes are supported:
No TC in use – do not use any timecode
Record Run
Free Run
Free Run (rec date)
Record Run No Gaps
Note
Record Run is the timecode which usually is best to use, but if the clip’s file is totally damaged, Record Run No Gaps will be the only chance of getting acceptable result.