Parenting Objects
When modeling a complex object, such as a watch, you may choose to model the different parts as separate objects. To make all the parts move as one (“the watch”), you can designate one object as the parent of all the other parts. These other parts become its children, and any translation, rotation, or scale of the parent will also affects its children.
Contrary to most biological lifeforms, each object or bone in Blender has at most one parent. If an object already has a parent object and you give it another parent then Blender will remove the previous parent relationship. When the plural “parents” is used in this chapter, it references the hierarchy of parents, so the parent, the grandparent, great grandparent, and so on, of an object.
Make Parent
Reference
- Mode
Object Mode
- Menu
- Shortcut
Ctrl-P
To parent objects, select at least two objects (select the child objects first, and select the parent object last), and press Ctrl-P. The Set Parent To menu will pop up allowing you to select from one of several possible different parenting types. Selecting one of the entries in Set Parent To confirms, and the child/children to parent relationship is created. The selected objects will have their ‘parent’ set to the active object, and as a result will be ‘siblings’.
The Set Parent To pop-up menu is context-sensitive, which means the number of entries it displays can change depending on what objects are selected when the Ctrl-P shortcut is used.
Moving, rotating or scaling the parent will also usually transform the child/children. Yet transforming the child/children of the parent will not affect the parent. In other words, the direction of influence is from parent to child and not child to parent.
Tip
You can “move” a child object back to its parent by clearing its origin.
- Type
Blender supports many different types of parenting, listed below. Besides parenting the selected objects, some types add a Modifier or Constraint to the child objects, with the parent as the target object or activates a parent property i.e. Follow Path.
Object
Bone
Vertex
Vertex (Triangle)
- Keep Transform
The object’s current world transform (so its absolute location, rotation and scale in the world) is computed. The new parent is set, and then the Parent Inverse matrix is computed such that after setting the new parent the object is still at its previous world transform.
Hint
Use the Outliner
There is another way to see the parent-child relationship in groups and that is to use the Outliner view of the Outliner editor.
Parent Inverse
Blender can assign a parent without moving the child object. This is achieved via a hidden matrix called the Parent Inverse matrix, which sits between the transform of the parent and the child.
When objects are parented with Ctrl-P, Parent Inverse matrix is updated. Depending on the choice in the Set Parent menu, the object’s local location, rotation, and scale are also updated. For more details, see Object Parent.
The Parent Inverse matrix can be cleared by using Clear Parent Inverse.
Note
When setting the parent via the Object Properties panel, the Parent Inverse matrix is always reset. This can cause an unexpected jump in the object’s position. To avoid this, use Ctrl-P to set the new parent.
Object Parent
Object Parent is the most general form of parenting that Blender supports. It will take selected objects and make the active object the parent object of all the selected objects. Each child object will inherit the transformations of the parent. The parent object can be of any type.
If the object has a pre-existing parent, that is cleared first. This moves the object to its own location, rotation and scale, without its parent’s influence.
There are three operators that allow you to set an object parent. They differ in the way they compute the Parent Inverse matrix and the local Transform of the object.
Example: Object Parent (Keep Transform)
Object Parent with Keep Transform will keep any previous transformations applied to them from the previous parent object.
Assume that we have a scene consisting of three objects, those being two empty objects named “EmptyA” and “EmptyB”, and a Monkey object. Fig. Scene with no parenting. shows the three objects with no parenting relationships active on them.
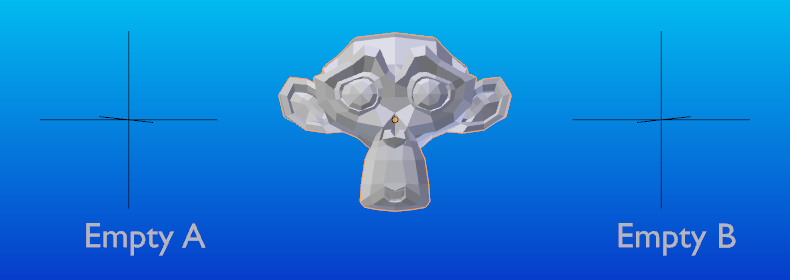
Scene with no parenting.
If you select the Monkey object by LMB click and then Shift-LMB click “EmptyA” object and press Ctrl-P and finally select Object from the Set Parent To pop-up menu. This will result in “EmptyA” object being the parent object of the Monkey object. With only “EmptyA” selected rotating/scaling/moving it will result in the Monkey object being altered respectively.
Scale the “EmptyA” object, so that the Monkey becomes smaller and moves to the left a little.
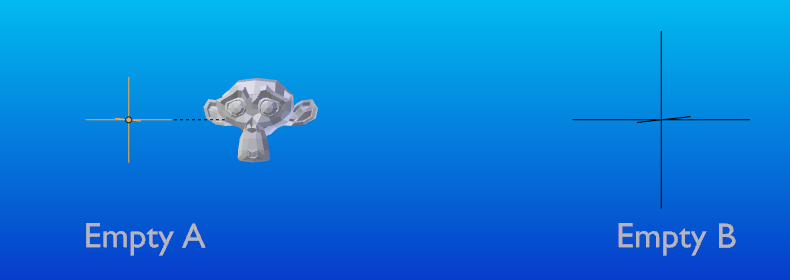
The monkey is the child object of “EmptyA”.
If you select only the Monkey object by LMB click and then Shift-LMB click “EmptyB” object and press Ctrl-P and select Object from the Set Parent To pop-up menu. This will result in “EmptyB” object being the parent object of the Monkey object. Notice that when you change the parent of the Monkey the scale of the Monkey changed.
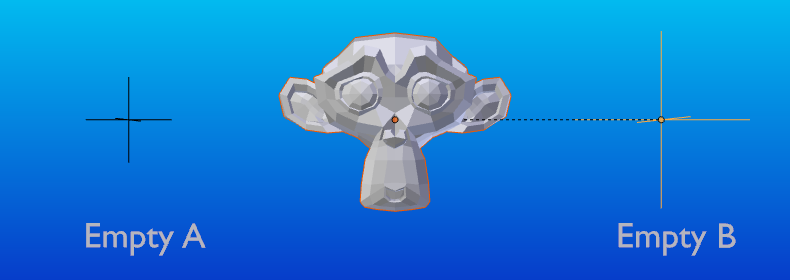
The monkey is the child object of “EmptyB”.
This happens because the Monkey object never had its scale altered directly, the change came about because it was the child of “EmptyA” which had its scale altered. Changing the Monkey’s parent to “EmptyB” resulted in those indirect changes in scale being removed, because “EmptyB” has not had its scale altered.
This is often the required behavior, but it is also sometimes useful that if you change your parent object that the child object keep any previous transformations it got from the old parent object; If instead when changing the parent object of the Monkey from “EmptyA” to “EmptyB” we had chosen parenting type Object and enable Keep Transform, the Monkey would keep its scale information it obtained from the old parent “EmptyA” when it is assigned to the new parent “EmptyB”.

The Object parent with Keep Transform.
If you want to follow along with the above description here is the blend-file:
Bone Parent
Bone parenting allows you to make a certain bone in an armature the parent object of another object. This means that when transforming an armature the child object will only move if the specific bone is the child object of moves.
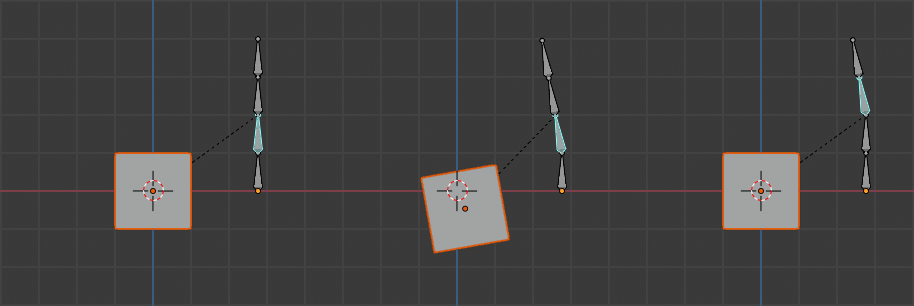
Three pictures of armatures with four bones.
In Fig. Three pictures of armatures with four bones. with the 2nd bone being the bone parent of the child object cube. The cube is only transformed if the 1st or 2nd bones are. Notice altering the 3rd and 4th bones has no effect on the cone.
To use bone parenting, you must first select all the child objects you wish to parent to a specific armature bone, then Shift-LMB select the armature object and switch it into Pose Mode and then select the specific bone you wish to be the parent bone by LMB selecting it. Once done press Ctrl-P and select bone from the Set Parent To pop-up menu.
Now transforming that bone in Pose Mode will result in the child objects also transforming.
Relative Parenting
Bone relative parenting is an option you can toggle for each bone. This works in the same way as bone parenting with one difference.
With bone parenting if you have parented a bone to some child objects and you select that bone and switch it into Edit Mode and then move that bone; When you switch back into Pose Mode on that bone, the child object which is parented to that bone will snap back to the location of the bone in Pose Mode.
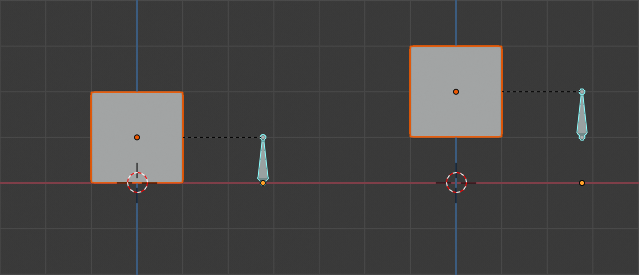
Single armature bone which has a child object cube parented to it using bone parenting.
In Fig. Single armature bone which has a child object cube parented to it using bone parenting. the 1st picture shows the position of the cube and armature before the bone is moved in Edit Mode. 2nd picture shows the position of the cube and armature after the bone was selected in Edit Mode, moved and switched back into Pose Mode. Notice that the child object moves to the new location of the pose bone.
Bone relative parenting works differently; If you move a parent bone in Edit Mode, when you switch back to Pose Mode, the child objects will not move to the new location of the Pose Bone.
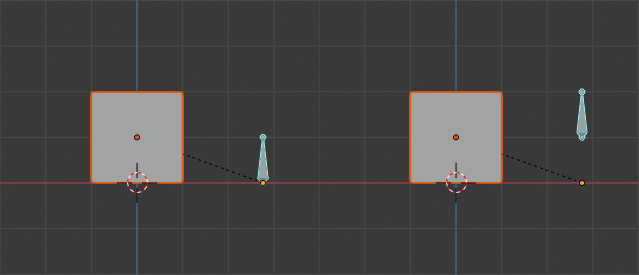
Single bone with bone relative parent to a cube.
In Fig. Single bone with bone relative parent to a cube. the 1st picture shows the position of the cube and armature before the bone is moved in Edit Mode. 2nd picture shows the position of the cube and armature after the bone was selected in Edit Mode, moved and switched back into Pose Mode. Notice that the child object does not move to the new location of the pose bone.
Note
When using Ctrl-P to set parents, choosing “Bone” or “Bone Relative” will respectively clear and set the bone’s “Relative Parenting” option. Since “Relative Parenting” is an option that is set per bone, this influences all child objects of that bone at once.
Vertex Parent
For objects of type curve, surface, mesh and lattice, there is the possibility to use one of its vertices or points as the parent of other objects. You can parent an object to a single vertex or a group of three vertices as well; that way the child/children will move when the parent mesh is deformed.
Vertex Parent from Edit Mode
In Object Mode, select the child/children and then the parent object. Tab into Edit Mode and on the parent object select either one vertex that defines a single point, or select three vertices that define an area (the three vertices do not have to form a complete face; they can be any three vertices of the parent object), and then press Ctrl-P and confirm.
At this point, if a single vertex was selected, a relationship/parenting line will be drawn from the vertex to the child/children. If three vertices were selected then a relationship/parenting line is drawn from the averaged center of the three points (of the parent object) to the child/children. Now, as the parent mesh deforms and the chosen parent vertex/vertices move, the child/children will move as well.
Vertex Parent from Object Mode
Vertex parenting can be performed from Object Mode, this is done like regular object parenting, press Ctrl-P in Object Mode and select Vertex or Vertex (Triangle).
The nearest vertices will be used from each object which is typically what you would want.
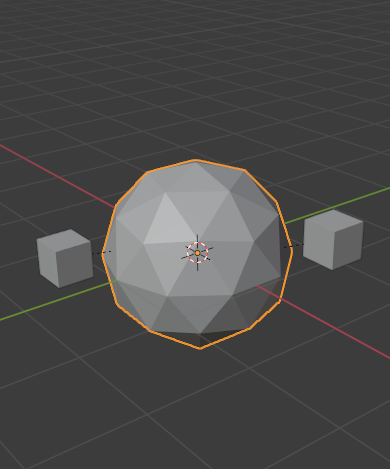
The small cubes can each be automatically parented to a triad of nearby vertices on the icosphere using the “Vertex (Triangle)” in the set parent context menu.¶ |
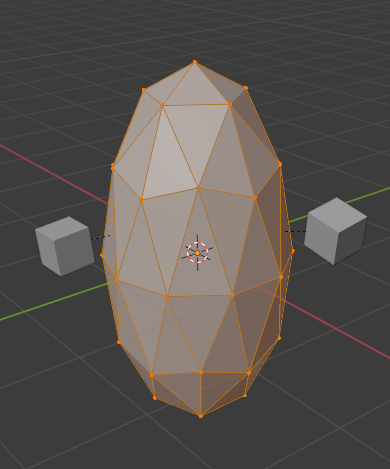
Reshaping the object in Edit Mode then means each of the cubes follows their vertex parent separately.¶ |
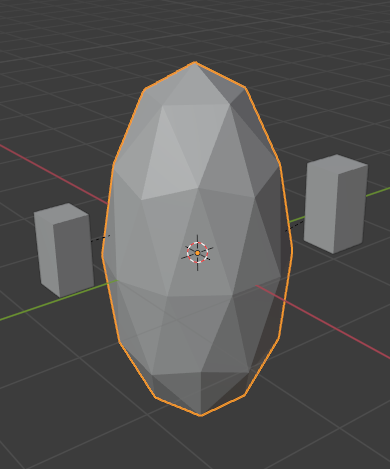
Scaling the parent icosphere in Object Mode means the child cubes are also scaled as expected.¶ |
The parent context menu item means users can rapidly set up a large number of vertex parent relationships, and avoid the tedious effort of establishing each parent-child vertex relationship separately.
Note
It is in fact a sort of “reversed” hook.
Make Parent without Inverse
Reference
- Mode
Object Mode
- Menu
This sets the parent, and then resets the Parent Inverse matrix and the object’s local location. As a result, the object will move to the location of the parent, but keep its rotation and scale.
Clear Parent
Reference
- Mode
Object Mode
- Menu
- Shortcut
Alt-P
You can remove a parent-child relationship via Alt-P.
- Clear Parent
If the parent in the group is selected, nothing is done. If a child or children are selected, they are disassociated from the parent, or freed, and they return to their original location, rotation, and size.
- Clear and Keep Transformation
Frees the children from the parent, and keeps the location, rotation, and size given to them by the parent.
See Non-Uniform Scale which may apply here.
- Clear Parent Inverse
Instead of removing the hierarchical parent-child relationship, this clears the Parent Inverse matrix from the selected objects. With an empty matrix, the location, rotation and scale properties of the children are interpreted in the coordinate space of the parent.
Known Limitations
Non-Uniform Scale
A parent with non-uniform scale and rotation in relation to its child may cause a shear effect.
While this is supported by parenting, the shear will be lost when the parent is cleared since it can’t be represented by location, scale and rotation.
If Clear and Keep Transformation moves the object, non-uniform scale is the most likely cause.