Edición
Editing text is quite different from other object types in Blender, and happens mainly in two areas. First, the 3D Viewport, where you type your text, and have a few shortcuts, e.g. for applying styles (see Font) – note however, that most Blender shortcuts you know in Edit Mode do not exist for texts. The second place is the Properties, especially the Font tab.
Texto
Referencia
- Modo
Modo Edición
- Menú
Editing text objects is similar to using a standard text editor but is not as full-featured and has some differences. The menu of the 3D Viewport header offers few options. You have no transform nor mirror tools, and so on. To leave Edit Mode use Tab as it does not insert a tab character in the text, but rather enters and exits Edit Mode, as with other object types.
- Cortar Ctrl-X
To cut and copy text to the buffer, use the shortcut or the matching entry in the Edit menu.
- Copiar Ctrl-C
To copy text to the buffer, use the shortcut or the matching entry in the Edit menu.
- Pegar Ctrl-V
To paste text from the buffer, use the shortcut or the matching entry in the Edit menu.
- Paste File
Inserts text from and external text file. This will bring up a File Browser for navigating to a valid UTF-8 file. As usual, be careful that the file does not have too many characters, as interactive response will slow down.
- To Uppercase
Changes the case of the selected text to uppercase.
- To Lowercase
Changes the case of the selected text to lowercase.
- Special Characters
This is a limited character map to insert characters which aren’t available from the keyboard. Many other special characters can be «composed», see Accent Characters. If you need others, you will have to copy-paste them from an external editor or character map program.
Nota
The text buffer is in sync with the desktop clipboard. But if it is used within Blender the text formatting will be copied as well. For other ways of inserting a text, see Inserting Text.
- Toggle Bold, Italics, Underline, Small Caps
To apply the Bold, Italics, Underline or Small Caps attribute to a set of characters, you either turn on the related setting prior to typing characters, or select existing text, and then toggle desired style from the menu.
Advertencia
Blender’s Bold and Italic buttons do not work the same way as in other applications, as they also serve as placeholders for you to load up other fonts manually.
- Kerning
Font kerning is the space between individual characters.
- Decrease Kerning Alt-Left
Decreases the spacing between the characters on either side of the cursor.
- Increase Kerning Alt-Right
Increase the spacing between the characters on either side of the cursor.
- Reset Kerning
Sets the spacing between the characters on either side of the cursor to their initial value.
- Borrar
- Previous/Next Character
Deletes the character before or after the cursor.
- Previous/Next Word
Deletes the word before or after the cursor.
Inserting Text
You can insert text in two ways: from the internal text buffer (as described above), or from a text file.
Using an existing text data-block, you can convert it to an object from the Text editor’s header, select , One Object or One Object per Line depending on your needs.
It is also possible to paste from the clipboard or a file from the Edit menu, while editing 3D text.
Accent Characters
Many special characters (such as accented chars, which are not directly available on your keyboard) can be «composed» using a combination of two other characters. To do so, type the main char, press Alt-Backspace, and then press the desired «modifier» to produce the special character. Some examples are given below:
|
|
Converting to a Mesh or Curve
In Object Mode, it is possible to convert a text object to a mesh or curve one, see Convertir.
Truco
The topology of the result is usually a bit messy, so it may be useful to use a Limited Dissolve deletion, or apply a Remesh modifier at a low threshold, to clean up your mesh.
Assigning Materials
Referencia
- Modo
Edit
- Panel
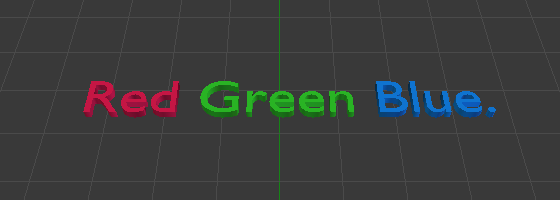
Each character can have a different Material index in order to have different materials on different characters.
You can assign indices either as you type, or after by selecting blocks of text and clicking on the Assign button in the Materials panel.

Red Green Blue text example.