Introducción
Animación con Grease Pencil
El objetivo principal de Grease Pencil es ofrecer una herramienta de animación 2D completamente inmersa en un entorno 3D.

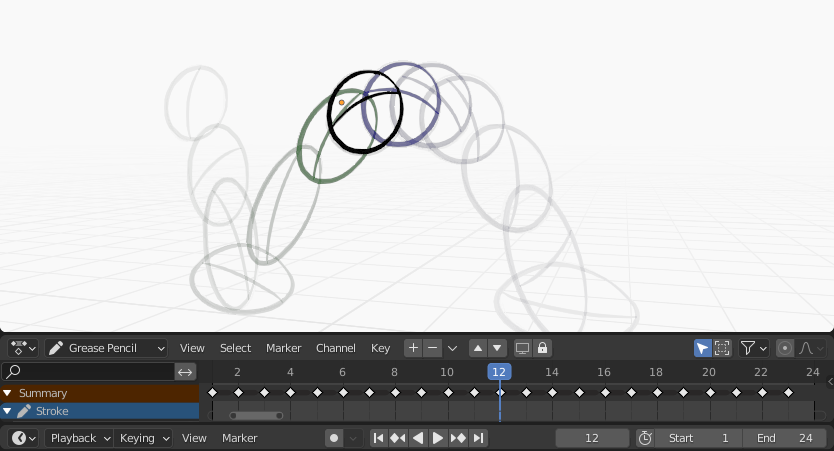
Sample animation showing Grease Pencil object keyframes in the Dope Sheet with onion skinning enabled.
En Blender, los objetos de Grease Pencil podrán ser animados de varias maneras:
- Moviéndolos en su totalidad
Cambiando su posición, rotación y escala con el tiempo;
- Dibujándolos fotograma a fotograma
Dibujando un fotograma por vez (como en la animación tradicional).
- Deformándolos
Animando sus puntos;
- Mediante una animación heredada
Provocando que el objeto se mueva, basándose en el movimiento de otro objeto (p.ej: su superior, un gancho, un esqueleto, etc). Útil, por ejemplo, para animación de recortes.
For a complete overview of animation in Blender please refer to the Animation & Rigging chapter.
Animación 2D tradicional
Claves
Traditional animation in Grease Pencil is achieved with the use of keyframes that hold the strokes information at a particular frame or frame range.
With Auto keyframe activated, every time you create a stroke in Grease Pencil object Draw Mode a new keyframe is added at the current frame on the active channel. With Auto keyframe deactivated, you will have to add manually a new keyframe or your new strokes will be added on the active keyframe.
See Keyframe Editing for more information.
Nota
The channels in the Dope Sheet correspond to the active 2D layer of the Grease Pencil object.
Grease Pencil has its own mode in the Dope Sheet to work with keyframes. See Grease Pencil mode in the Dope Sheet section for more information. There are also several tools on the Stroke menu to work with keyframes and strokes. See Animation tools for more information.
Piel de cebolla
One key element in traditional animation is the use of onion skinning. Grease Pencil offer a lot of flexibility and options for this tool. See Onion Skinning for more information.
Opciones de animación
Modo Dibujo
In Draw Mode there are three options related to the animation workflow that you can use.

General drawing/animation options.
- Agregar datos de influencia
When enabled, new strokes weight data is added according to the current vertex group and weights. If there is no vertex group selected, no weight data is added.
This is useful for example in cut-out animation for adding new drawing on the same vertex group without the need to creating it afterwards.
See Weight Paint Mode for more information.
- Dibujo aditivo
When creating new frames, the strokes from the previous/active frame are include as a basis for the new one.
- Multifotograma
If you need to add new strokes to your animation on several frames you can use multiframe drawing.
You can activate multiframe drawing with the Multiframe button next to the modes selector (faded lines icon). See Multiframe for more information.
Modo Edición
In Edit Mode there is an option related to the animation workflow that you can use.

Multiframe edition.
- Multifotograma
Sometimes you may need to modify several frames at the same time with edit tools, for example to repositioning drawings in an animation.
You can activate multiframe edition with the Multiframe button next to the modes selector (faded lines icon). See Multiframe for more information.
Ejemplos
Animación tradicional
This example shows you how to animate a bouncing ball with a traditional 2D animation technique and Grease Pencil.
First, go to menu to start with a new 2D animation template. The template is ready to quick start your animation with a Grease Pencil object already created, Onion Skinning activated, Auto Keyframe enabled and in camera view.
Set the range of the animation in the Timeline from 1 to 24.
In the 3D Viewport draw a ball on the upper left corner with the Draw Tool (extreme).
Move to frame 12 and draw a squashed ball in the bottom center (breakdown).
Move to frame 24 and draw a ball in the top right corner of the 3D Viewport (extreme).
Keep drawing all the in-between frames you want using the onion skinning ghost as a reference.
Para poder comprobar la animación, presionar Espacio para reproducirla.