Actions
When animating objects and properties in Blender, Actions record and contain the data. As everything else in Blender, Actions are data-blocks.

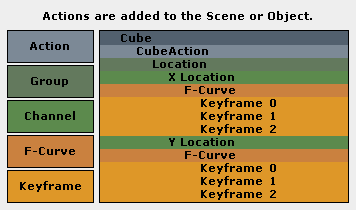
Actions.
So when you animate an object by changing its location with keyframes, the animation is saved to the Action.
Each property has a channel which it is recorded to, for example,
Cube.location.x is recorded to Channel X Location.
The X location and Y location properties can be shared across multiple objects,
if all objects have X location and Y location properties beneath them.

Graph Editor. Each channel has an F-curve represented by the lines between the keyframes.
- Actions
Record and contain animation data.
- Groups
Are groups of channels.
- Channels
Record properties.
- Curve-F
F-Curves are used to interpolate the difference between the keyframes.
- Fotogrammi Chiave (keyframes)
Keyframes are used to set the values of properties bound to a point in time.
Working with Actions

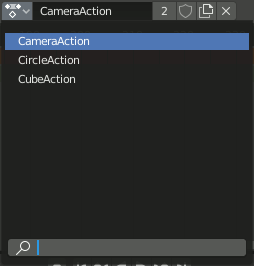
The Action data-block menu.
When you first animate an object by adding keyframes, Blender creates an Action to record the data.
Actions can be managed with the Action data-block menu in the Dope Sheet Action Editor header, or the Sidebar region of the NLA Editor.
If you are making multiple actions for the same object, press the shield button for each action. This will give the actions a Fake User and will make Blender save the unlinked actions.
Objects can only use one Action at a time for editing. The NLA Editor is used to blend multiple actions together.
Bake Action
Riferimento
- Editor
Vista 3D
- Modalità
Object and Pose Modes
- Menu
The final motion of objects or bones depends not only on the keyframed animation, but also on any active F-curve modifiers, drivers, and constraints. On each frame of all the scene’s frames, the Bake Action tool computes the final animation of the selected objects or bones with all those modifiers, drivers, and constraints applied, and keyframes the result.
This can be useful for adding deviation to a cyclic action like a Walk Cycle, or to create a keyframe animation created from drivers or constraints.
Manual Frame Range

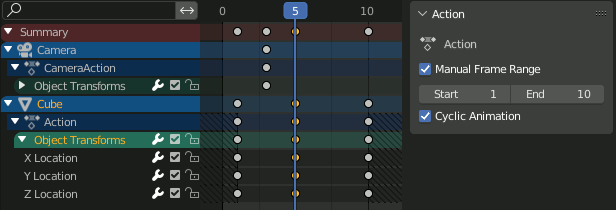
Actions with and without a Manual Frame Range in Dope Sheet.
It is possible to manually specify the intended useful frame range of an action via a panel available in the Dope Sheet or the NLA Editor when a channel or NLA track is selected.
- Manual Frame Range
Specifies if the manual frame range should be used, and the frame values.
When the range is set, it is used instead of the actual range occupied by key frames when adding a new track based on the action to NLA. It can also be used by exporters to determine the range of frames to export.
The range is displayed in the background of the editor as diagonal hash fill, to distinguish it from the solid fill of the current playback range.
The frame values are most commonly expected to be integers, but can be fractional.
- Cyclic Animation
Specifies that the action is intended to be cyclic over the specified range. The first and last frames of the range should represent the same pose of the cycle one loop apart, i.e. the range should include the duplicated initial key of the loop.
Nota
This option signifies intent and does not make the action cycle on its own. However, if Cycle-Aware Keying is enabled, it will automatically enable cyclic extrapolation and set up the loop period for curves newly added to the action.