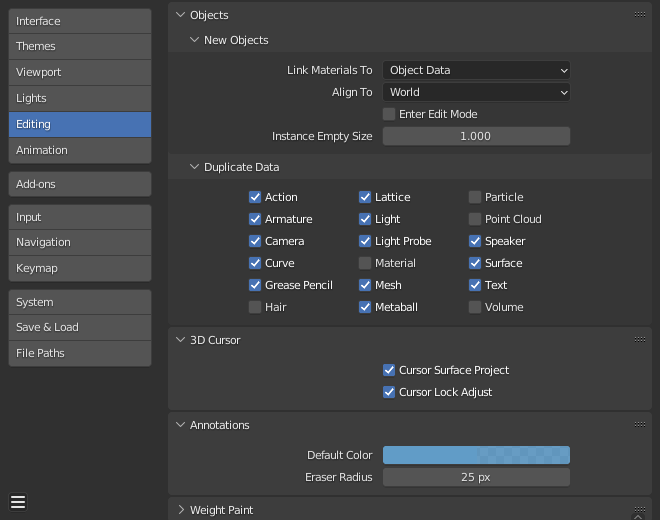
Modifica
These preferences control how several tools will interact with your input.

Oggetti
New Objects
- Link Materials to
To understand this option properly, you need to understand how Blender works with Objects. Almost everything in Blender is organized in a hierarchy of data-blocks. A data-block can be thought of as containers for certain pieces of information. For example, the Object data-block contains information about the Object’s location, rotation, and scale while the associated linked Object Data data-block contains information about the mesh.

Example for a mesh.
A material may be linked in two different ways:
- Object Data
Any created material will be created as part of the Object Data data-block.
- Oggetto
Any created material will be created as part of the Object data-block.

A material linked to Object Data (left) and Object (right).
Vedi anche
- Align to
- Mondo
New objects align with world coordinates.
- Vista
New object align with view coordinates.
- Cursore 3D
New objects align to the 3D cursor’s orientation.
- Enter Edit Mode
If selected, Edit Mode is automatically activated when you create a new object.
- Instance Empty Size
The display size for empties when a new collection instance is created.
Copy on Duplicate
The checkboxes define what data is copied with a duplicated object and what data remains linked. Any boxes that are checked will have their data copied along with the duplication of the object. Any boxes that are not checked will instead have their data linked from the source object that was duplicated.
For example, if you have Mesh checked, then a full copy of the mesh data is created with the new object, and each mesh will behave independently of the duplicate. If you leave the mesh box unchecked then when you change the mesh of one object, the change will be mirrored in the duplicate object.
The same rules apply to each of the checkboxes in the data-block list.
Cursore 3D
- Cursor Surface Project
When placing the cursor by clicking, the cursor is projected onto the surface under the cursor.
- Cursor Lock Adjust
When the viewport is locked to the cursor, moving the cursor avoids the view jumping based on the new offset.
Annotazioni
- Default Color
The default color for new Annotate layers.
- Eraser Radius
The size of the eraser used with the Annotate Tool.
Vedi anche
Weight Paint
Mesh skin weighting is used to control how much a bone deforms the mesh of a character. To visualize and paint these weights, Blender uses a color ramp (from blue to green, and from yellow to red). Enabling the checkbox will enable an alternate map using a ramp starting with an empty range. Now you can create your custom map using the common color ramp options. For detailed information see the Color ramps page.
Grease Pencil
- Distance
- Manhattan
The minimum number of pixels the mouse should have moved either horizontally or vertically before the movement is recorded. Decreasing this should work better for curvy lines.
- Euclidean
The minimum distance that mouse has to travel before movement is recorded.
Vedi anche
Editor Testi
- Auto Close Character Pairs
Automatically insert the corresponding character to close an expression when typing characters such as quotes, brackets, braces, or parentheses.
Node Editor
- Auto-Offset
Automatically offset the following or previous nodes in a chain when inserting a new node. See Auto-Offset for more information.
- Auto-offset Margin
Margin to use for offsetting nodes.
Miscellaneous
- Sculpt Overlay Color
Defines a color to be used in the inner part of the brushes circle when in Sculpt Mode, and it is placed as an overlay to the brush, representing the focal point of the brush influence. The overlay color is visible only when the overlay visibility is selected (clicking at the eye to set its visibility), and the transparency of the overlay is controlled by the alpha slider located at the in the Sidebar.