Motion Paths
Reference
| Editor: | 3D View, Properties editor |
|---|---|
| Mode: | Object Mode |
| Panel: |
Reference
| Editor: | 3D View, Properties editor |
|---|---|
| Mode: | Pose Mode |
| Panel: | |
| Menu: |
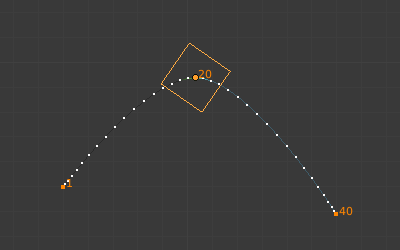
An animated cube with its motion path displayed.
The Motion Paths tool allows you to visualize the motion of points as paths over a series of frames. These points can be object origins and bone joints.
To create or remove motion paths, it is necessary to first select the bones. Then:
- To show the paths (or update them, if needed), click on the Calculate Path button.
- To hide the paths, click on the Clear Paths button.
注釈
Remember that only selected bones and their paths are affected by these actions!
The paths are shown in a light shade of gray for unselected points, and a slightly blueish gray for selected ones. Around the current frame a glow indicate the direction of movement: blue towards future frames and green towards the past. Each frame is displayed by a small white dot on the paths.
The paths are automatically updated when you edit your poses/keyframes, and they are also active during animation playback. Playing the animation affects the paths only when the Around Current Frame option is enabled.
Options
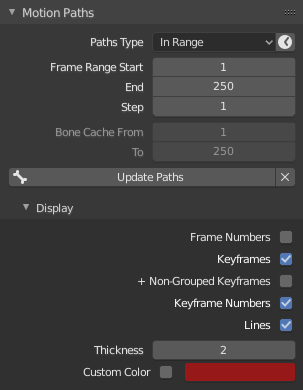
The Motion Paths panel in the Armature tab.
- Type
- Around Frame
- Display paths of points within a fixed number of frames around the current frame. When you enable this button, you get paths for a given number of frames before and after the current one (again, as with ghosts).
- In Range
Display paths of points within specified range.
- Clock Button
- Updates the display frame range from the scene frame range.
- Frame Range
- Before, After
- Number of frames to show before and after the current frame (only for Around Current Frame Onion-skinning method).
- Start, End
- Starting and Ending frame of range of paths to display/calculate (not for Around Current Frame Onion-skinning method).
- Step
- Allows displaying one point for every n frames on the path. Mostly useful when you enable the frame number display (see below), to avoid cluttering the 3D Views.
- Cache/Bone Cache
- From, To
- These are the start/end frames of the range in which motion paths are shown. You cannot modify this range without deleting the motion path first.
- Calculate/Update Paths
If no paths have been calculated, Calculate Paths will create a new motion path in cache based on the options specified in the pop-up menu or the Adjust Last Operation panel.
If a path has already been calculated, Update Paths will update the path shape to the current animation. To change the frame range of the calculated path, you need to delete the path and calculate it again.
- Start, End
- These are the start/end frames of the range in which motion paths are shown. You have to Calculate Paths again if you modify this setting, to update the paths in the 3D Views. The start frame is inclusive (i.e. if you set Start to 1, you will really see the frame 1 as starting point of the paths...).
- Bake Location
- Bones only -- By default, you get the tips' paths. By changing this setting to Tails, you will get the paths of the bone's roots (remember that in Blender UI, bones' roots are called "heads"...). You have to Calculate Paths again if you modify this setting, to update the paths in the 3D Views.
- Clear Paths
X - Clears paths on all objects/bones or just the selected ones when holding Shift.
Show
- Frame Numbers
- When enabled, a small number appears next to each frame dot on the path, which is of course the number of the corresponding frame.
- Keyframes
- When enabled, big yellow square dots are displayed on motion paths, showing the keyframes of their bones (i.e. only the paths of keyed bones at a given frame get a yellow dot at this frame).
- + Non-Grouped Keyframes
- For bone motion paths, it searches the whole Action for keyframes instead of in groups with matching name only (this is slower).
- Keyframe Numbers
- When enabled, you will see the numbers of the displayed keyframes, so this option is obviously only valid when Show Keys is enabled.
- Lines
Toggles whether the lines between the points are shown.
- Thickness, Custom Color
- Customizable thickness and color for the lines.
Example
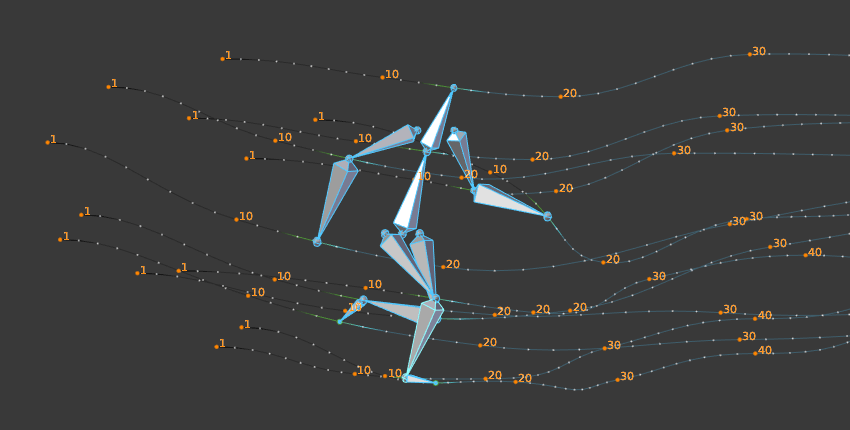
An example of a motion path of an armature.