Particle Instance Modifier
When a Particle Instance modifier is added to an object, the mesh of this object will be duplicated at the location of the particles of the selected Particle System from another target object. This means that to use this modifier, you must have at least one other object that has a Particles System on it.
Because of the correlation in which the Particle Instance modifier is influenced by the underlying particle systems on other objects, some of the apparent effects generated by the modifier can look and act vastly different, depending on the underlying settings of the particle systems it is associated with. This is worth taking account of, when it seems that the Particle Instance modifier settings do not return the expected results.
Options
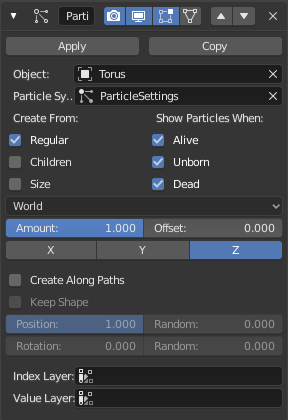
The Particle Instance modifier.
- Object
The target object which has a particle system associated with it.
- Particle System
Which particle system from the target Object to apply this modifier to.
Create From
- Normal
When enabled, the modifier will use the regular (parents) particles to duplicate the mesh of the modified object.
- Children
When enabled, the modifier will use the children particles to duplicate the mesh of the modified object.
- Size
Scale the instanced copies of the mesh by the particle size attribute. When this is disabled, all the copies appear the same size as the origin.
See the particle system's Render and Children panels for particle's size options.
Show Particles When
- Unborn
When enabled, the modifier will use the unborn particles to duplicate the mesh of the modified object.
- Alive
When enabled, the modifier will use the alive particles to duplicate the mesh of the modified object.
- Dead
When enabled, the modifier will use the dead particles to duplicate the mesh of the modified object.
Further Options
- Space
- World, Local
Use World Space, or Local Space of the target object (that the particle system is assigned to).
World space means that the locations of the copies of the modified mesh will depend on the location of the modified object and of the target object.
Local space means that the locations of the copies of the modified mesh will depend only on the location of the modified object.
- Amount
The proportion of particles to be used. Allows you to randomly skip particles to adjust the amount of instances.
警告
The random algorithm used currently only ensures that relative amount to be respected statistically. The actual amount of instances generated will differ from the theoretical one, depending on the Seed value of the target particle system (and the Offset value described below, too).
That deviation is not significant with high number of particles, but it will be highly noticeable with low numbers (e.g. with 100 particles in the target system, and an Amount value of
0.1, it can generate either up to 15 or 5 instances, instead of the 10 expected).- Offset
A relative offset in the range of particles used for instantiation. Allows you to avoid overlapping of the used particles, when the same particle system is used in multiple modifier instances.
ちなみに
If you want to fully avoid overlaps, your Offset value must be at least as high as your Amount value.
- Rotation Axis X/Y/Z
Specify which axis of the modified object to use as pole axis to apply the rotation from the instantiated particles.
Using Paths
By default, the instances are placed depending on the particles position in the current frame. By enabling this option, you can select the position along the particles path regardless of the current frame.
You can adjust the particles' path (using the Path visualization type) on the Render panel of the Particle System tab.
注釈
The particle system must be baked, except for Hair type or Keyed physics.
- Create Along Paths
This option tries to make the instance of the modified object to follow, to deform its shape along the particle path (or the hair strand).
- Keep Shape
Enabling this prevents the instance from being deformed, and places it on the path according to the Position value.
- Position
Specify what percentage of the path the instance fills, or the position on the path if the Keep Shape option is enabled.
- Random
Adds some randomness to the Position value of each instance.
- Rotation
Specifies the rotation around the path.
- Random
Adds some randomness to the Rotation value of each instance.
Custom Data Layers
These fields allow you to select vertex color layers, which will be filled with colors based on the particles information. These vertex color layers can be used, for example, in a shader to add variance to a material.
- Index Layer
A vertex color layer for values based on the particles index.
- Value Layer
A vertex color layer for random per-particle values.
Examples
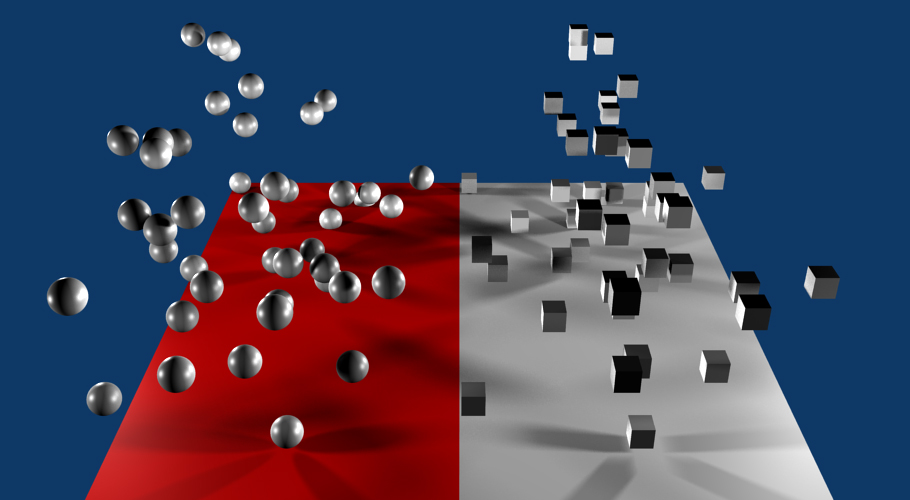
Particle Instance modifier example.
The render above shows a single plane mesh object assigned to two different vertex groups and each of those vertex groups is assigned to a separate and independent particle system, with each particle system being assigned to a different Particle Instance modifier. In the case shown the Particle Instance modifiers are added to a sphere and a cube. See example blend-file.
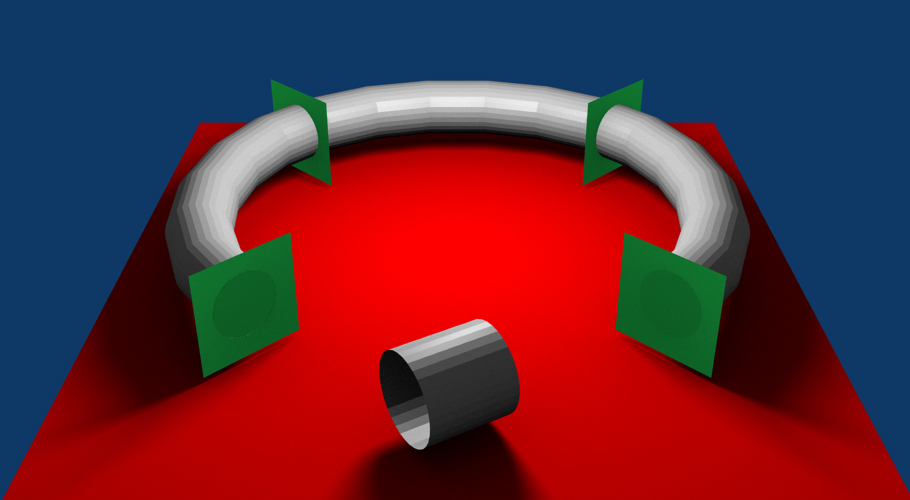
Create Along Path example.
In this example, a single Keyed particle travels through four points (green planes), on an elliptical path. The Particle Instance modifier is added to a cylinder object and then associated with that Keyed particle system.
When the Create Along Paths is activated, instead of the cylinder location just following the position of the particle, the cylinder mesh is fitted to the shape of the path followed by the particle. The mesh geometry of the object which is deformed can have an impact on how well the deformation is carried out. In the case of the cylinder, it has many loop cuts along its length so that it can bend at those points to deform along the particle path.
The Particle Instance modifier Create Along Paths feature works for hair (strand) particles as well as with keyed particles. In this case, the mesh of the Particle Instance modifier will follow the length and profile of the hair strands paths.
注釈
Strands, when they are generated, instantly die when created, so for the Create Along Paths checkbox to be of any use, you must also have the Dead checkbox enabled.