はじめに
UV Editor は、画像/テクスチャなどの 2D アセットを 3D オブジェクトにマッピングし、UV と呼ばれるものを編集するために使用します。

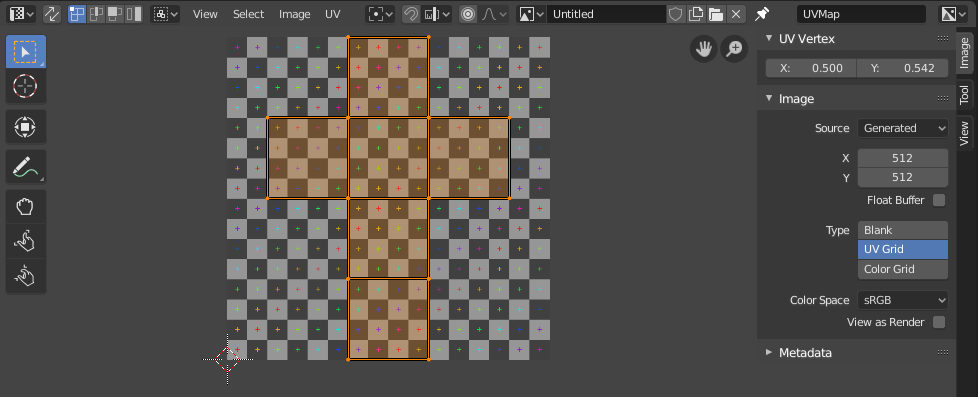
UV マップとテストグリッドテクスチャを持つ UV Editor。
2D テクスチャを 3D オブジェクトへマッピングするための最も柔軟な手法は、"UV マッピング" と呼ばれるものです。この手法では、3D (X、Y と Z) のメッシュをもとに、フラットな 2D (X や Y...というより、すぐに説明しますが "UとV" ) のイメージへと展開します。画像の色はメッシュへマッピングされ、メッシュの面の色として表現されます。UV テクスチャリングを使用することにより、オブジェクトへ、手続き型のマテリアルやテクスチャでは不可能なリアリティを与えられるほか、頂点ペイントよりも細かなディテールを加えることができます。
UV の説明
UVマッピングは「段ボール箱のカット」と例えると、最も解りやすいです。箱は 3次元 (3D) のオブジェクトで、ちょうどシーンに追加したメッシュキューブのようなものです。
ハサミで箱の縫い目や折り目を切ると、テーブルの上に平らに広げることができるでしょう。テーブル上の箱を見下ろした時、左右の方向を U、上下の方向と V と言えます。そのイメージは 2 次元 (2D) です。普段は 3 次元空間 (3D) を参照するために使用している X、Y (と Z) の代わりに、これらの「テクスチャ空間座標」を参照するために U とV を使用します。
箱を再び組み立てると、紙上での特定の UV 位置が、箱の (X, Y, Z の) 位置へ転送されます。これは、コンピュータが 2D イメージを 3D オブジェクトにラッピングする際に行う処理です。
UV アンラップの工程では、UV Editor での平らなイメージを、オブジェクト (このケースでは箱) の面へどのようにマッピングするかを Blender へ正確に伝えます。この工程を、あなたは完全に自由に行うことができます。(前の例を続けると、最初に箱をテーブル上に平らに広げた後、さらに細かく切ったり、何らかの方法で欠片を引き伸ばしたり縮めたりできます。またそれらを、同様に何らかの方法でテーブル上に広げられた写真の上へ、自由に再配置することができます)。
例

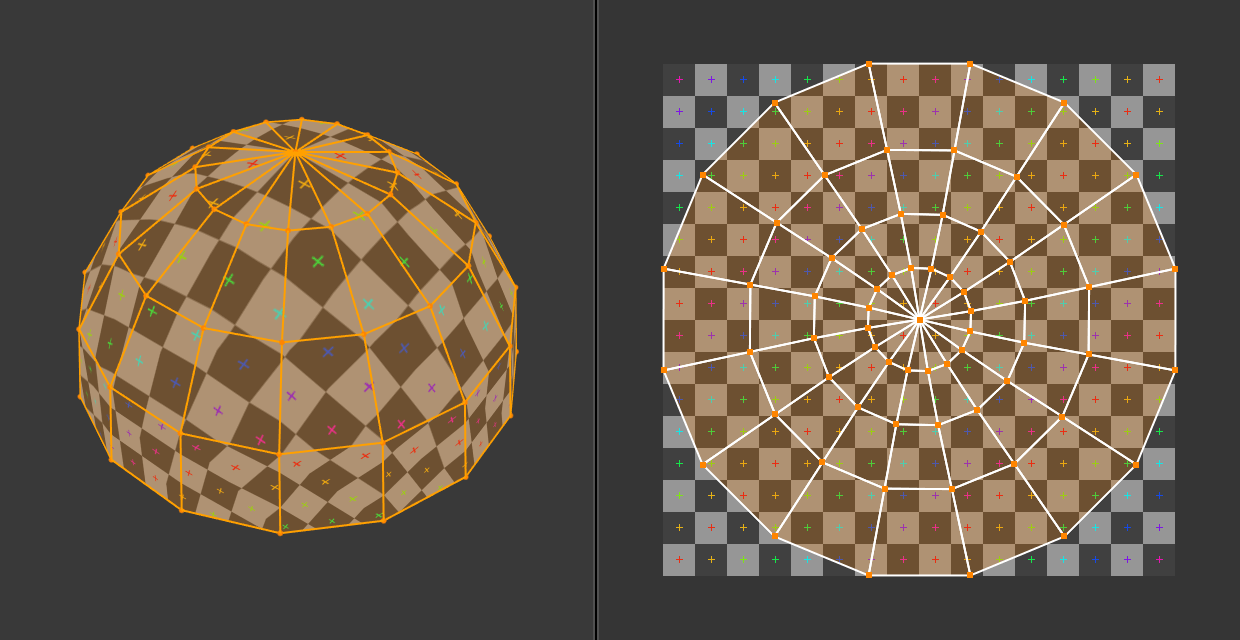
3D 空間 (XYZ)と UV 空間。
この図では、3D 空間に表された面の形状と大きさが、UV 空間では異なることがわかります。この違いは、3D パーツ (XYZ) の 2D 平面 (UV マップ) への「ストレッチ」(技術的にはマッピングと呼ばれます) によって引き起こされます。
3D オブジェクトが UV マップを持つ場合、3D 座標の X、Y、Z に加えて、オブジェクトの各ポイントに対応した U と V の座標も持ちます。
注釈
(上の球体のように) より複雑なモデルでは、面をカットされない代わりに、平らにするために引き伸ばされるという状態になります。これにより、UV マップは簡単に作成されますが、最終的にマッピングされたテクスチャに歪みが発生する場合があります。
UV の利点
While procedural textures are useful -- they never repeat themselves and always "fit" 3D objects -- they are not sufficient for more complex or natural objects. For instance, the skin on a human head will never look quite right when procedurally generated. Wrinkles on a human head, or scratches on a car do not occur in random places, but depend on the shape of the model and its usage. Manually-painted images, or images captured from the real world gives more control and realism. For details such as book covers, tapestry, rugs, stains, and detailed props, artists are able to control every pixel on the surface using a UV texture.
UV マップは、テクスチャのどの部分がモデルの各ポリゴンに適用されるべきかを示します。各ポリゴンの頂点は、画像のどの部分がマッピングされるかを定義する 2D 座標に割り当てられます。これらの 2D 座標は (3D の XYZ 座標と対比して) UV と呼ばれます。これらの UV マップを生成する操作は、メッシを 2D 平面上に展開することから「アンラップ」とも呼ばれます。
For most simple 3D models, Blender has an automatic set of unwrapping algorithms that you can easily apply. For more complex 3D models, regular Cubic, Cylindrical or Spherical mapping, is usually not sufficient. For even and accurate projection, use seams to guide the UV mapping. This can be used to apply textures to arbitrary and complex shapes, like human heads or animals. Often these textures are painted images, created in applications like the Gimp, Krita, or your favorite painting application.
インターフェース
ヘッダー

UV Editor のヘッダー。
ヘッダーには、UV を操作するためのいくつかのメニューとオプションが含まれています。
- Sync Selection
Syncs selection between the UV Editor and the 3D Viewport. See Sync Selection for more details.
- Selection Mode
The UV element type to select. See Selection Mode for more details.
- Sticky Selection Mode
Option to automatically expand selection. See Sticky Selection Mode for more details.
- View
エディタでのコンテンツの表示方法を制御するためのツールです。ナビゲート 参照してください。
- Select
UV の選択 を行うためのツールです。
- Image
Tools for opening and manipulating images. See Editing.
- UV
Contains tools for Unwrapping Meshes and Editing UVs.
- Image
A data-block menu used for selecting images. When an image has been loaded or created in the Image editor, the Image panel appears in the Sidebar region. See イメージの設定.
- Image Pin
Todo.
- Active UV Loop Layer
Select which UV map to use.
- Display Channels
Select what color channels are displayed.
- Color and Alpha
Replaces transparent pixels with background checkerboard, denoting the alpha channel.
- Color
Display the colored image, without alpha channel.
- Alpha
Displays the Alpha channel a grayscale image. White areas are opaque, black areas have an alpha of 0.
- Z-Buffer
Display the depth from the camera, from Clip Start to Clip End, as specified in the Camera settings.
- Red, Green, Blue
Single Color Channel visualized as a grayscale image.
Tool Settings
- Pivot
Similar to working with pivot points in the 3D Viewport.
- UV Snapping
Similar to Snapping in the 3D Viewport.
- Proportional Editing
See Proportional Editing.