Ivy Gen
Based on the wonderful code by Thomas Luft and his original IvyGen program.
Original Blender port by testscreenings, further advances by PKHG and TrumanBlending.

有効化方法
Blenderを開き、 Preferences(プリファレンス)に行き、 Add-ons(アドオン) タブを開きます。
Click Add Curve then Ivy Gen to enable the script.
Interface(インターフェイス)
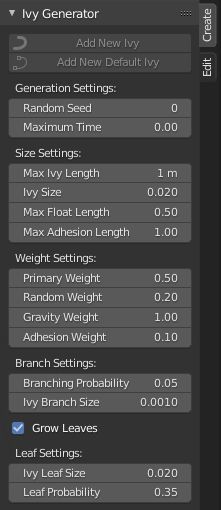
Located in the .
Located in the .
The Update Ivy operator is separate from the main menu and appears in the 3D Viewport. You can adjust settings in the panel and press the Update button to update parameters.
手順
Select the object you want to grow ivy on.
Enter Edit Mode and select a vertex that you want the ivy to spawn from.
Snap the cursor to the selected vertex.
Enter Object Mode and with the object selected: adjust settings and choose Add New Ivy.
The Add Default Ivy operator will use the default parameters during creation. This will generate your initial Ivy Curve and Leaves. From here you can access the Ivy menu in the Sidebar. I suggest to make small changes and then press Update Ivy in the 3D Viewport operator.
参照
- Category(カテゴリー)
Add Curve
- Description(詳細)
Adds generated ivy to a mesh object starting at the 3D Cursor.
- Location(位置、場所)
- File(ファイル)
add_curve_ivygen.py
- Author(作者)
testscreenings, PKHG, TrumanBlending
- メンテナー
Vladimir Spivak (cwolf3d)
- License(ライセンス)
GPL
- サポートレベル
Community(コミュニティ)
- Note(メモ)
このアドオンはBlenderにバンドルされています。