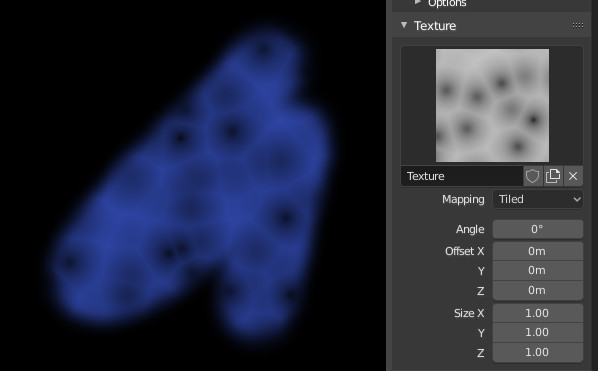
Texture(テクスチャ)

Texture options and example.
Use the texture data-block at the bottom of the paint panel to select a preloaded image or procedural texture to use as your brush pattern.
Note that in order to use it, you must have a placeholder material defined, and that particular texture defined using the Material and Texture buttons. It is not necessary to have that material or texture applied to any mesh anywhere; it must only be defined.
The example to the right shows the effects of painting with a Voronoi texture.
- Texture(テクスチャ)
In paint modes the texture is used as a color source, while for sculpting it is used to determine the strength of the brush.
- Mapping
Sets the way the texture is applied to the brush stroke.
- View Plane
If View Plane is enabled, the current view angle is used to project the brush texture onto the model. I.e. the texture follows the mouse, so it appears that the texture is being dragged across the model. In 2D painting, the texture moves with the brush.
- Area Plane
Projects the brush texture along the local surface normal, which keeps the texture from stretching when sculpting on a portion of the mesh that is at an extreme angle to the viewpoint.
- Tiled(タイル状)
The Tile option tiles the texture across the screen, so moving the brush appears to move separately from the texture. The Tile option is most useful with tileable images, rather than procedural textures.
- 3D
The 3D option allows the brush to take full advantage of procedural textures. This mode uses vertex coordinates rather than the brush location to determine what area of the texture to use.
- Random(ランダム)
Picks a random texture coordinate to sample from for each dab.
- Stencil
Stencil mapping works by projecting the paint from the camera space on the mesh or canvas. Painting is applied only inside the boundaries of the stencil. The stencil is displayed as a screen space overlay on the viewport. To the transform the stencil texture and the stencil mask with additional Alt pressed:
Move RMB
Scale Shift-RMB
Rotate Ctrl-RMB
When using stencil scaling, X and Y are used to constrain the scaling to one axis. Pressing one of the buttons twice reverts to unconstrained scaling.
- Image Aspect
Restore the aspect ratio of the original image to reset stretching introduce by scaling, (Image textures only.) This operator can use the tiling and scale values of the brush texture if the relevant are enabled in Adjust Last Operation(最後の操作を調整) panel.
- Reset Transform
Restores the position of the stencil.
- Angle Ctrl-F
This is the rotation angle of the texture brush. It can be changed interactively via Ctrl-F in the 3D Viewport. While in the interactive rotation you can enter a value numerically as well.
- Rake R
Angle follows the direction of the brush stroke. Not available with 3D textures. (Shortcut sculpting only.)
- Random R
Angle is randomized per dab.
- Random Angle
Constraints the random deviation to a range.
- Offset(オフセット) X, Y, Z
Offset the texture map placement in X, Y, and Z axes.
- Size X, Y, Z
Set the scale of the texture in each axis. Not available for Drag sculpting textures.
- Sample Bias Sculpt Mode
Value added to texture samples.