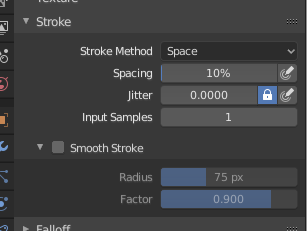
Stroke

Stroke panel.
- Stroke Method E
Defines the way brush strokes are applied to the canvas.
- Dots
Apply paint on each mouse move step.
- Drag Dot
Leaves only one dab on the canvas which can be placed by dragging.
- Space
Creates brush stroke as a series of dots, whose distance (spacing) is determined by the Spacing setting.
- Spacing
Represents the percentage of the brush radius.
Limits brush application to the distance specified by spacing.
- Airbrush
Flow of the brush continues as long as the mouse click is held (spray), determined by the Rate setting. With other methods the brush only modifies the color when the brush changes its location. This option is not available for the Grab sculpting brush.
- Rate
Interval between paints for airbrush.
- Anchored
Creates a single dab at the brush location. Clicking and dragging will resize the dab diameter.
- Edge to Edge
The brush location and orientation are determined by a two point circle, where the first click is one point, and dragging places the second point, opposite from the first.
- Line
Clicking and dragging lets you define a line in screen space. The line dabs are separated by Spacing, similar to space strokes. With Alt the line stroke is constrained to 45 degree increments.
- Curve
Defines the stroke curve with a Bézier curve (dabs are separated according to Spacing). Use Ctrl-RMB to create the initial control point of the curve.
- Paint Curves
Stroke Curves are reusable and can be stored and selected by using the 데이터블록 메뉴(data-block menu) menu.
- Add Points
You can define additional curve control points by using Ctrl-RMB. The handles can be defined by dragging the mouse. The stroke flows in the direction of the first control point to the second control point. If another control point is added after the second control point, instead of extending it from the first control point in a different direction, it will become the initial control point, and thus the stroke still flows in the direction of the first to the second.
- Transforming Points
The control points and handles can be dragged with LMB. To make sure that the handles of a control point are symmetrical, drag them using Shift-RMB. A few transform operators are supported such as moving, scaling and rotating.
- Selection
The handles can be selected individually by using RMB, extend the selection by Shift-RMB and deselect/select all by using A.
- Delete Points X
To delete a curve point, use X.
- Draw Curve Return
To confirm and execute the curved stroke, press Return or use the Draw Curve button.
- Spacing Distance Sculpt Mode Only
Method used to calculate the distance to generate a new brush step.
- View
Calculates the brush spacing relative to the view.
- Scene
Calculates the brush spacing relative to the scene using the stroke location. This avoids artifacts when sculpting across curved surfaces.
- Adjust Strength for Spacing
Attenuate the brush strength according to spacing. Available for the Space, Line, and Curve stroke methods.
- Dash Ratio
Ratio of samples in a cycle that the brush is enabled. This is useful to create dashed lines in texture paint or stitches in Sculpt Mode. Available for the Space, Line, and Curve stroke methods.
- Dash Length
Length of a dash cycle measured in stroke samples. This is useful to create dashed lines in texture paint or stitches in Sculpt Mode. Available for the Space, Line, and Curve stroke methods.
- Jitter
Jitter the position of the brush while painting.
- Jitter Pressure
Brush Jitter can be affected by enabling the pressure sensitivity icon, if you are using a Graphics Tablet.
- Jitter Unit
Controls how the brush Jitter is measured.
- View
The Jitter is measured based on how the cursor appears on the monitor i.e. 《screen space》.
- Scene
The Jitter is measured based on real world units. The unit type and scaling can be configured in the Scene Units.
- Input Samples
Recent mouse locations (input samples) are averaged together to smooth brush strokes.
Stabilize Stroke
Stabilize Stroke makes the stroke lag behind the cursor and applies a smoothed curve to the path of the cursor. This can be enabled temporary by holding Shift-S while painting or permanently by clicking the checkbox found in the header.
- Radius
Sets the minimum distance from the last point before stroke continues.
- Factor
Sets the amount of smoothing.