Tools
Reference
| Mode: | Sculpt Mode |
|---|---|
| Panel: |
Brush
Brush Type
Reference
| Mode: | Sculpt Mode |
|---|---|
| Panel: | |
| Menu: |
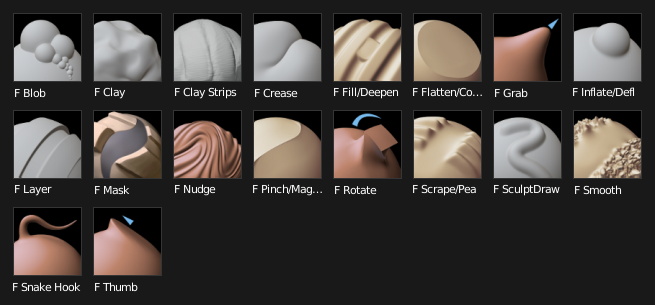
Sculpt brushes.
- Blob
- Pushes mesh outward or inward into a spherical shape with settings to control the amount of pinching at the edge of the sphere.
- Clay C
- Similar to the SculptDraw brush, but includes settings to adjust the plane on which the brush acts. It behaves like a combination of the Flatten and SculptDraw brushes.
- Clay Strips
- Similar to the Clay brush, but it uses a cube to define the brush area of influence rather than a sphere.
- Crease Shift-C
- Creates sharp indents or ridges by pushing or pulling the mesh, while pinching the vertices together.
- Fill/Deepen
- Works like the Flatten brush, but only brings vertices below the brush plane upwards. The inverse of the Fill brush is to Deepen by pushing vertices below the plane downward.
- Flatten/Contrast Shift-T
- The Flatten brush determines an «area plane» located by default at the average height above/below the vertices within the brush area. The vertices are then pulled towards this plane. The inverse of the Flatten brush is the Contrast brush which pushes vertices up or down away from the brush plane.
- Grab G
- Used to drag a group of points around. Unlike the other brushes, Grab does not modify different points as the brush is dragged across the model. Instead, Grab selects a group of vertices on mouse-down, and pulls them to follow the mouse. The effect is similar to moving a group of vertices in Edit Mode with proportional editing enabled, except that Grab can make use of other Sculpt Mode options (like textures and symmetry).
- Inflate/Deflate I
- Similar to SculptDraw, except that vertices in Inflate mode are displaced in the direction of their own normals.
- Layer L
This brush is similar to SculptDraw, except that the height of the displacement layer is capped. This creates the appearance of a solid layer being drawn. This brush does not draw on top of itself; a brush stroke intersects itself. Releasing the mouse button and starting a new stroke will reset the depth and paint on top of the previous stroke.
- Persistent
- You can keep sculpting on the same layer between strokes when this is on.
- Set Persistent Base
- This button resets the base so that you can add another layer.
- Mask M
Lets you select mesh parts to be unaffected by other brushes by painting vertex colors. The mask values are shown as gray-scale. I.e. the darker a masked area is, the less effect sculpting on it will have. See also the options of the Mask menu.
- Mask Tool
The mask brush has two modes:
- Draw
- Mask drawing.
- Smooth Shift
- Pressing Shift with the mask brush active will toggle the mask smoothing mode.
- Nudge
- Moves vertices in the direction of the brush stroke.
- Pinch/Magnify P
- Pulls vertices towards the center of the brush. The inverse setting is Magnify, in which vertices are pushed away from the center of the brush.
- Rotate
- Rotates vertices within the brush in the direction the cursor is moved. The initial drag direction is the zero angle and by rotating around the center you can create a vortex effect.
- Scrape/Peaks
- The Scrape brush works like the Flatten brush, but only brings vertices above the plane downwards. The inverse of the Scrape brush is to Peak by pushing vertices above the plane up away from the plane.
- SculptDraw X
- Moves vertices inward or outward, based the average normal of the vertices contained within the drawn brush stroke.
- Smooth S
- As the name suggests, eliminates irregularities in the area of the mesh within the brush’s influence by smoothing the positions of the vertices.
- Snake Hook K
Pulls vertices along with the movement of the brush to create long, snake-like forms.
- Pinch
- The Snake Hook brush tends to loose volume along the stroke, with pinch > 0.5 its possible to sculpt shapes without loosing volume.
- Rake
- A factor to support grabbing the mesh with rotation following the cursor’s motion.
- Thumb
- Similar to the Nudge brush, this one flattens the mesh in the brush area, while moving it in the direction of the brush stroke.
- Simplify
- This brush collapses short edges (as defined by the detail size) whether or not the Collapse Short Edges option is enabled. This brush has no effect if dynamic topology is not enabled. It can be found in the menu.
Common Options
- Radius
- This option controls the radius of the brush, measured in pixels. F allows you to change the brush size interactively by dragging the mouse and then LMB (the texture of the brush should be visible inside the circle). Typing a number then enter while using F allows you to enter the size numerically. Brush size can be affected by enabling the pressure sensitivity icon, if you are using a Graphics Tablet.
- Strength
Controls how much each application of the brush affects the model. For example, higher values cause the SculptDraw brush to add depth to the model more quickly, and cause the Smooth brush to smooth the model more quickly. This setting is not available for Grab, Snake Hook, or Rotate.
You can change the brush strength interactively by pressing Shift-F in the 3D View and then moving the brush and then LMB. You can enter the size numerically also while in Shift-F sizing. Brush strength can be affected by enabling the pressure sensitivity icon, if a supported tablet is being used.
Tips
If the range of strengths does not seem to fit the model (for example, if even the lowest strength setting still makes too large of a change on the model) then you can scale the model (in Edit Mode, not Object Mode). Larger sizes will make the brush’s effect smaller, and vice versa.
- Autosmooth
- Sets the amount of smoothing to be applied to each stroke.
- Normal Weight Ctrl
Constrains brush movement along the surface normal. Especially useful with the Grab brush, can be temporarily enabled by holding Ctrl. E.g. Grab brush can be used to push a depression (hole) into the mesh when Normal Weight is set.
Applies to Grab and Snake Hook brushes.
- Use Original Normal (padlock icon)
- When locked it keeps using the normal of the surface where stroke was initiated, instead of the surface normal currently under the cursor.
- Sculpt Plane
Use this menu to set the plane in which the sculpting takes place. In other words, the primary direction that the vertices will move.
- Area Plane
- The movement takes place in the direction of average normal for all active vertices within the brush area. Essentially, this means that the direction is dependent on the surface beneath the brush.
- View Plane
- Sculpting in the plane of the current 3D View.
- X, Y, Z Plane
- The movement takes place in the positive direction of one of the global axes.
- Plane Offset
- Offset for planar brushes (Clay, Fill, Flatten, Scrape), shifts the plane that is found by averaging the faces above or below.
- Trim
- Ability to limit the distance that planar brushes act. If trim is enabled vertices that are further away from the offset plane than the trim distance are ignored during sculpting.
- Front Faces Only
- When enabled, the brush only affects vertices that are facing the viewer.
- 2D Falloff
- This turns the brush influence into a cylinder (the depth along the view is ignored) instead of a sphere. It can be used along the outline of a mesh to adjust its silhouette.
- Add/Subtract Ctrl
- Brush direction toggle. Ctrl pressed while sculpting.
- Accumulate
- Causes stroke dabs to accumulate on top of each other.
Symmetry/Lock Panel
Reference
| Mode: | Sculpt Mode |
|---|---|
| Panel: | |
| Menu: |
- Mirror
- Mirror the brush strokes across the selected local axes. Note that if you want to alter the directions the axes point in, you must rotate the model in Edit Mode and not in Object Mode.
- Radial
- These settings allow for radial symmetry in the desired axes. The number determines how many times the stroke will be repeated within 360 degrees around the central axes.
- Feather
- Reduces the strength of the stroke where it overlaps the planes of symmetry.
- Lock
- These three buttons allow you to block any modification/deformation of your model along selected local axes, while you are sculpting it.
- Tiling
- Using this option allows you to seamlessly tile your strokes along the given axes. This allows to create repeating patterns.
- Tile Offset
- The default tile size is set to one BU. The offset allows the option to alter the tile size along all three axes.