Gerenciando mapas UV
After you finish editing a UV map, you may need to create additional maps on the same object, or transfer a UV map to another mesh.
Transferindo mapas UV
You can copy a UV map from one mesh to another Mesh provided both meshes have the same geometry/vertex order. This is useful for example when you want to recreate a UV map from an earlier version of your model with intact UVs.
Fluxo de trabalho
- RMB Select the target mesh (to which you want to copy the UV map).
- Shift select the source mesh (that contains the intact UV map).
- (Shortcut: Ctrl-L …).
The target Mesh will now have a UV map that matches the original mesh.
Múltiplos mapas UV
You are not limited to one UV map per mesh. You can have multiple UV maps for parts of the mesh by creating new UV maps. This can be done by clicking the Add button next to UV maps list (in Object Data tab in the Properties Editor) and unwrapping a different part of the mesh. UV maps always include the whole mesh.
Painel Mapas UV
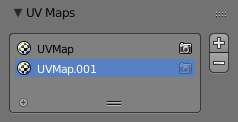
O painel de Mapas UV na aba de Malhas.
In the Mesh tab the UV maps panel contains a Visualização em listas that lists the UV maps created for this mesh. The selected map is displayed in the UV/Image Editor.
- Renderização ativa
- Clique no ícone de câmera para habilitar aquela textura UV para a renderização. Caso nenhum outro mapa esteja especificado explicitamente.
- Adicionar
+ - Clicking the Add button duplicates the selected UV map.
Veja também
Note that each texture can be mapped to a specific UV texture. See the Mapping panel of the texture tab.