Редактирование
Преобразование
Справка
- Меню:
- Горячая клавиша:
G, R, S
You can move the selected node(s) by simply clicking and dragging any empty part on them. Alternatively, you can press G, move the mouse, and click LMB to confirm.
Dragging a node on top of an existing link will intelligently insert the selected node into the link path. This generally works by using the first socket that matches the link type. The automatic node attachment feature can be toggled with Alt. When a node is automatically attached the surrounding nodes will be shifted to the right or left depending on the T toggle; see Авто-смещение for more information on this feature.
В общем случае рекомендуется располагать узлы таким образом, чтобы данные шли слева направо и сверху вниз.
The width of a node can be changed by dragging its left or right border.
Rotating (R) and scaling (S) only apply when you have multiple nodes selected and only affect the nodes“ positions.
Соединение портов
LMB-click on a socket and drag. You will see a line coming out of it: this is called a link. Keep dragging and connect the link to an input socket of another node, then release the LMB.
While multiple links can route out of an output socket, typically a single link can be attached to an input socket, that is unless the input is a multi-socket input with looks like a pill shaped socket.
To swap multiple links of a similar type, press and hold Alt while moving a link. This feature also works when adding a new link into a pre-existing socket.
Чтобы изменить положение исходящих соединений узла, а не добавлять новые, удерживайте Ctrl при перетаскивании из порта выхода. Это работает как для одного, так и для нескольких соединений.
Nodes that have no connections can be inserted on a link by just move the node over the link and release when the link is highlighted.
- Make Links (создание соединения) F
Выделите несколько узлов с открытыми портами, затем используйте Make Links, чтобы создать между ними связи. Используйте Make Links снова, если есть другие узлы, которые можно подключить.
- Make and Replace Links (создание и замена связей) Shift-F
Make and Replace Links работает аналогично функции Make Links, но заменяет существующие связи, если они существуют.
Разъединение портов
Интерактивно
Drag the link away from its input socket and let it go, keeping it unconnected.
Выключение связей
Справка
- Меню:
- Горячая клавиша:
Ctrl-Alt-ПКМ
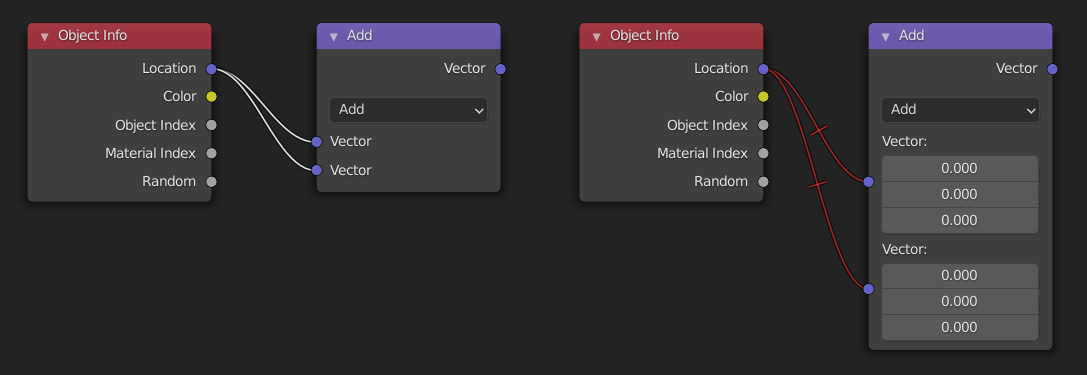
Activate the menu item or hold the key combination, then draw a line across one or more links to mute/unmute them. A muted link acts as though it’s no longer there; this also means the input fields for specifying fixed values become visible again.
When muting links on the input side of a reroute node, the links on its output side will be muted too.

Разрыв соединений
Справка
- Меню:
- Горячая клавиша:
Ctrl-RMB
Activate the menu item or hold the key combination, then draw a line across one or more links to delete them.
Примечание
The key combination is normally reserved for Lasso Select. In node editors, lasso selection is instead performed with Ctrl-Alt-LMB.
- Detach Links Alt-LMB drag
Use Detach Links to cut all the links attached to the selected nodes and move the nodes to a new location.
Дублирование
Справка
- Меню:
- Горячая клавиша:
Shift-D
Select one or more nodes, activate the menu item or press the key combination, then move the mouse to a new location and click LMB (or press Return) to place the duplicated node(s).
Примечание
Когда вы дублируете узел, новый узел будет расположен точно над узлом, который был дублирован. Если вы оставите его там (а это довольно легко сделать), вы не сможете легко сказать, что там два узла! Если вы сомневаетесь, выберите узел и слегка переместите его, чтобы увидеть, не скрыто ли что-то под ним.
Duplicate Linked
Справка
- Меню:
- Горячая клавиша:
Alt-D
Duplicate selected nodes, but not their node trees (in the case of group nodes), and move them.
Копирование/Вставка
Справка
- Меню:
,
- Горячая клавиша:
Ctrl-C, Ctrl-V
В буфер обмена копируются не только выбранные узлы, но и соединения между ними.
Примечание
Вставленный узел будет помещен в то же положение, в котором он был скопирован. Используйте те же меры предосторожности, что и при дублировании.
Удаление
- Delete X, Delete
Удаление выделенного узла (узлов)
- Удаление с переподключением Ctrl-X
Deletes the selected node(s), then creates new links connecting their former input nodes to their former output nodes.
Отключение
Справка
- Меню:
- Горячая клавиша:
M
Muting a node removes its contribution to the node tree, and makes all links pass through it without change. Links will appear red as an indicator of passing through the muted node.
Совет
Соединение с отдельными узлами можно выключить с помощью Выключение связей.
Отображение/Скрытие
- Hide (скрыть) H
Collapses the node so only the node header is visible. This can also be toggled by clicking the triangle on the left of the node header.
- Toggle Node Preview (предпросмотр узла) Shift-H
Показывает/скрывает область предварительного просмотра узла, которая отображает кадр после применения операции этого узла. Это также можно переключить, щёлкнув значок шара материала в заголовке узла.
Примечание
This operator are only available in the Compositor.
- Toggle Hidden Node Sockets (скрытие неиспользуемых портов) Ctrl-H
Показывает/скрывает любые входные или выходные порты, к которым не подключены другие узлы.
- Toggle Node Options (переключение параметров узла)
Показывает/скрывает все параметры узла.
- Collapse and Hide Unused Sockets (свернуть и скрыть неиспользуемые порты)
Скрывает неиспользуемые порты и сворачивает узел до одного заголовка.
Слои
- Read Render Layers Ctrl-R
При необходимости считывает все слои рендеринга текущей сцены из кэша. Это можно использовать для экономии оперативной памяти при рендеринге, поскольку слои рендеринга не нужно сохранять в оперативной памяти. А также для восстановления некоторой информации из неудачного рендера. Чтобы это работало, необходимо включить ref:Cache Result <bpy.types.RenderSettings.use_render_cache>.
Примечание
This operator are only available in the Compositor.