Властивості – Properties
Форма – Shape
Орієнтир – Reference
- Режим – Mode
Усі Режими – All Modes
- Панель – Panel
«Властивості > Текст > Форма» –
Більшість устав у панелі Shape спільно використовуються з блоками даних кривих – Curves, будь ласка, щодо деталей зверніться до довідки про них.
- Швидке Редагування – Fast Editing
Не заповнюються літери у Режимі Редагування – Edit Mode, лише показується їх контур.
Простір Текстур – Texture Space
Кожен Об’єкт може мати автоматично генеровану розкладку UV, ці розкладки можуть налагоджуватися тут.
Дивіться детальніше Generated UV Properties.
Геометрія – Geometry
Орієнтир – Reference
- Режим – Mode
Усі Режими – All Modes
- Панель – Panel
«Властивості > Шрифт > Геометрія» –
- Зсув – Offset
Зсуваються керувальні точки кривих, що визначають літери, що зробить їх тонше або товстіше. Використовуйте обережно, це може швидко призвести до артефактів…
Видавлення, Звуження та Скіс – Extrusion, Taper & Bevel
Решта устав цієї панелі, що використовуються для надання об’єму літерам, також спільно використовуються з блоками даних кривих – Curves, будь ласка, щодо деталей зверніться до довідки про них.
Примітка
Те, як ефект об’єкта Звуження працює залежить від того, як будуються криві, що визначають літери. Результати можуть часто виглядати зовсім випадковими…
Примітка
Bevel is applied to the curves defining the letters, which means that usually it will follow their outlines (there will be two parallel beveled curves, and not a single one, as one might expect).
Шрифт – Font
Орієнтир – Reference
- Режим – Mode
Усі Режими – All Modes
- Панель – Panel
Blender comes with a built-in font by default that is displayed in each of the four font style data-block menus. The built-in font is always present and shows in this list as «Bfont». The data-block menu contains a list displaying the currently loaded fonts. Select one for each font style.
To load a different Font, click one of the Load buttons in the Font panel and navigate to a font file. The File Browser will give all valid fonts a capital «F» icon.
If you select a font that is unsupported by Blender, you will get the error Not a valid font.
Примітка
Location of Fonts on Unix
Fonts are typically located under /usr/lib/fonts, or some variant like /usr/lib/X11/fonts,
but not always. They may be in other locations as well,
such as /usr/share/local or /usr/local/share, and possibly related sub-trees.
Remember that the same font will be applied to all chars with same style in a text, but that a separate font is required for each style. For example, you will need to load an Italics font in order to make characters or words italic. Once the font is loaded you can apply that font «Style» to the selected characters or the whole object. In all, you would need to load a minimum of four different types of fonts to represent each style (Normal, Italics, Bold, Bold & Italics).
It is important to understand, that Blender does not care what font you load for «normal», «bold», etc., styles. This is how you can have up to four different fonts in use in the same text, but you have to choose between different styles of a same font, or different fonts. Blender has a number of typographic controls for changing the style and layout of text, found in the Font panel.
- Жирно – Bold
Toggled with the Bold button before typing. Text can also be set to bold by selecting it then using the Bold entry in the Text menu of the 3D Viewport.
- Курсив – Italics
Toggled with the Italic button before typing. Text can also be set to italic by selecting it then using the Italic entry in the Text menu of the 3D Viewport.
- Підкреслення – Underline
Вмикає підкреслювання, як це керується уставами підкреслення – underline settings нижче.
- Зменшені Заголовні – Small Caps
Вмикайте цю опцію для уводу символів як зменшених заголовних.
Розмір Small Caps може бути змінено за допомогою Small Caps Scale setting.
Трансформа – Transform
- Розмір – Size
Керує розміром тексту в об’єкті цілком (неможливо керувати розміром кожного символу незалежно). Зауважте, однак, що символи з різними шрифтами (різні стилі, дивіться нижче) можуть мати різні видимі розміри.
- Косування – Shear
Керує нахилянням тексту в об’єкті цілком. Як це подібне, як може здатися, це не є те саме, що й стиль курсиву.
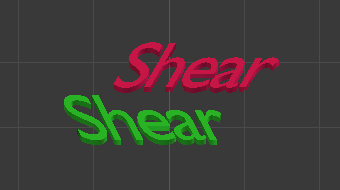
Приклад косування.
- Шрифт з Об’єктів – Object Font
Дозволяє індивідуальним об’єктам використовуватися для рендера шрифтів, ви можете створювати/моделювати ваш власний складний шрифт у Blender’і. Це поле використовується для вибору імені префікса об’єктів («сімейство» об’єктів), що буде використовуватися для розміщення індивідуальних символів, використовуваних для уведення. Це досить складний процес, тому тут детальні кроки для виконання:
Створіть символи для шрифту, кожен символ може бути будь-яким типом об’єктів (сіть, крива тощо). Вони повинні всі мати ім’я за такою схемою іменування: «загальний префікс», за яким слідує «ім’я символу» (наприклад, «ft.a», «ft.b» тощо).
Для об’єкта тексту увімкніть примірникування вершин – Instancing Vertices.
У вкладці Font заповніть поле Object Font «загальним префіксом» об’єктів вашого «шрифту». Тепер, кожен раз, коли символ у вашому тексті відповідатиме суфіксній частині імені об’єкта «шрифту», то цей об’єкт дублюватиметься на цей символ.
Примітка
Ці об’єкти дублюються так, що їх центр розташовується у нижньому правому кутку відповідних символів.
- Текст на Кривій – Text on Curve
Вибирається об’єкт кривої, за якою об’єкт тексту буде слідувати.
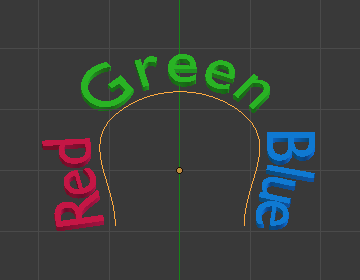
Текст на кривій.
Порада
Ви повинні швидше використовувати модифікатор «Крива» – Curve modifier, який пропонує більше керування, і є стандартним способом для досягнення таких ефектів у сучасному Blender’і.
- Підкреслення – Underline
Toggled with the Underline button before typing. Text can also be set to Underlined by selecting it then using the Underline entry in the Text menu of the 3D Viewport.
- Позиція Підкреслення – Underline Position
Це дозволяє вам зсувати вертикально позицію підкреслення.
- Товщина Підкреслення – Underline Thickness
Це керує товщиною підкреслення.
- Масштаб Зменшених Заголовних – Small Caps Scale
Це масштабування застосовується до заголовних літер для перетворення їх на зменшені заголовні.
Paragraph
Орієнтир – Reference
- Режим – Mode
All
- Панель – Panel
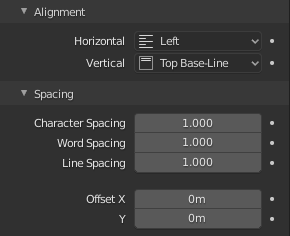
The Paragraph Panel has settings for the alignment and spacing of text.
The Paragraph panel.
Alignment
- Horizontal Alignment
- Left
Aligns text to the left of the frames when using them, else uses the origin of the text object as the starting point of the text (which grows to the right).
- Center
Centers text in the frames when using them, else uses the origin of the text object as the mid-point of the text (which grows equally to the left and right).
- Right
Aligns text to the right of the frames when using them, else uses the origin of the text object as the ending point of the text (which grows to the left).
- Justify
Only flushes a line when it is terminated by a word-wrap (not by a newline), and uses white-space instead of character spacing (kerning) to fill lines.
- Flush
Always flushes the line, even when it is still being typed-in. It uses character spacing (kerning) to fill lines.
Примітка
Both Justify and Flush only work within frames.
- Vertical Alignment
- Top Base-Line
With text boxes, aligns the „top“ base-line of the text to the top of the frames.
With no text box, aligns the actual base-line of the text to the origin of the object, and grows to the bottom.
Примітка
That difference of reference point in the first line depending on usage of boxes or not is indeed confusing.
- Top
With text boxes, aligns the top of the text to the top of the frames.
With no text box, aligns the top of the text to the origin of the object, and grows to the bottom.
- Center
With text boxes, centers the text in the frames.
With no text box, centers the text on the origin of the object, and grows in both top and bottom directions equally.
- Bottom
With text boxes, align the bottom of the text to the bottom of the frames.
With no text box, align the bottom of the text to the origin of the object, and grows to the top.
- Bottom Base-Line
With text boxes, aligns the base-line of the text to the bottom of the frames.
With no text box, aligns the base-line of the text to the origin of the object, and grows to the top.
Spacing
- Character Spacing
A factor by which space between each character (kerning) is scaled in width.
In Edit Mode in the 3D Viewport, you can also control individual kerning at text cursor position by pressing Alt-Left / Alt-Right to decrease/increase it.
- Word Spacing
A factor by which white-space between words is scaled in width.
- Line Spacing
A factor by which the vertical space between lines is scaled.
- Offset X/Y
These settings control the X and Y offset of the text position within the object. This applies relatively to the object’s origin, either to the whole text or, when using text boxes, to each frame.
Text Boxes
Орієнтир – Reference
- Режим – Mode
All
- Панель – Panel
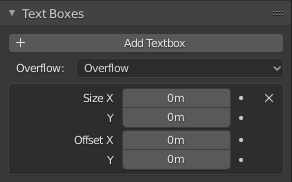
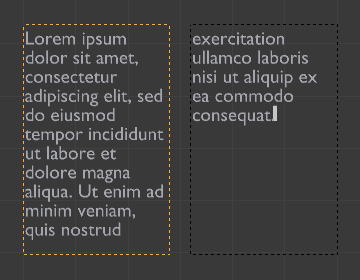
Text boxes (or frames) allow you to distribute the text among rectangular areas within a single text object. An arbitrary number of freely positionable and re-sizable text frames are allowed per text object.
The text flows continuously from the lowest-numbered frame to the highest-numbered frame with text inside each frame word-wrapped. It flows between frames when a lower-numbered frame cannot fit any more text. If the last frame is reached, text overflows out of it (by default, see options below).
Text Boxes panel.
- Add Textbox
Inserts a new frame, just after the current one (in text flow order). The new frame will have the same size and position as the selected one.
- Delete
X Delete the current frame.
- Overflow
How to handle text overflowing available space in the defined boxes.
- Overflow
Just keep text running out of the last box.
- Scale to Fit
Scale text to fit into the available space.
- Truncate
Hide the end of the text that does not fit into the available space.
Примітка
It will only truncate in Object Mode, in Edit Mode the whole text remains visible (and overflows as needed).
- Size X/Y
Specifies the width and height of the text box, if set to zero no word-wrap happens (it is ignored, and the whole text box system is disabled if all are set to a null size).
- Offset X/Y
Controls the X and Y offset of the frame, i.e. its position.
Multiple columns, text flowing between boxes.